|
Cary Clark / FAQ / Build / all | |
| What are the dimensions of LEGO® brick? From Robert M. Dye: ! A 2x2 brick is 5 plates wide, so the aspect ratio is 1 (stud-to-stud) to 2.5 (thickness of plates). Or, 1 (brick thickness) to 1.2 (stud-to-stud). Or, 1 (plate thickness) to 0.4 (stud-to-stud). From Steve Bliss: ! The basic ratio is 2:5, for stud-spacing to plate-height -- which is why you see Technic models with beam-plate-plate-beam stacked up: this allows beams to be placed vertically, and connected to the other beams. In LDU (LDraw units), the measurements are: Brick height = 24 Plate height = 8 Stud pitch = 20I believe the LU (LEGO Unit) measurements are: Brick height = 6 Plate height = 2 Stud pitch = 5From Robert Munafo: ! The actual dimension (rather than the ratios) can be determined by carefully measuring a properly constructed “wall” of bricks. Vertical dimensions are prone to error caused by sloppy stacking, but long horizontal walls constructed from two or more layers of overlapping bricks are not prone to such error. A wall of this type built from Technic beams made in the late 1990’s shows that the stud pitch distance is 7.986 millimeters, plus or minus 2 microns, when the parts are at 25 degrees centigrade (77 degrees Farenheit). It is also worthwhile to note that LEGO bricks are always made a little smaller than this dimension would suggest. For example, the length of a 2x4 brick is a little less than 4 times 7.986 millimeters. The length is diminished slightly so that there will be a small gap when bricks are stacked next to each other. This gap allows for dust, marred surfaces and other imperfections. If the gap were not there the bricks would tend to push each other apart and the overall construction would be less strong. Using the ratios above and converting to imperial measurements yields the following figures for all three dimensions:
The following popular approximations are often used. Note that the Imperial approximations are each about 1 percent smaller than the corresponding S.I. (Metric) approximation:
From Robert Munafo: ! If you do the math you get: 1 LDU = 0.3993 +/- 0.0001 millimeters 1 millimeter = 2.5043 +/- 0.0006 LDU 1 LDU = 0.015720 +/- 0.000004 inches 1 inch = 63.611 +/- 0.016 LDUFrom Jef Poskanzer: ! Approximate dimensions in millimeters: Spacing of stud centers: 8 Diameter of studs: 5 Height of block: 9.6 Height of studs: 1.7 Thickness of brick walls: 1.5 Outer diameter of cylinders (found on underside of bricks): 6.31 Thickness of cylinder walls: 0.657
From David Eaton: ! Here’s a conversion tool to convert between minifig or Technic scale to real-world units: http://www.suave.net/~dave/cgi/scale.cgi What are the official LEGO brick colors? From Steven Barile: ! Here’s my attempt to get the RGB color values for many brick colors using a huge paper version Pantone pallette: 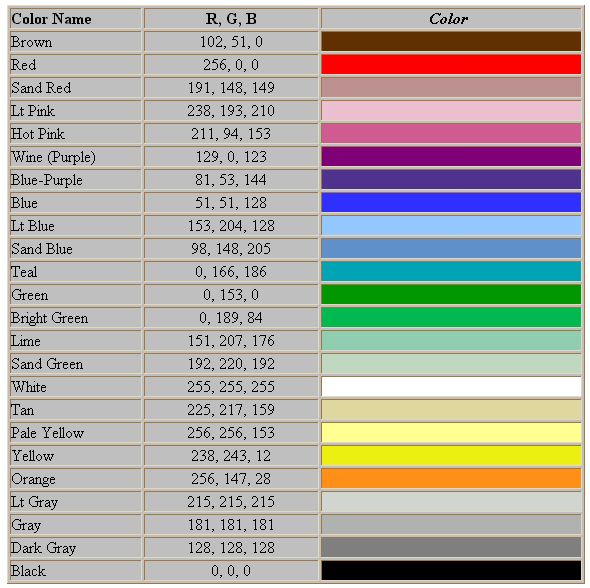
From Steven Barile: ! There’s also a more extensive version that I did for the PNLTC web site. You can find that here: http://www.pnltc.org/articles/article_colortable.html From Suzanne Rich: ! Here’s a different type, one for print colors (CMYK). To read those color values, use something like Photoshop to sample inside framed boxes. Some of these may be considered official, as well as the naming scheme. 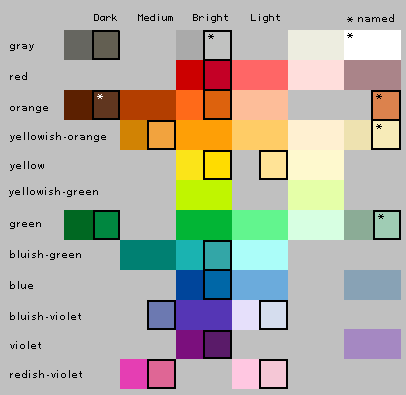
From Kevin Dixon: ! When I was inventorying some of the Harry Potter sets, I ended up using the color names here: http://home.att.net/~baylit/Color.html It seemed to have good distinction between butterscotch, orange, and light orange, which show up in Harry Potter, and are all quite similar. How can I change the gender (the direction of the studs) on a LEGO® part? From Robert M. Dye: !
From Steve Bliss: !
From Larry Pieniazek: !
From Josh Spaulding: !
From Robert M. Dye: !
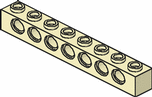
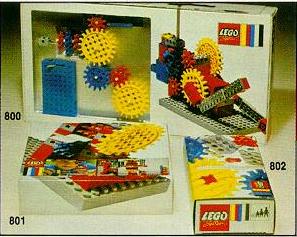
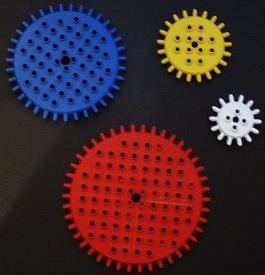
What is that goo on the front of a LEGO® minifig neck? From John Gerlach: ! It’s used by the machines that assemble the mini-figures, to tell which side is the front, so it can line the face up properly. From Wayne R. Hussey: ! It helps keep the head on. I’ve removed it before and the head would come off too easily. I have a part labled FABULAND®. What does that mean? From Sheree Rosencrantz: ! FABULAND is a LEGO theme that was produced from 1979 to 1989. However, many FABULAND parts have showed up in later themes, including Harry Potter. The best FABULAND part registry is at http://members.tripod.com/%7ESybrand_Bonsma/fabu1eng.html What sets contained brightly colored gears with wide spaced teeth? From Mark Koesel: !

In 1976, these sets were discontinued, to make way for the new “Technical Sets” which later picked up the name Technic and, for a time, used the name Expert Builder in the US.
Also note that the large gears sold through Dacta today are quite different from any of the ones mentioned above. These Dacta gears would be most compatible with the Duplo line, and in particular Duplo Toolo. These gears mount to special larger “Duplo-size” Cross axles and components. What does “microfig scale” mean? From Jeremy Sproat: ! It’s smaller than minifig-scale. The physical scale is variable and up to the modeller. From Jeremy Sproat: ! Here are some microfig examples:
From Eric Brok: ! Maybe we should call it Bonsai Building, because it’s not only about small scale (Microfig scale), but also about purity, restriction, simpleness, elegance. Is LEGO® safe for fish tanks? from Dean Husby: ! According to Lego Customer Service, LEGO is safe in fish tanks. It has no effect on the fish, and the plastic will not leach anything into the water. It is a hard plastic and therefor does not contain any or very few of the substances to keep plastic soft. (To be safe don’t put any soft LEGO items in the tank.) How can I fabricate lights? From Martin Legault: ! An LED will do, use the 1 3/4 mm size since they fit great into technic holes. Brightness will depend on the current you send through the LED. In general, 10 mA will work just fine. The formula for current is C = T / R, where T is the voltage and R the resistance. The LED will drop about 2V (between 1.8 - 2.2, depending on the colors). For example: R led
---/\/\/---|>---
7V 2V
...so take 7V, divide it by .01A, and the result is a 700 ohm
resistor.
700 ohm resistors are NOT the standard value, so you could take a 680 or a 720 ohm resistor. From Tom McDonald: ! If you’re not math-oriented like me, I’ve found that if you use 5 ordinary LEDs connected in series with each other using 9VDC they work fine. If you use LEDs that soak up more current than your average LED (often because they’re bigger and brighter) you can use fewer LEDs. I tried to use all lego for custom lighting on my train station platform; but alas, I had to use 8 gauge copper wire for pole strength and conductivity along with insulated 30 ga. I used pneumatic tubing for the outside of the pole, and clear 1x1’s fit right over my LEDs :) I’ve also used light bulbs. MagLite flashlight bulbs work great as they’re very bright for their size. Where can I buy rubber hose? From Mike Clemens: ! Aquarium air pump hoses may be the same size as Lego hose, at least for the pneumatic sets. Try your local pet store. How can I clean LEGO® parts? From Tom McDonald: ! I just use plain water for 80% of cleaning, water with mild dish soap for 19%. Any other solvents or solutions can be hard on the plastic. If you use rubbing alcohol, don’t let it sit on the part for more than a few seconds. Also, avoid getting petroleum jelly on the tires. From Ed “Boxer” Jones: ! I use Palmolive and warm water. One thing I also do is I have a large wire seive (like window screen, only finer) that I place in a larger pot of water and soap. This makes draining the pieces that much easier. For drying, I air dry them. In the past, I have also used the air only setting on the clothes dryer to remove water stuck in crevases. For that, place the pieces in a cotton pillowcase knotted at the open end. From Richard Marchetti: ! A 1/4 part bleach to 3/4 parts water -- or some other milder conconction of bleach to water -- used on white, grey, or clear bricks and left to soak for 1- 2 weeks will whiten older bricks that have been exposed to direct sunlight and yellowed. The result is old, yet very clean, bricks. Actual dirt may be cleaned off with a good soak in a mild detergent like “Simple Green” mixed with water, and then brushed off with a soft toothbrush if need be, or merely rinsed off after some marginal scrubbing with a sponge -- and not the side with the scrub pad, just the plain old sponge part. The scrubbing pad side of a sponge is abrasive enough to polish metal, and will scratch the bricks. From Louise Belles: ! When I needed clean LEGO® pieces to build a candy dispenser, I just bought new ones. I may be taking this quote too far: Phyllis Diller said, “Cleaning the house while the kids are still growing, is like shoveling the walk while it is still snowing.” Is it OK to use hot water to wash LEGO® parts? From Reinhard “Ben” Beneke: ! I experimented with elements in a precisely controlled oven. Heating bricks in water should have the same results. Bricks, plates and minifigs heated to:
Here are detailed explanations and pictures: http://www.1000steine.de/myimages/album10 How can I clean an already assembled LEGO® set without disassembling it? From Ed “Boxer” Jones: ! What I have done in the past, with minimal “breakage”, is to put the construction in the tub and let the luke-warm water from the shower gently flow over it. It does, however, take a lot longer to dry. And if you are storing it in the basement, it could actually become mildewed. From Sean McInnis: ! I use an old toothbrush and water. It’s good for getting into all the nooks and crannies without taking the whole thing apart. How can I reapply crooked stickers? From Paulo Caparica Junior: ! Use Undu: http://www.vernlib.com/undu.asp How do I go about scanning and printing stickers? From Dean Husby: ! I’ve put together a FAQ on scanning and printing stickers. You’ll find version 1.0 here: http://news.lugnet.com/faq/?n=768 Is it possible to restore yellowed parts to their original color? From Richard Marchetti: ! Yes, for some colors, at least. Use 1/4 part bleach (or less) to 3/4 parts water and allow the parts to soak for 1 to 2 weeks. This absolutely works for white, grey, or clear. From Dan Walker: This worked great for whitening yellowed white parts. But it ruined some old light gray castle parts, making them whiter, but further from the original color than the yellowed color. Beware! How do I remove the center bar from a LEGO® bucket? From Larry Pieniazek: ! Assuming you might want to reuse the bar someday, you need to preserve the tangs on the ends of the bucket pivots. Get a table knife, the kind thats thick and wide bladed, but not sharp. A butterknife works too. CAREFULLY.. slide the knife betwen the bucket handle and the bucket side. Twist the knife to push the handle away from the bucket. This puts a strain on the tangs on the end of the bar. Use your fingers to pinch these tangs together while continuing to twist. The handle should pop off. Do this on both sides. Then spread the bucket to get the bar out. If you’re gentle and careful you won’t deform the plastic, but if you force it you will break the tangs off. I have lately been able to achieve 100% success but when I started doing it was only at about 60%. How can I remove candle wax from my LEGO® pieces? From Kevin Wilson: ! Put it in the freezer, which will make the wax very brittle and it should come off much easier. From Gary Istok: ! First freeze and then break away the large pieces. Then try using discarded women’s panty hose/nylons to scrub away the wax. Panty hose should not scratch the LEGO. From Beth Reiten: ! I’d strongly agree with the freezer folks, with one minor addition. While still cold, if it looks like you’re going to have a dye mark problem, try some baby oil on a tissue directly on the dye mark. Oil picks up wax soluble dye quite well... if it’s on something that can handle oil (I don’t recommend this technique on the latex paint in your house!) The problem with heat is that most candle waxes -- other than the 100% paraffin used in tea lights -- is that the lowest temperature that it’ll melt at is around 125 - 150 F. Sounds like that’s too high for Legos! How do I remove the print from a LEGO® part? From Nick Chauvin: ! By using various grades of automotive sandpaper and Blue Magic metal polish. I buy it in the automotive section at Wal-Mart. This may not work as well on translucent, as even though you get the surface to tactilely and reflectively be the same, it may still be a bit fogged. Begin by sanding away all of the offending paint with 800 grit; sanding in one direction to minimize scratches. Do not sand too hard, or else corners on canopies will become rounded. After all the paint is gone, switch to 1000 grit, and sand in a circular motion until the previous scratches are gone. Use 2000 grit sandpaper in the same manner as the 1000 grit. At this point you should have a smooth dull surface. Apply a few drops of the Blue Magic metal polish to the part and buff it in using a piece of an old t-shirt. Use the metal polish in a ventilated area because it contains ammonia. After four of five applications of polish the surface should shine like a brand new piece. From Craig Hamilton: ! Brasso metal polish works like magic to remove pre-printed images from lego parts without a trace. It is a very fine abrasive and will remove the paint very slowly, but your patience will be rewarded. From Craig Hamilton: ! To do selective removals, use a very sharp blade to literally scrape off the re-printed image. Use the same rules and technique as shaving. Move it in clean, light strokes, keeping the strokes in one direction. From Alexander Ericson: There is a much, much easier way to remove print from a lego piece than any that I’ve heard before. It involves no sandpaper, no shaving, and no Brasso. Simply take a piece of white Sculpey Brand “Original Scupley”, knead it for a few minutes to soften it up, then firmly place it over the print that you want to remove. Wait a few minutes, then remove the clay. I’m not entirely sure how this works, but I presume that the plasticizers in the clay eat away at the print. Take a bit of rubbing alcohol and wipe off the clay/print remants. If any print remains, repeat process. I accidentally stumbled upon this process while I was trying to make a mold of a minifig head. After failing at this task, I removed the clay cast, only to find that there was clay stuck to the face. I wiped it off with my thumb, only to find that I had taken the face with it! Original Sculpey is a low-quality polymer clay, as far as sculpting goes. It comes in bricks of 1.75 pounds, in white or terra-cotta. What paints work best with LEGO® minifigs? From Mark de Kock: ! Have you tried acrylic paints from Games Workshop®? These paints are specially designed to be put on plastic figures. Thin the paint down with water before use. From Justin M. Kopp: ! A different method a friend and I always used: Fine point Sharpie Markers. Last a long time as long as you let them dry and are gentle with your minifigs. Plus, a little rubbing alcohol takes it all off! From Mark Sandlin: ! I use the Marvy-Uchida brand DecoColor markers for colors, and Sharpies only for black. After I paint them, I’ll put the minifig next to a 60 watt lightbulb to dry. (Not too close, or you might cook your fig!) I let them dry for at least 24 hours next to the bulb before I touch them. Here’s an example: 
For more pictures, see Aves and his “Payback” in the “Spacecraft” section of my site. What’s the best way to bond LEGO® pieces? From Mike McKee: ! I like to use a warm glue gun (not hot melt). It provides a good, solid adhesion. You can get the bricks apart later, with a little extra effort, and then completely peel out the adhesive easily. I’ve also used Elmer’s Glue-All for more solid fixation, but I’ve found it harder to get the dried glue off of the bricks. From Eric Harshbarger: ! I use Oatey All Purpose, PVC, CPVC, ABS Cement. It is available in the US at Lowes and Home Depot hardware stores. From John Gerlach: ! When I worked at the LEGO Imagination Center, we used the ‘Super Glue’ brand adhesive on Technic pieces. I don’t know how well it will stand up to tension though. Put a small drop inside the connector, then push the axle in. This way any excess glue will be inside the connector instead of on the outside. (One of the rules of glueing - try not to let any glue show from the outside!) Also, be careful not to glue your fingers together! For regular bricks, we used MEK. MEK stands for methyl ethyl keytone. It’s a solvent that fuses the ABS plastic together. Very nasty stuff to work with - you don’t want to breath the vapors. What’s the best way to cut a baseplate? From Will Hess: ! Patience. Clamp the plate and a ruler together and make many (MANY!) light cuts along the surface of the plate with an Exacto knife. This takes a while but it works! From Tom Stangl: ! Exacto knives work just fine with baseplates, just get a metal ruler, hold it down firmly on the bottom of the baseplate, and VERY lightly slide the knife across the first time to set the cut line. Then you can bear down afterwards and cut through in very few passes (but the heavier you press, the more likely you are to stray off of the cut line). #11 blades will last through MANY cuts, and are cheap in bulk. Using an Xacto knife takes no kerf, it basically pushes the plastic out of the way. The only loss is in what you scrape off of the edge to smooth it. What’s the best way to cut other pieces? From Thomas Avery: ! Use a Dremel, or any other small motorized rotary tool. http://www.dremel.com/Dremel.html The carbide cutting/shaping wheel is preferable over the normal cut-off ones. I think you can also get an accessory that turn your rotary tool into a little chop saw. This is great for making very straight and precise cuts. You may need to use a little sandpaper and a sharp knife to smooth the edges out. From Richie Dulin: ! I’ve used a cutting disk to remove the mask from a Darth Vader Helmet, the neck flare from a crown, and the bat wings from a Batlord helm among other things. I’ve also used it to make a notch in the corner of a 2x2 plate, so I could get a fine hole drilled right in the corner (to make earrings). A fine razor saw is a generally poor alternative -- cheaper, but harder to control, and much harder on the fingers. It’s a good idea to cut quickly, or to do intricate work as a series of small cuts - if things get too hot, the brick/piece you’re cutting may well distort. It’s also a good idea to wear eye protection. |
|
Primary content in this document is © Cary Clark. All other text, images, or trademarks in this document are the intellectual property of their respective owners. |
| |
©2005 LUGNET. All rights reserved. - hosted by steinbruch.info GbR |