|
|
|
Ari Holopainen / oldstuff |
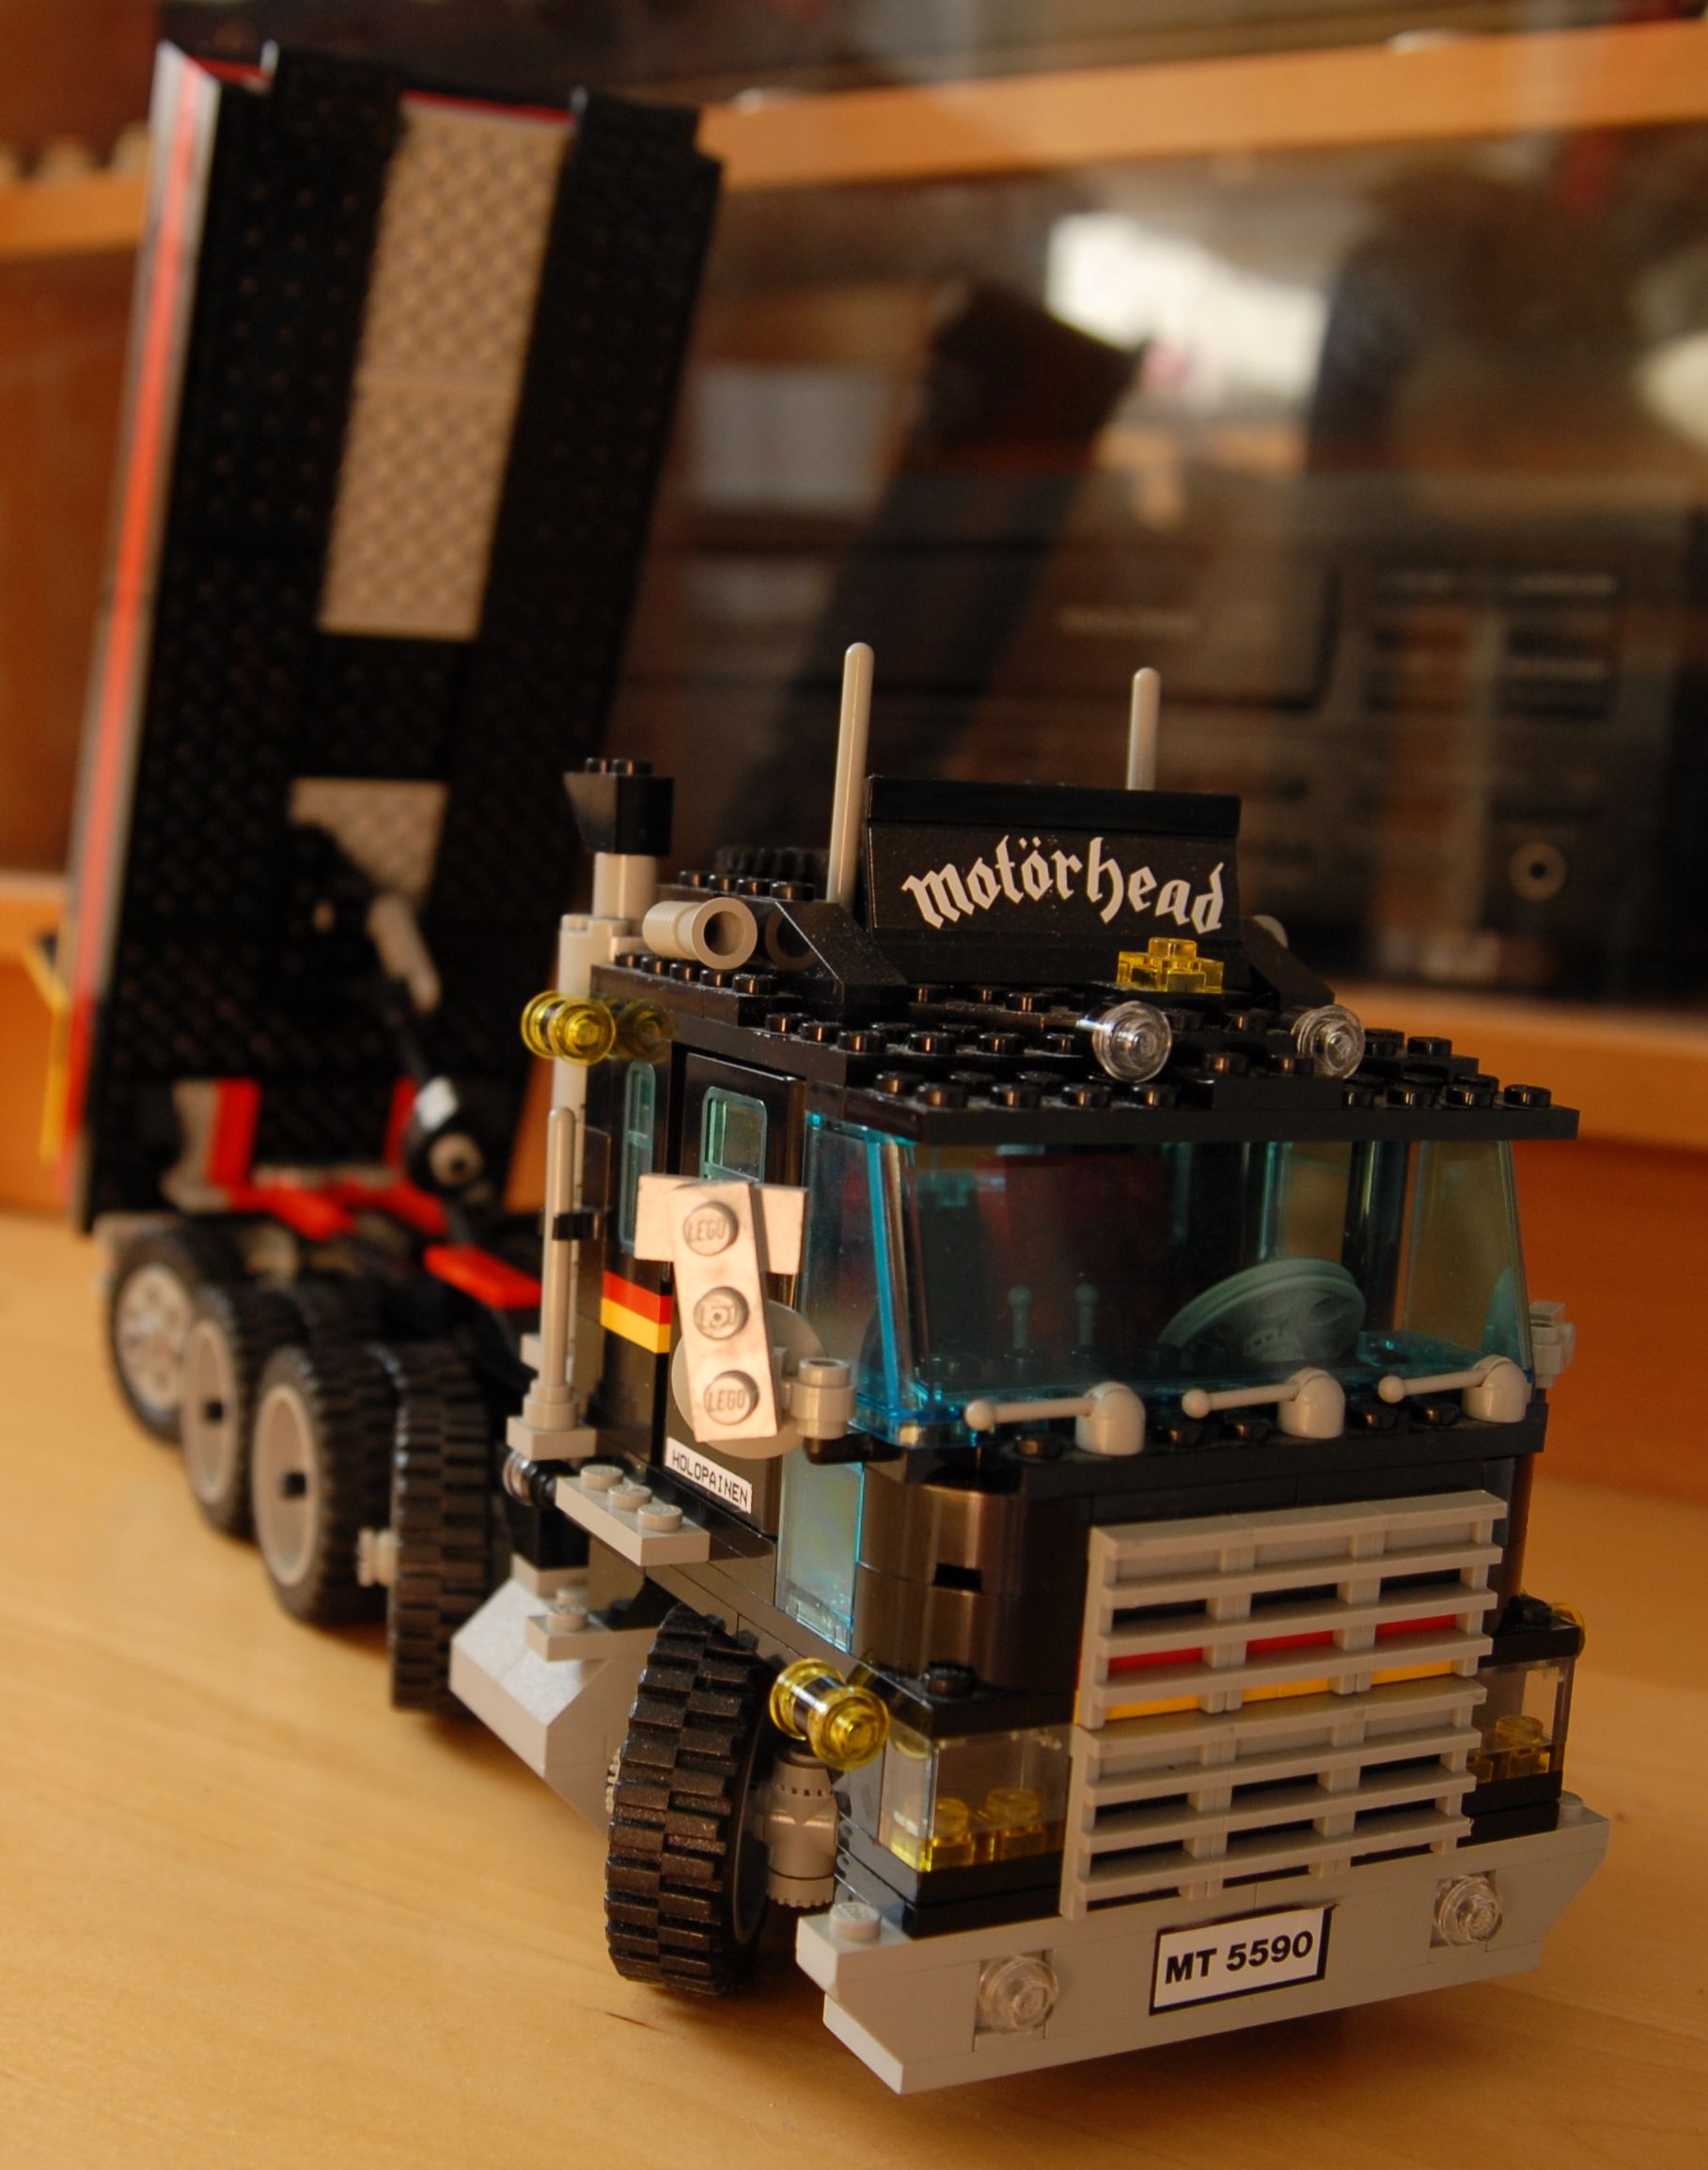
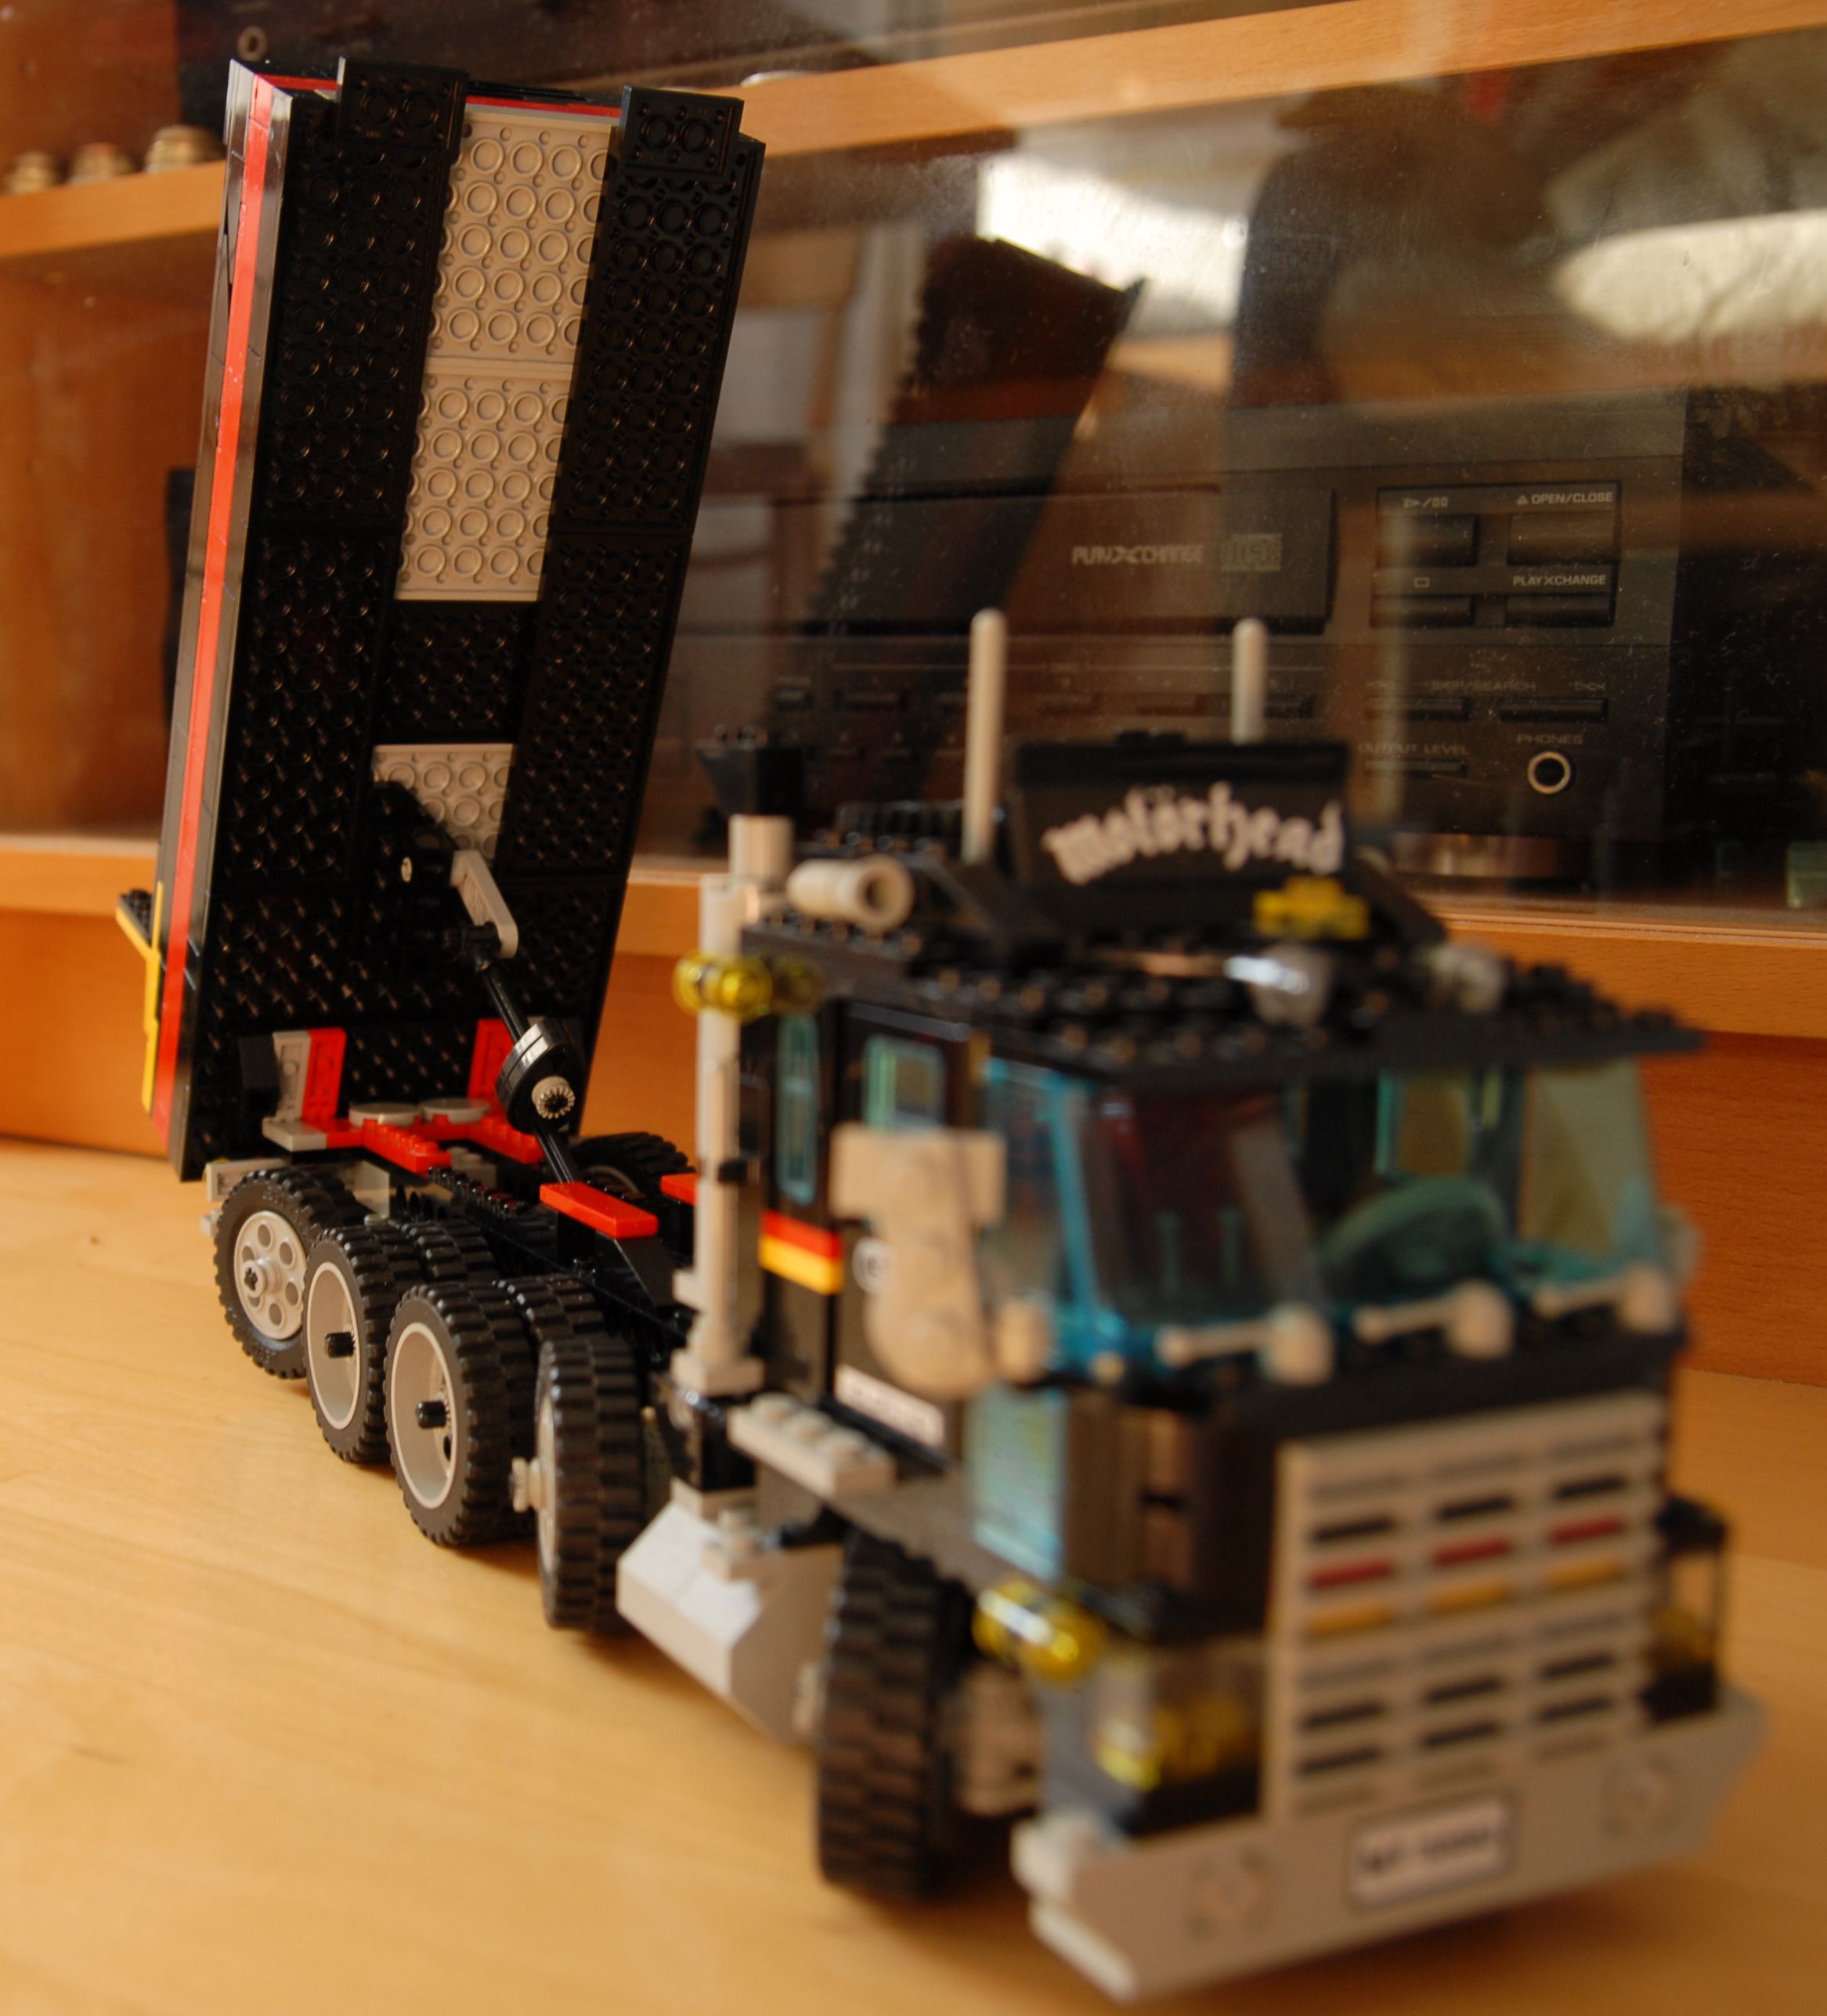
| MY LEGO VEHICLES Here are located my old and present lego vehicles except motorized Model Team truck, which can be found on page Project 5590. Links to Brickshelf Gallery folders are updated on this page so they should work again. Table of Contents: A. Lego 4WD vehicle - A.1. Version history - A.2. Version 5, 14-speed - A.3. Version 7, 13-speed - A.4. Version 8, 5x4 twin stick B. Lego 4x2 truck 16-speed C. Ugly cabriolet with lights D. Small scale - D.1. Version 1, 6x2 tractor truck & 3-axle semi trailer - D.2. Version 2, 10x4 truck with crane - D.3. Version 3 8x4 truck with crane & 2-axle trailer E. Modified 5590 - E.1. Version 1, 6x2/4 tractor truck - E.2. Version 2, 10x4 dump truck A. Lego 4WD Vehicle:
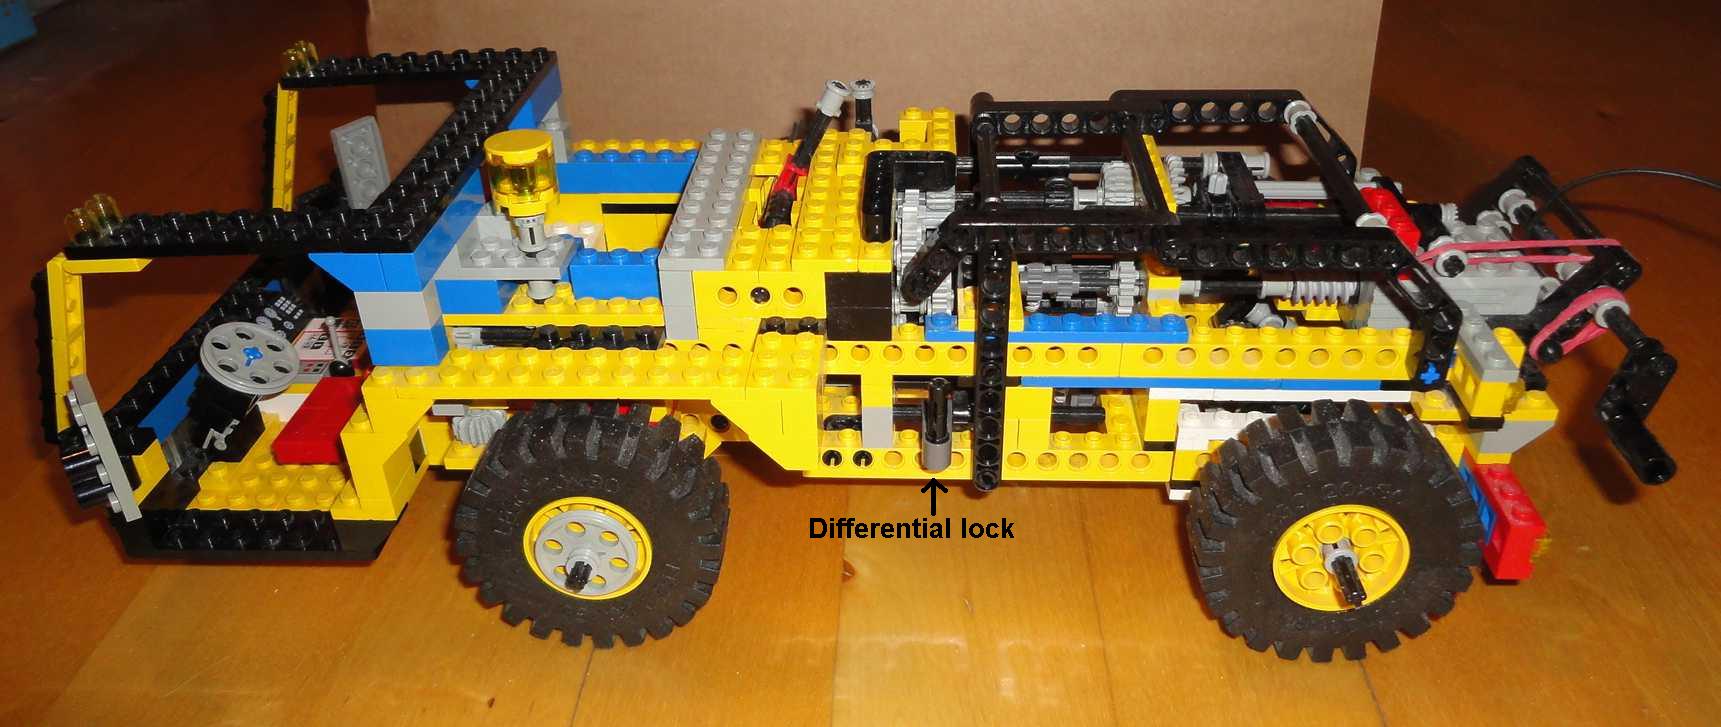
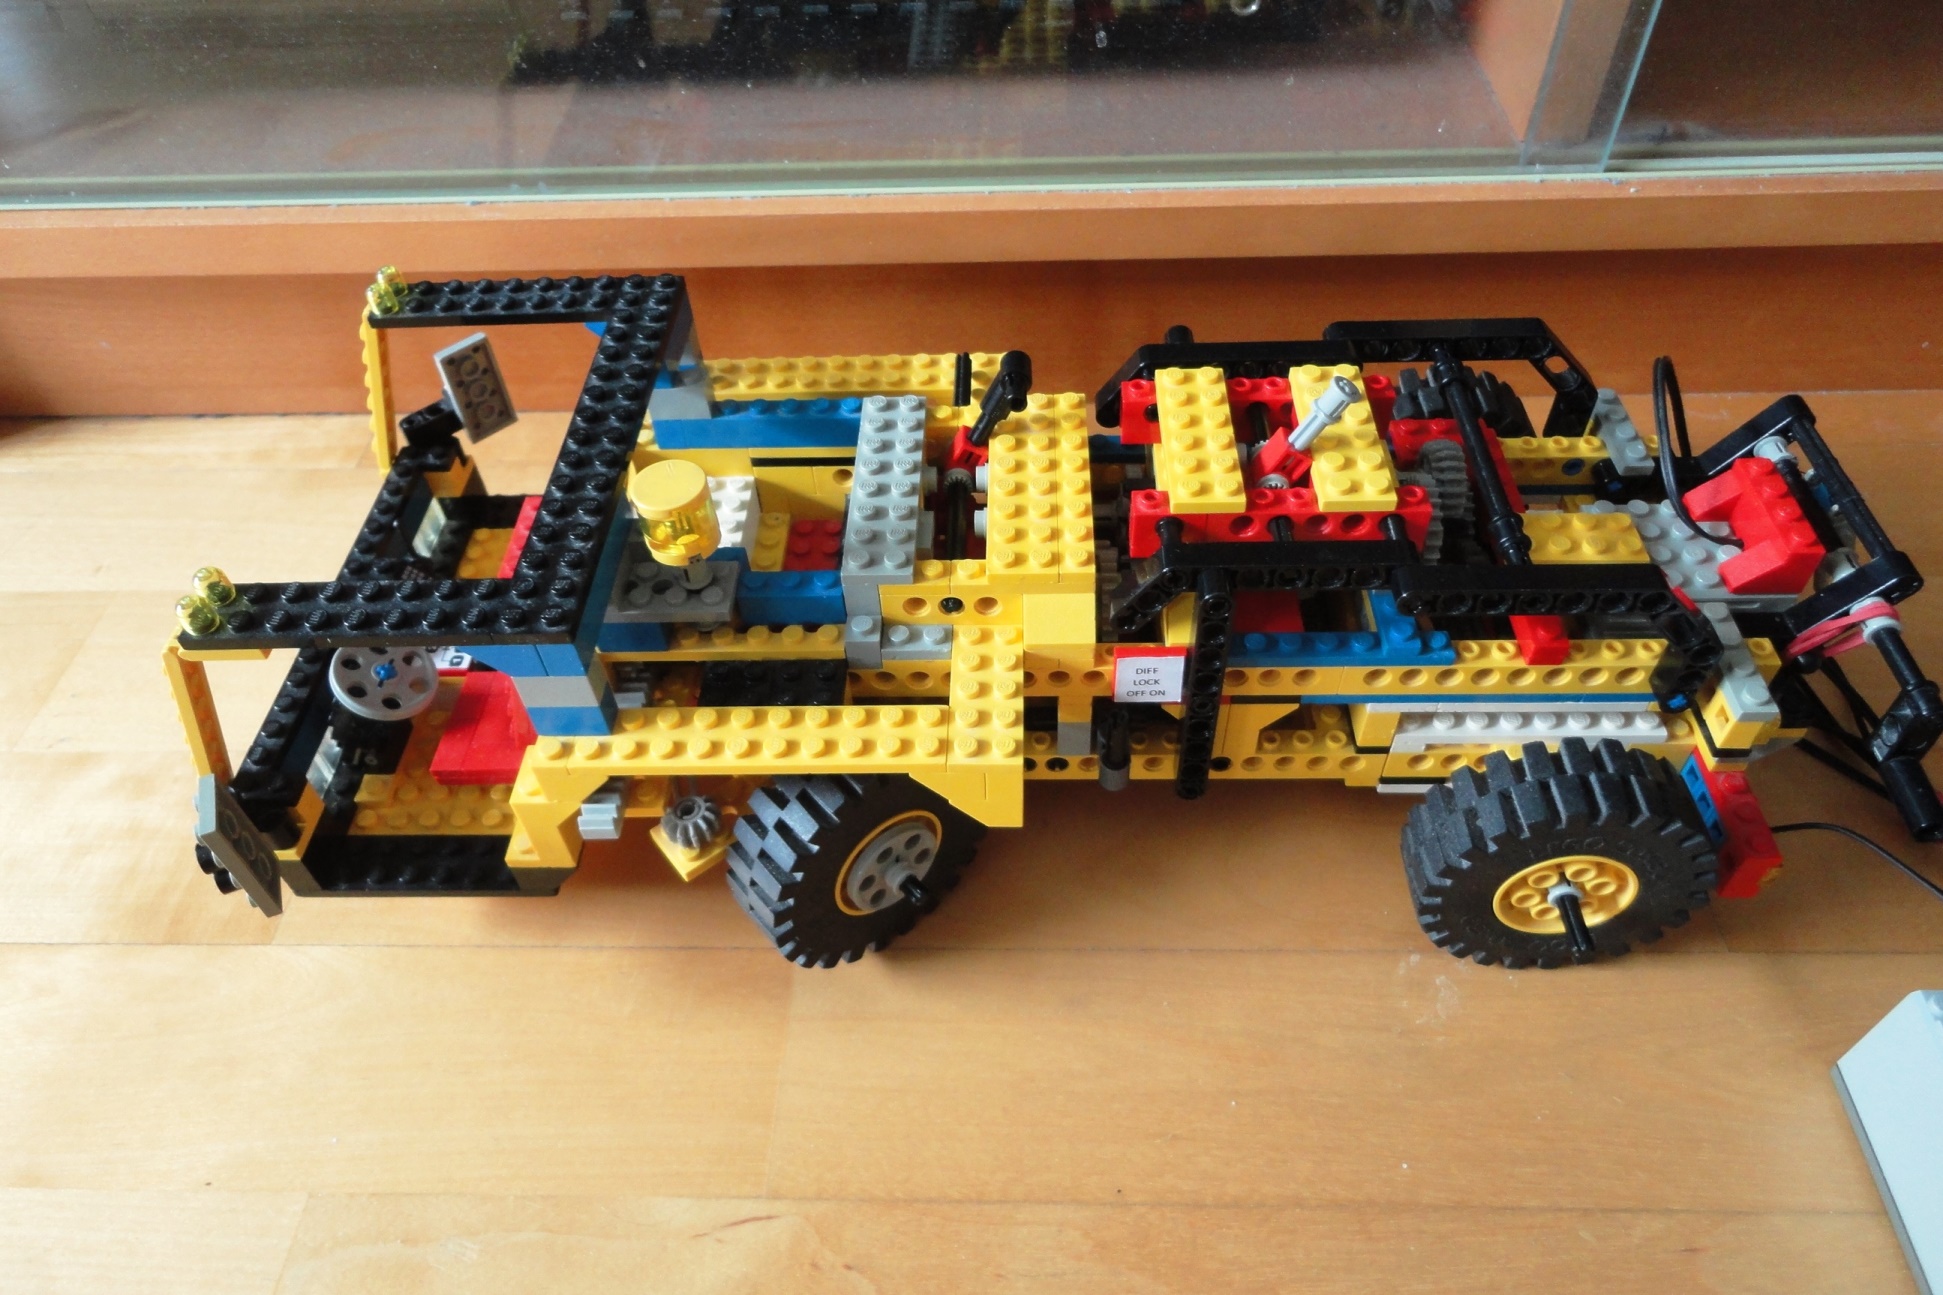
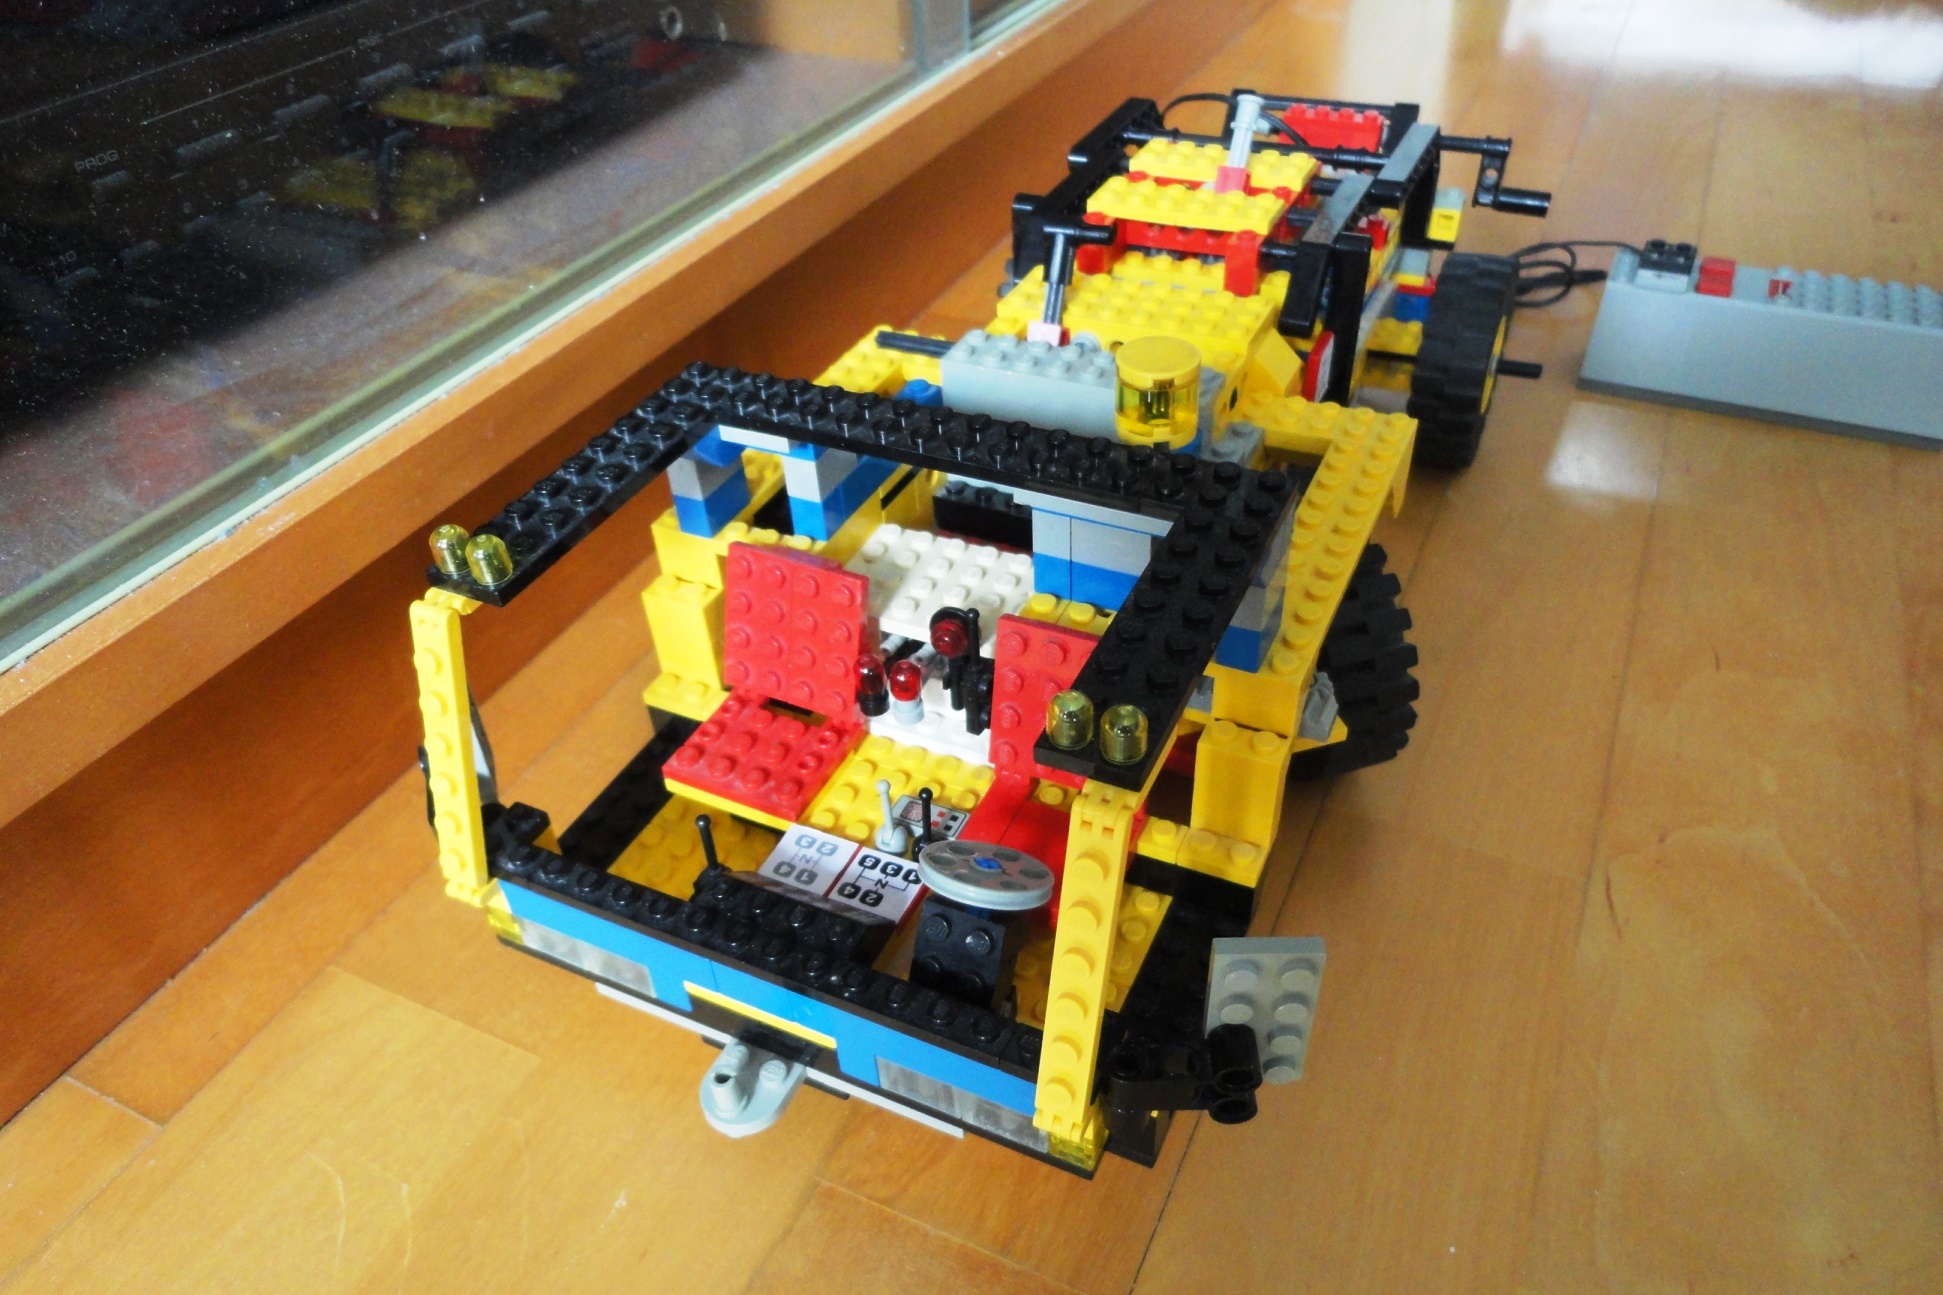
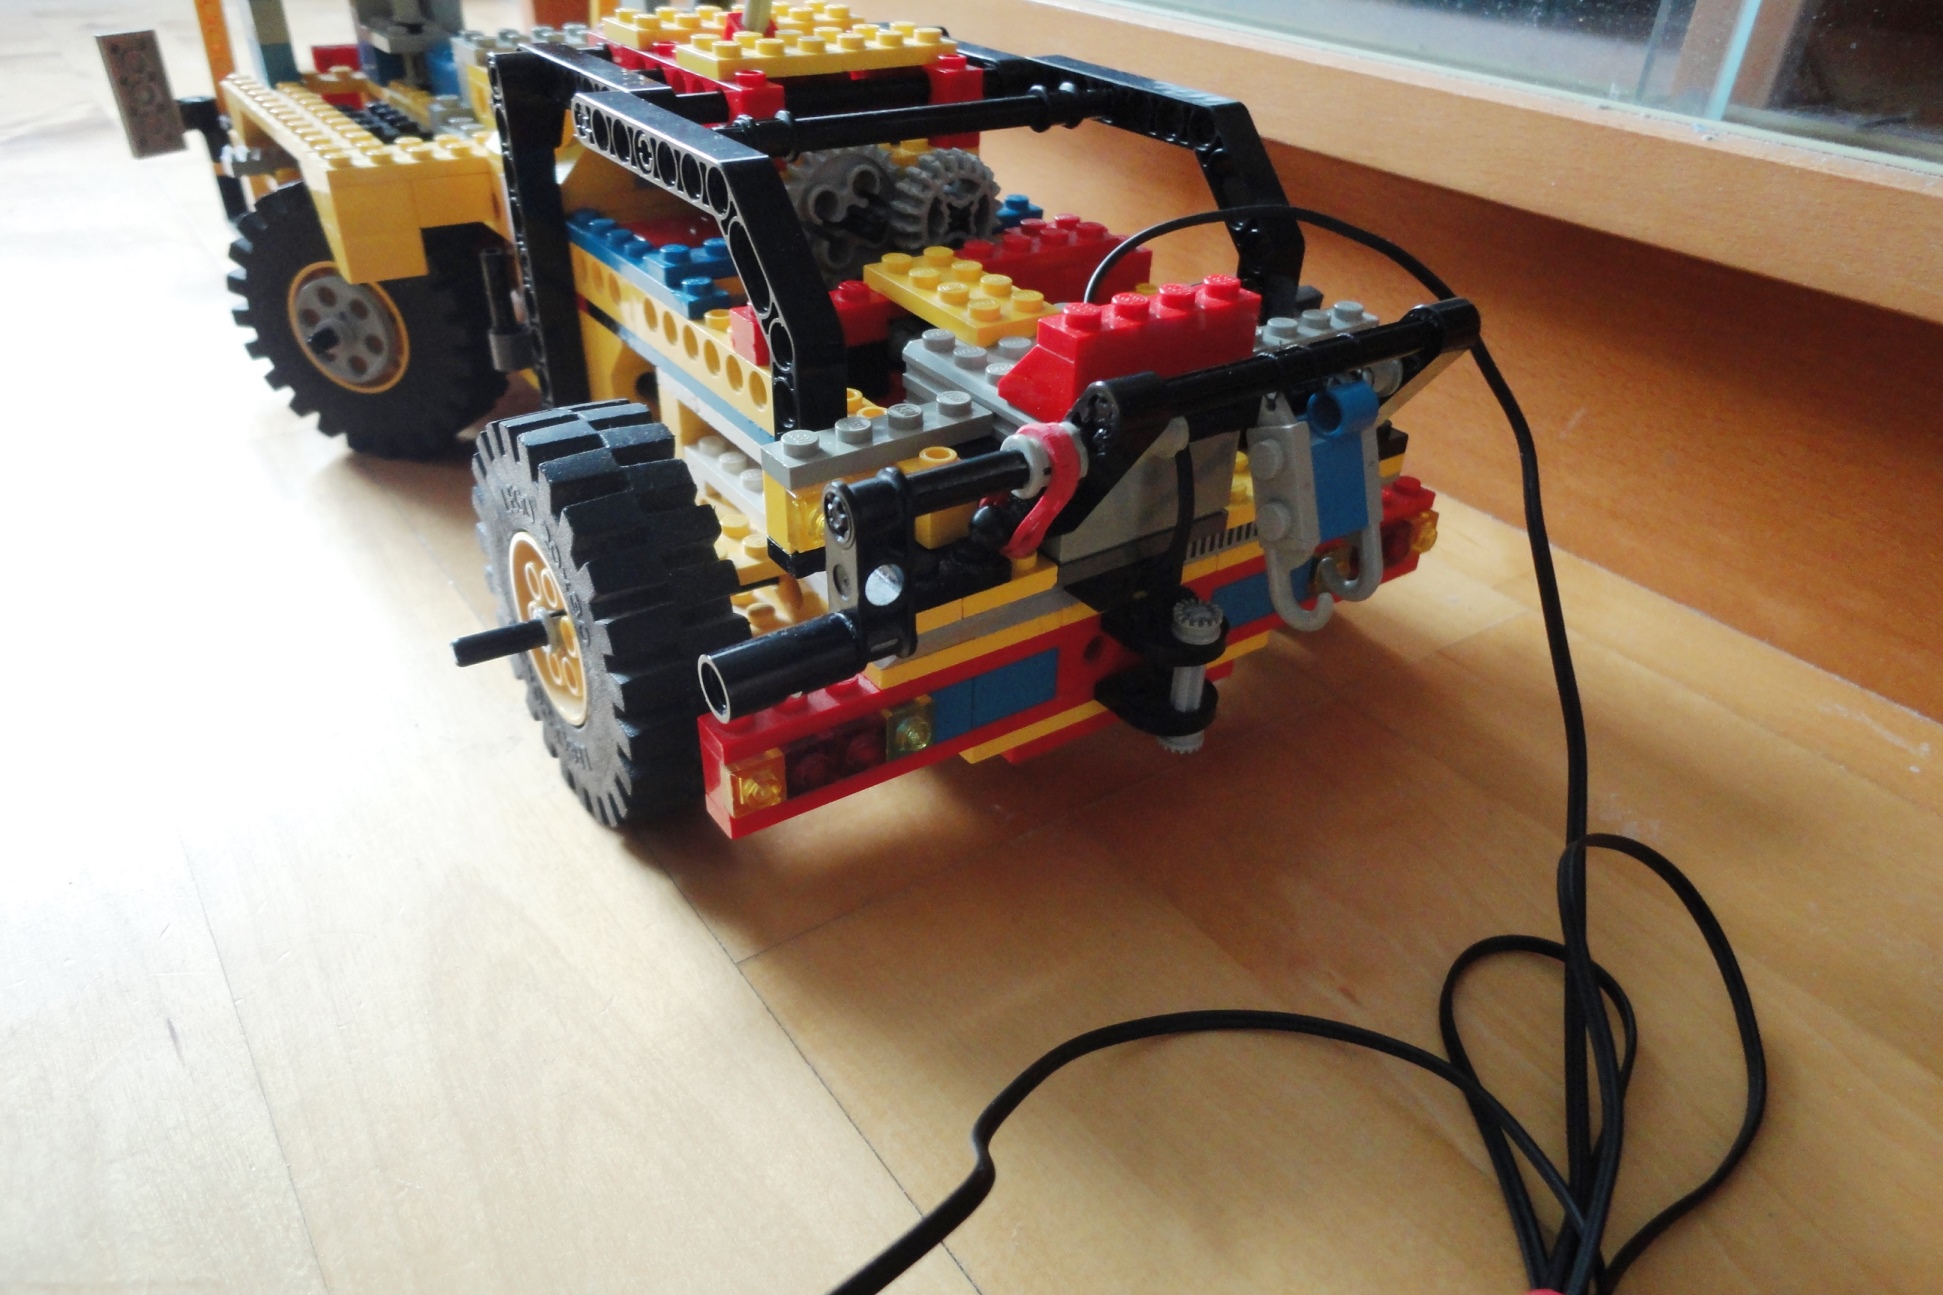
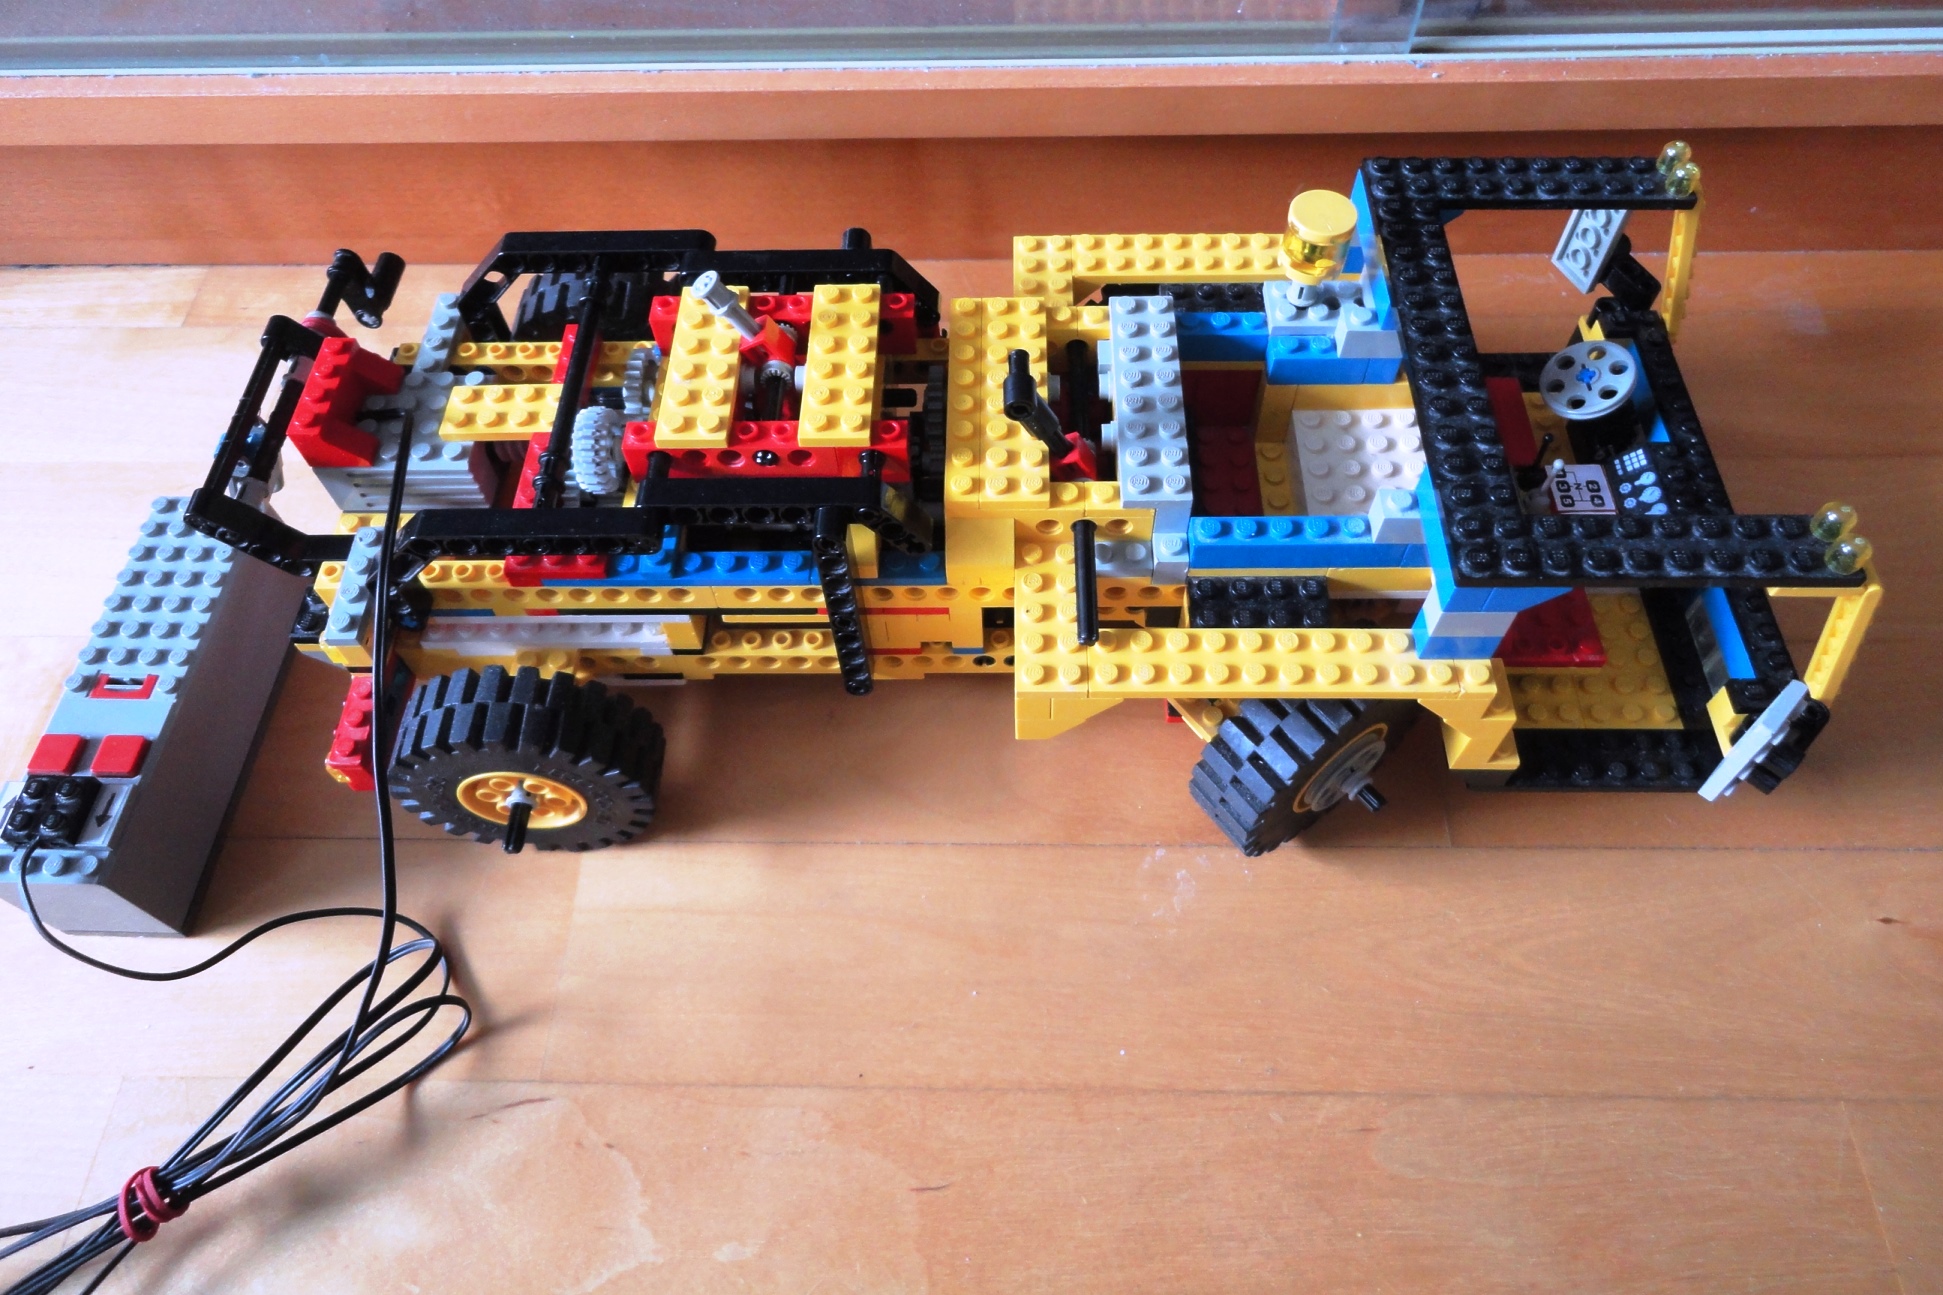
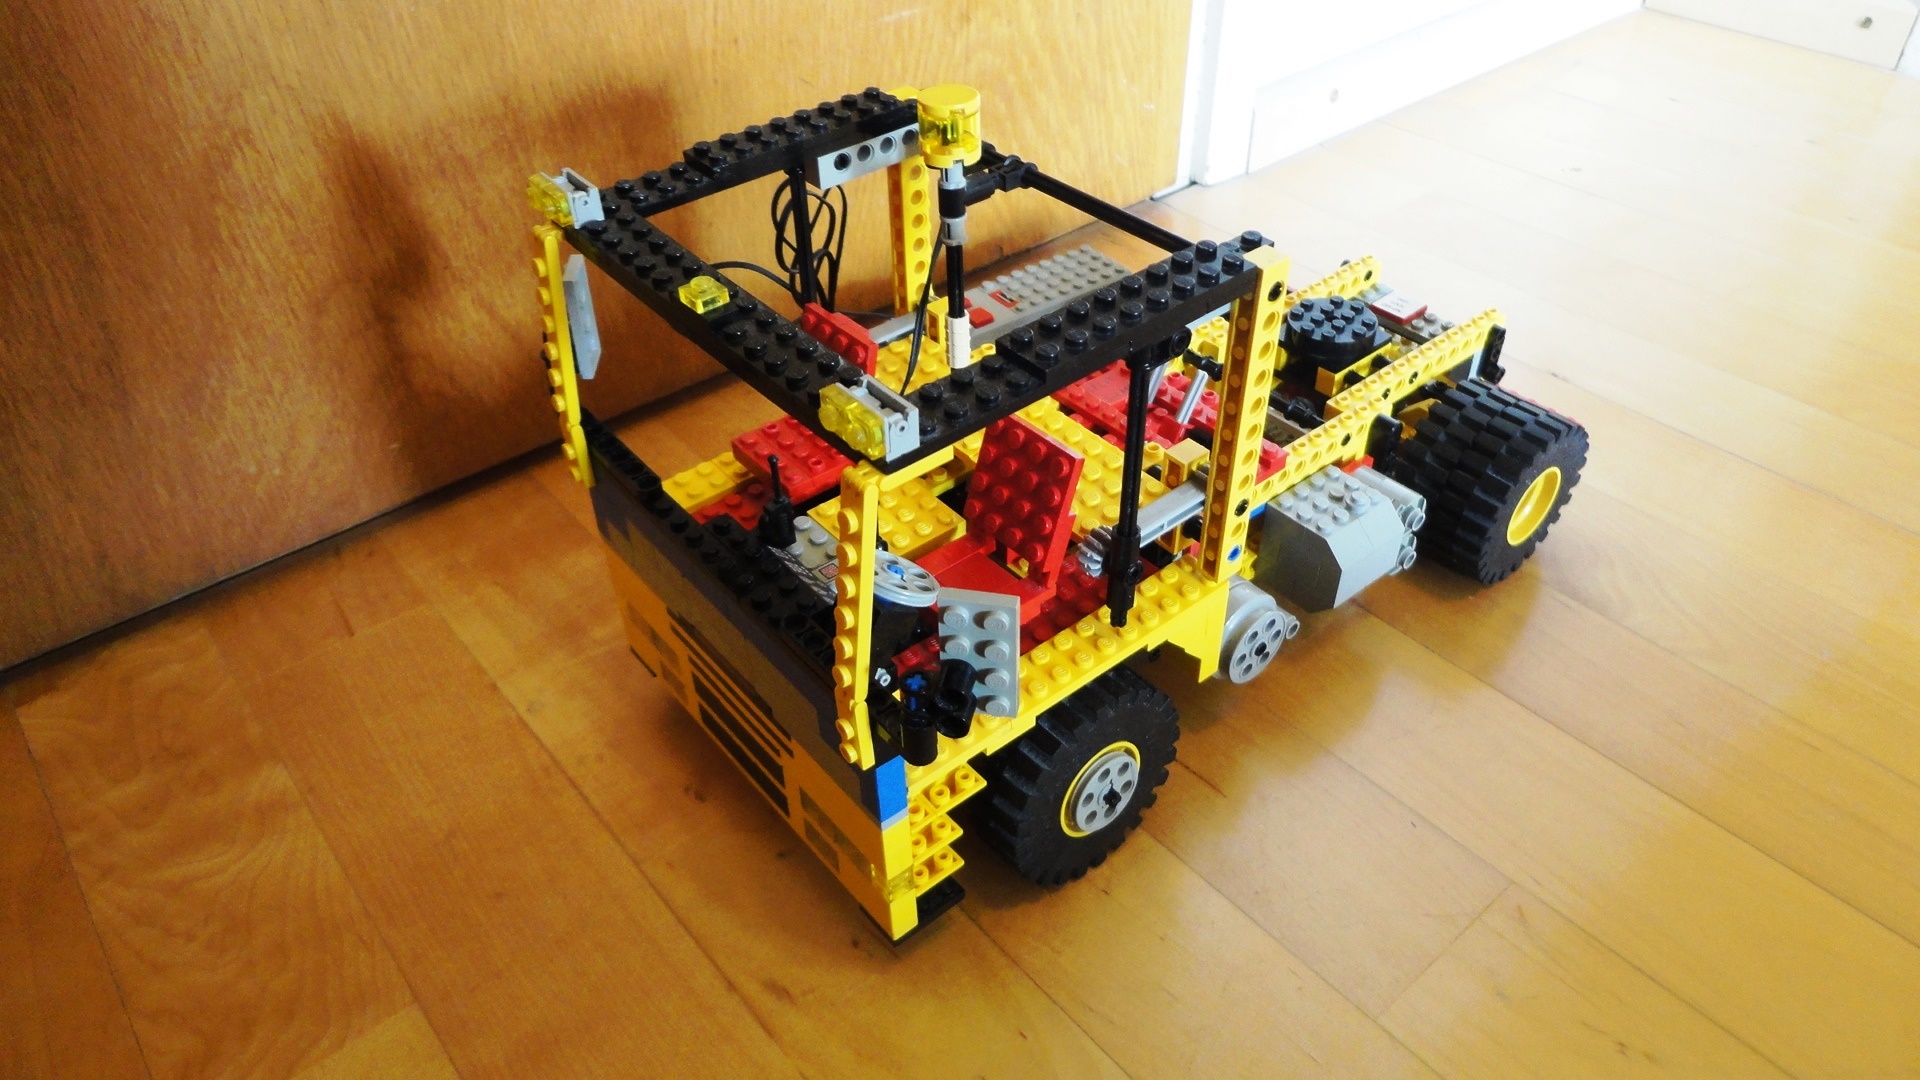
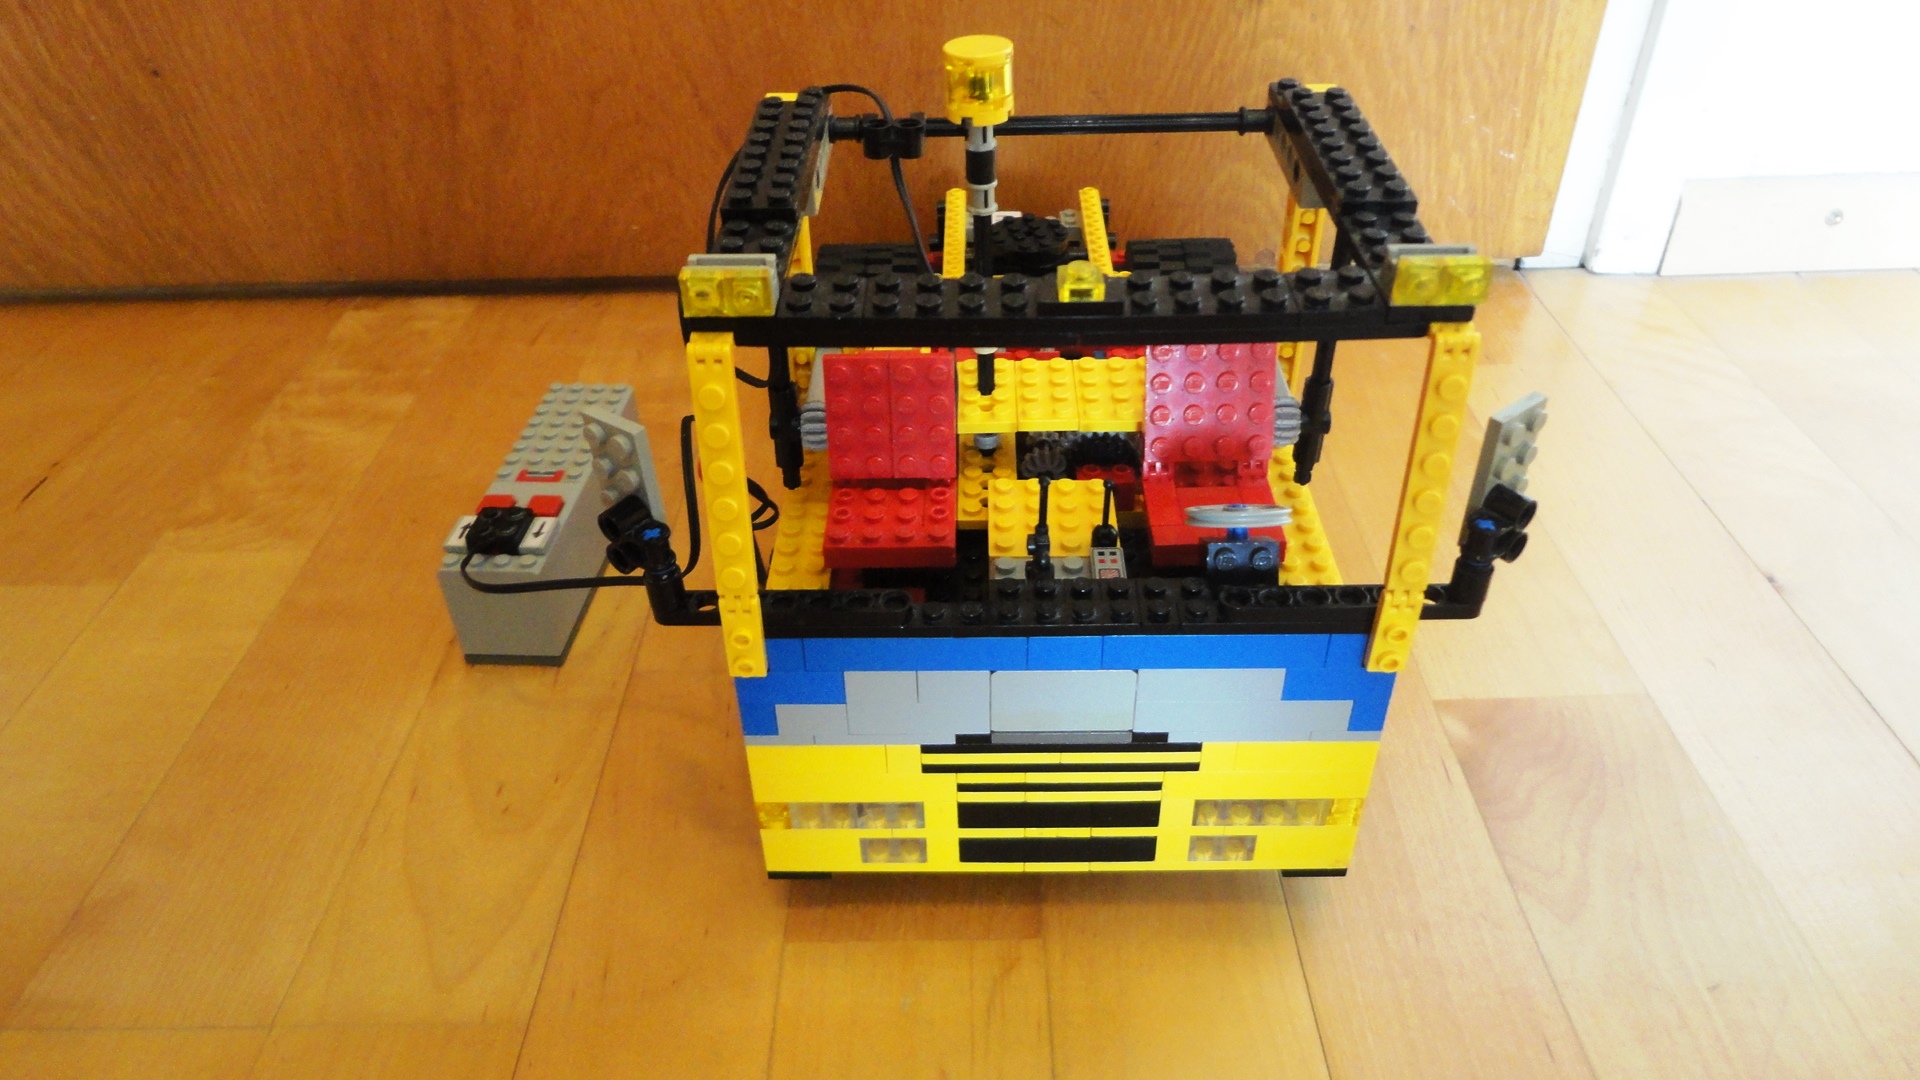
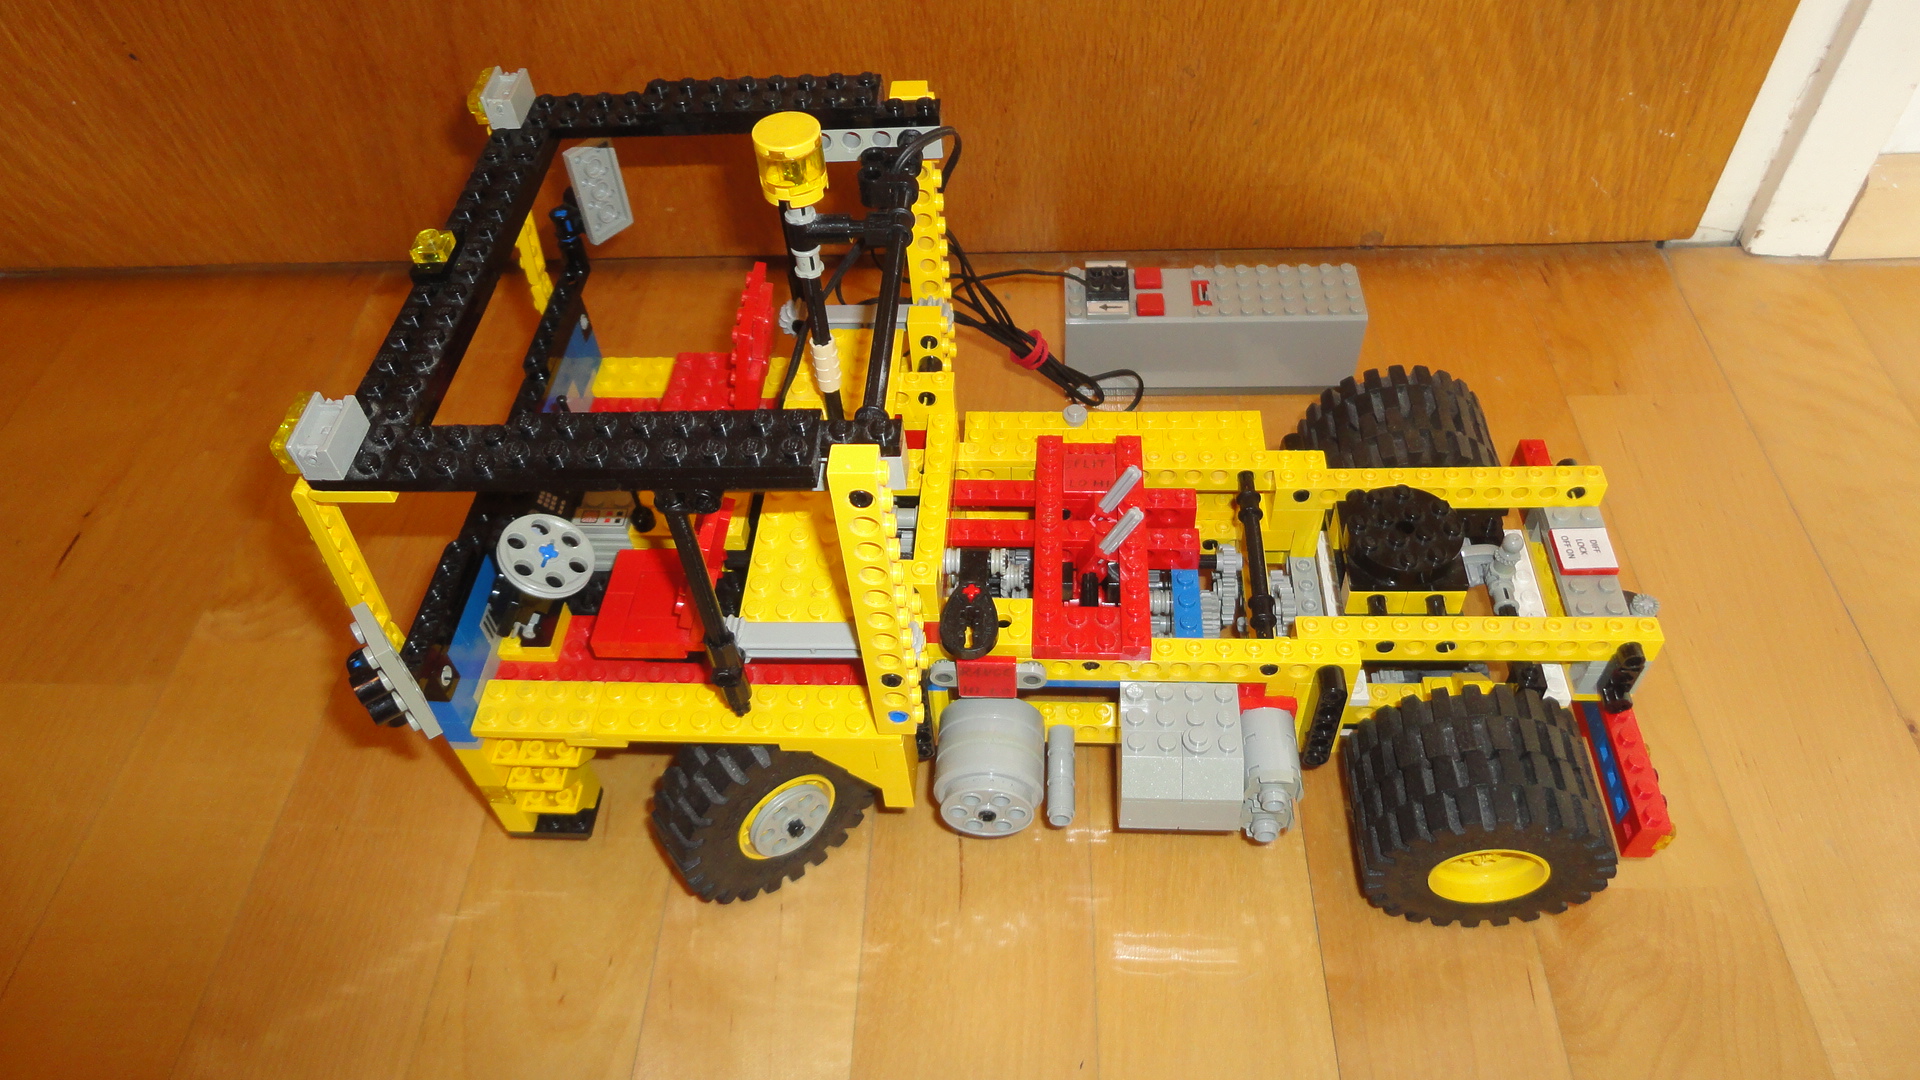
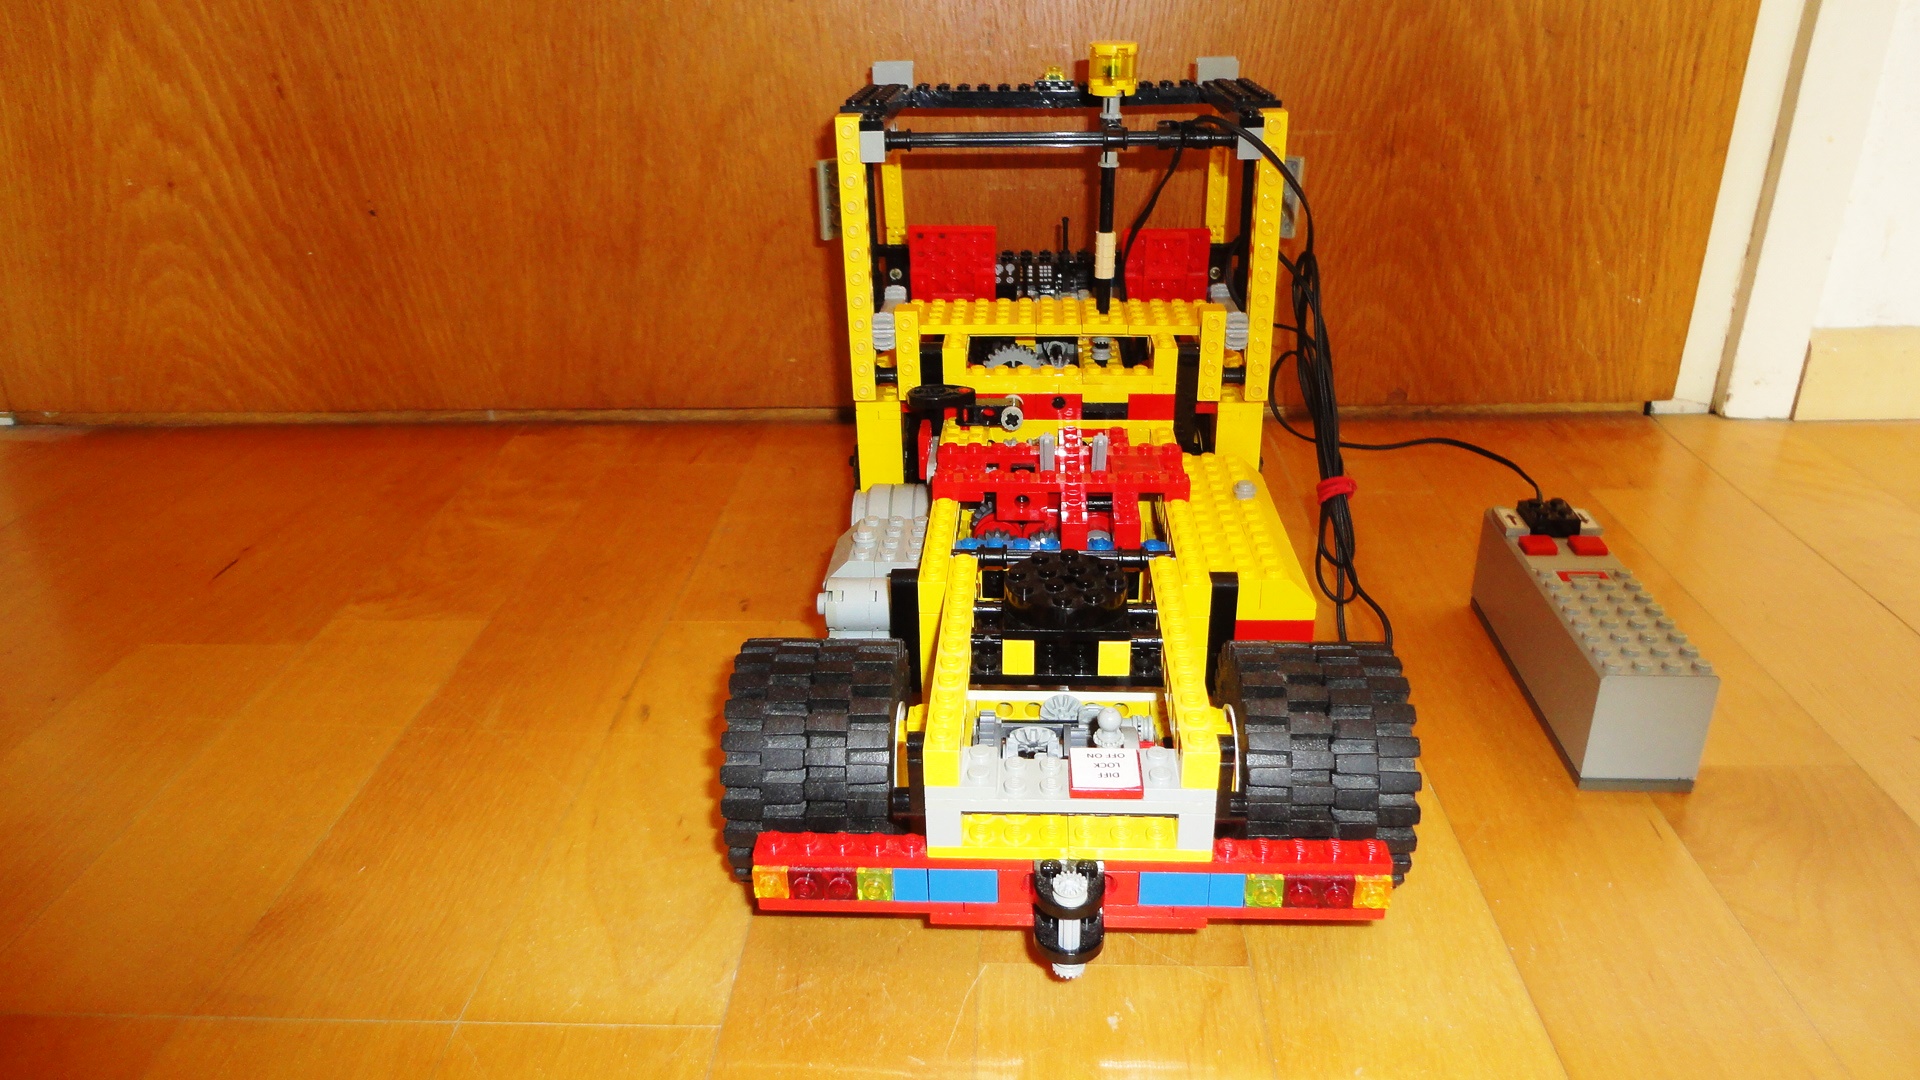
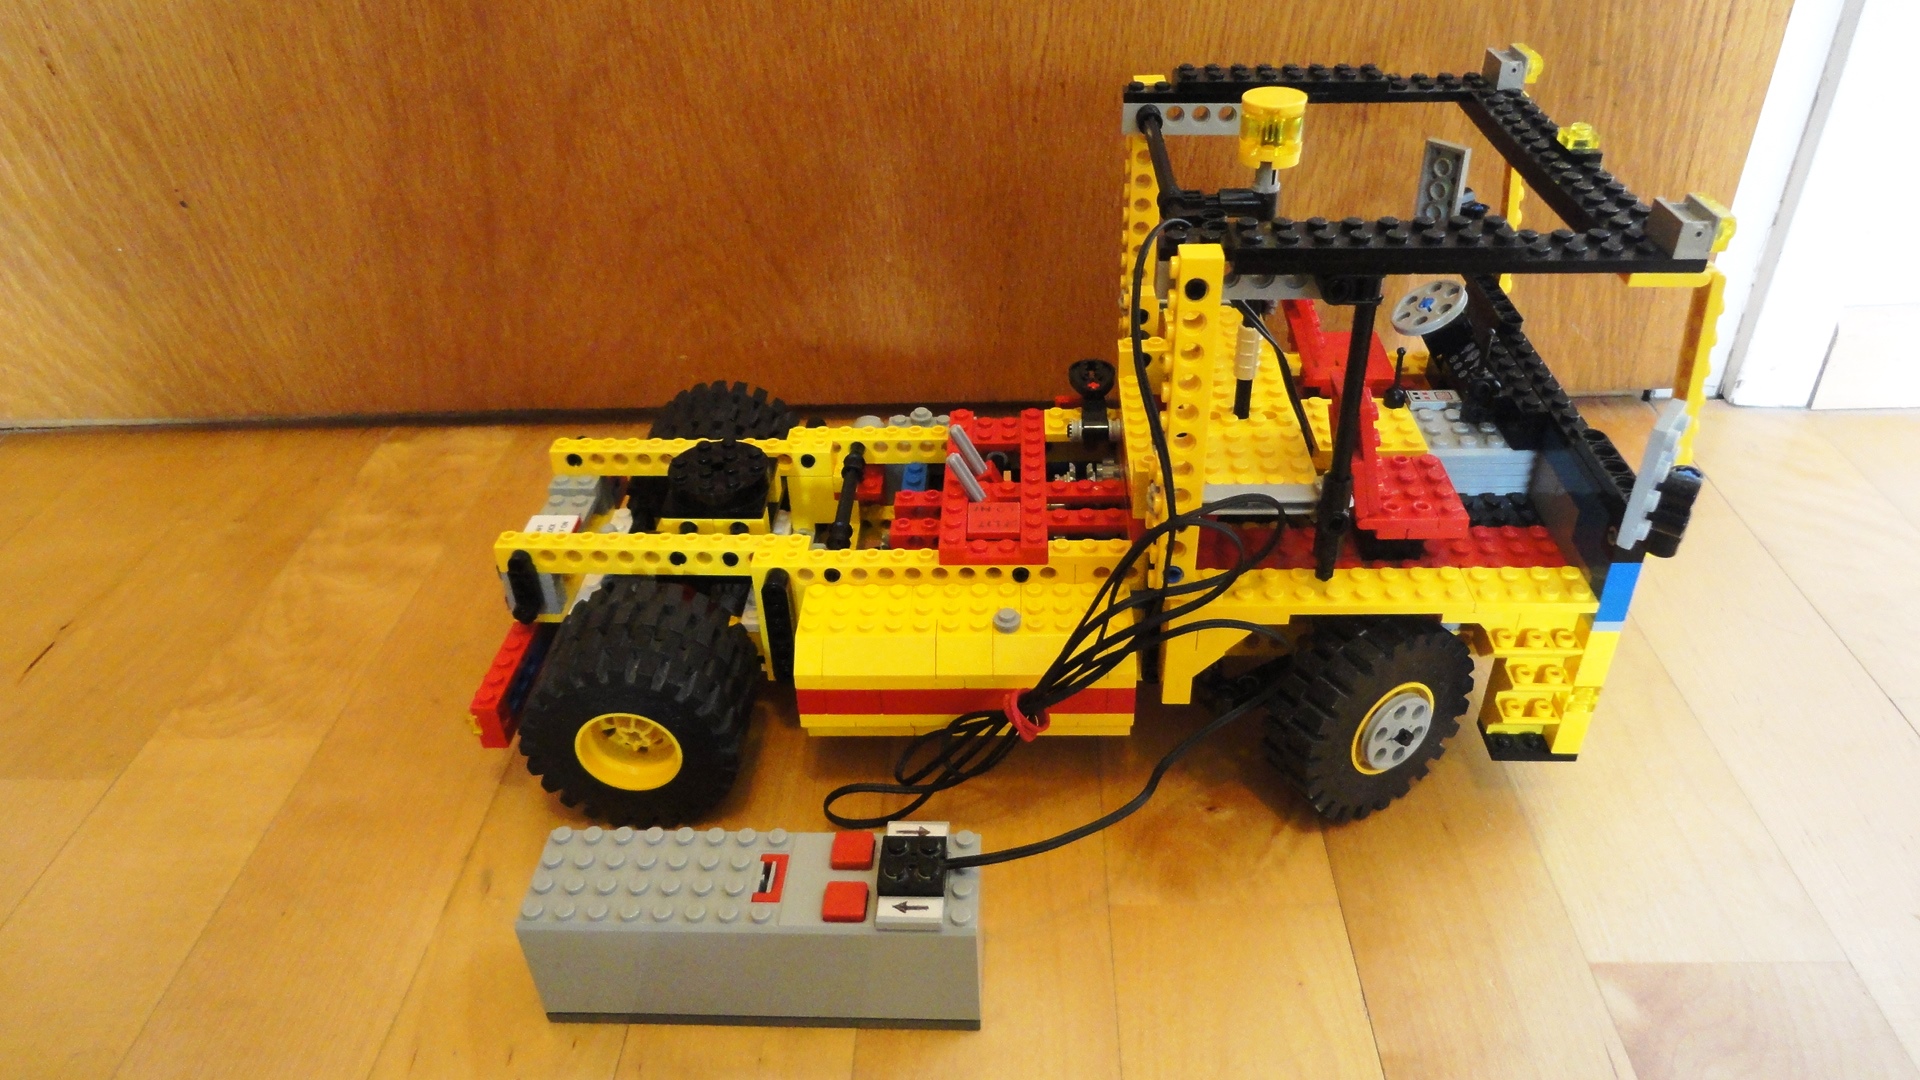
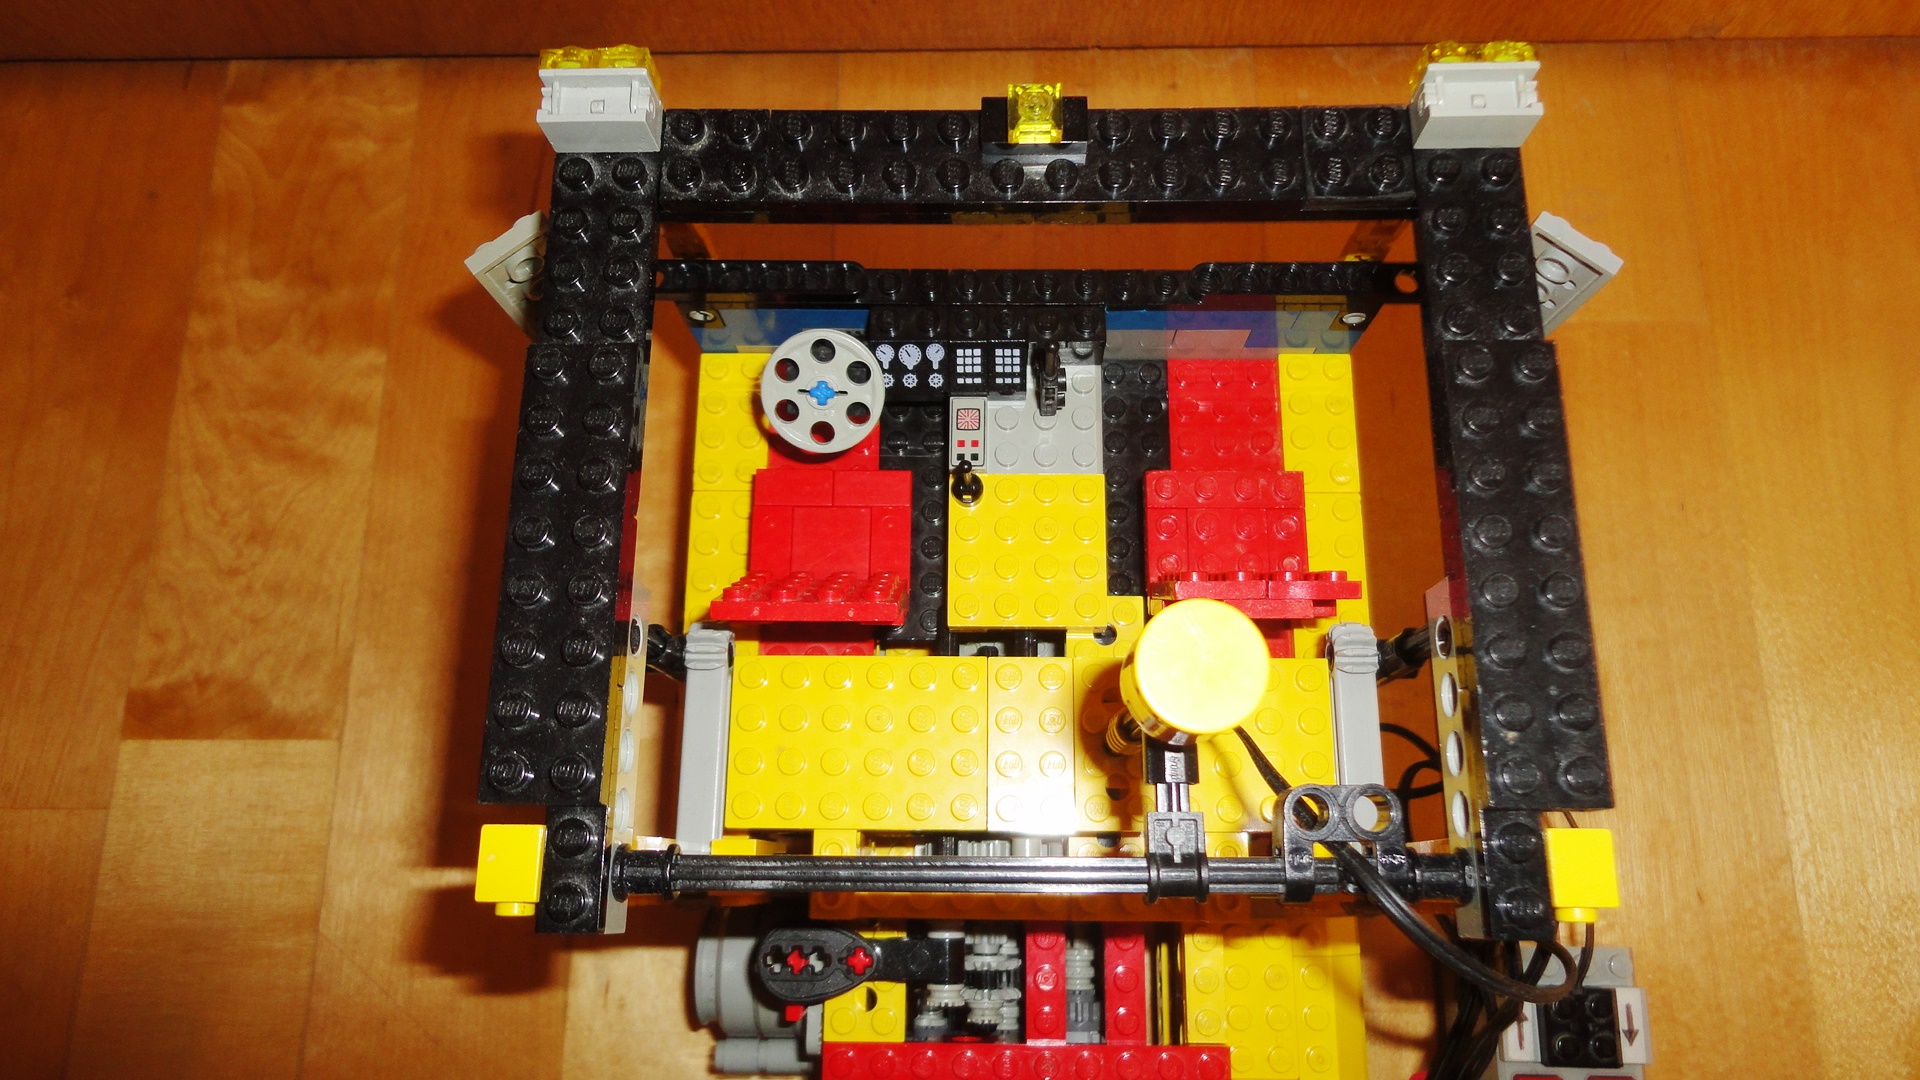
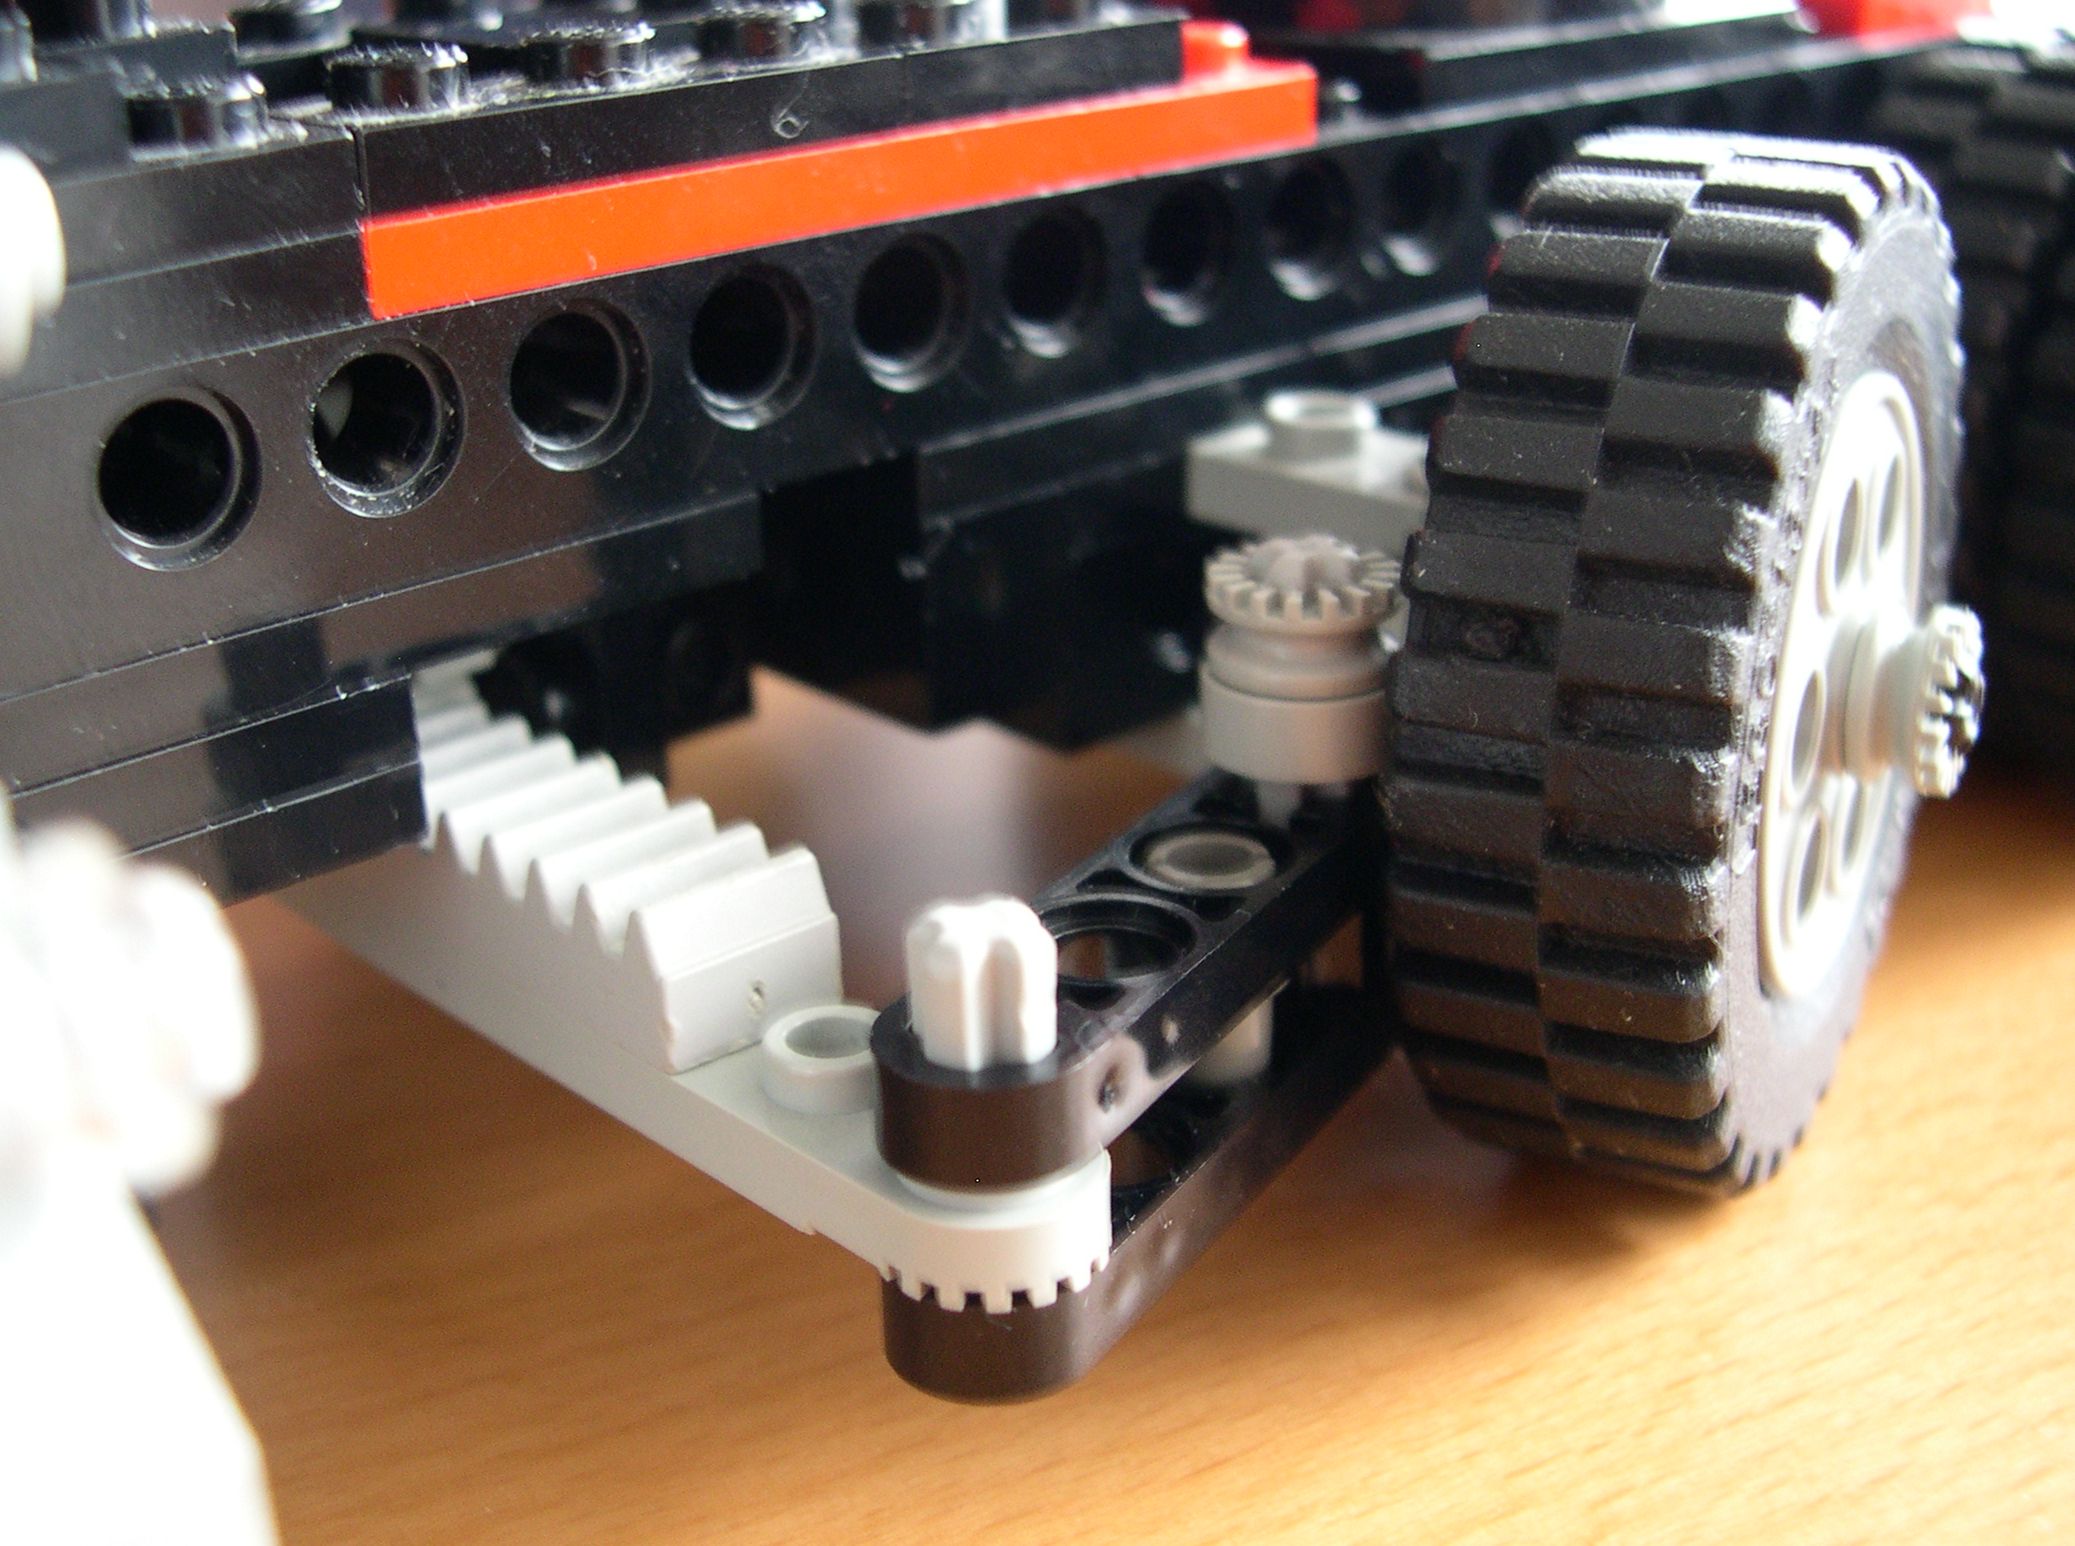
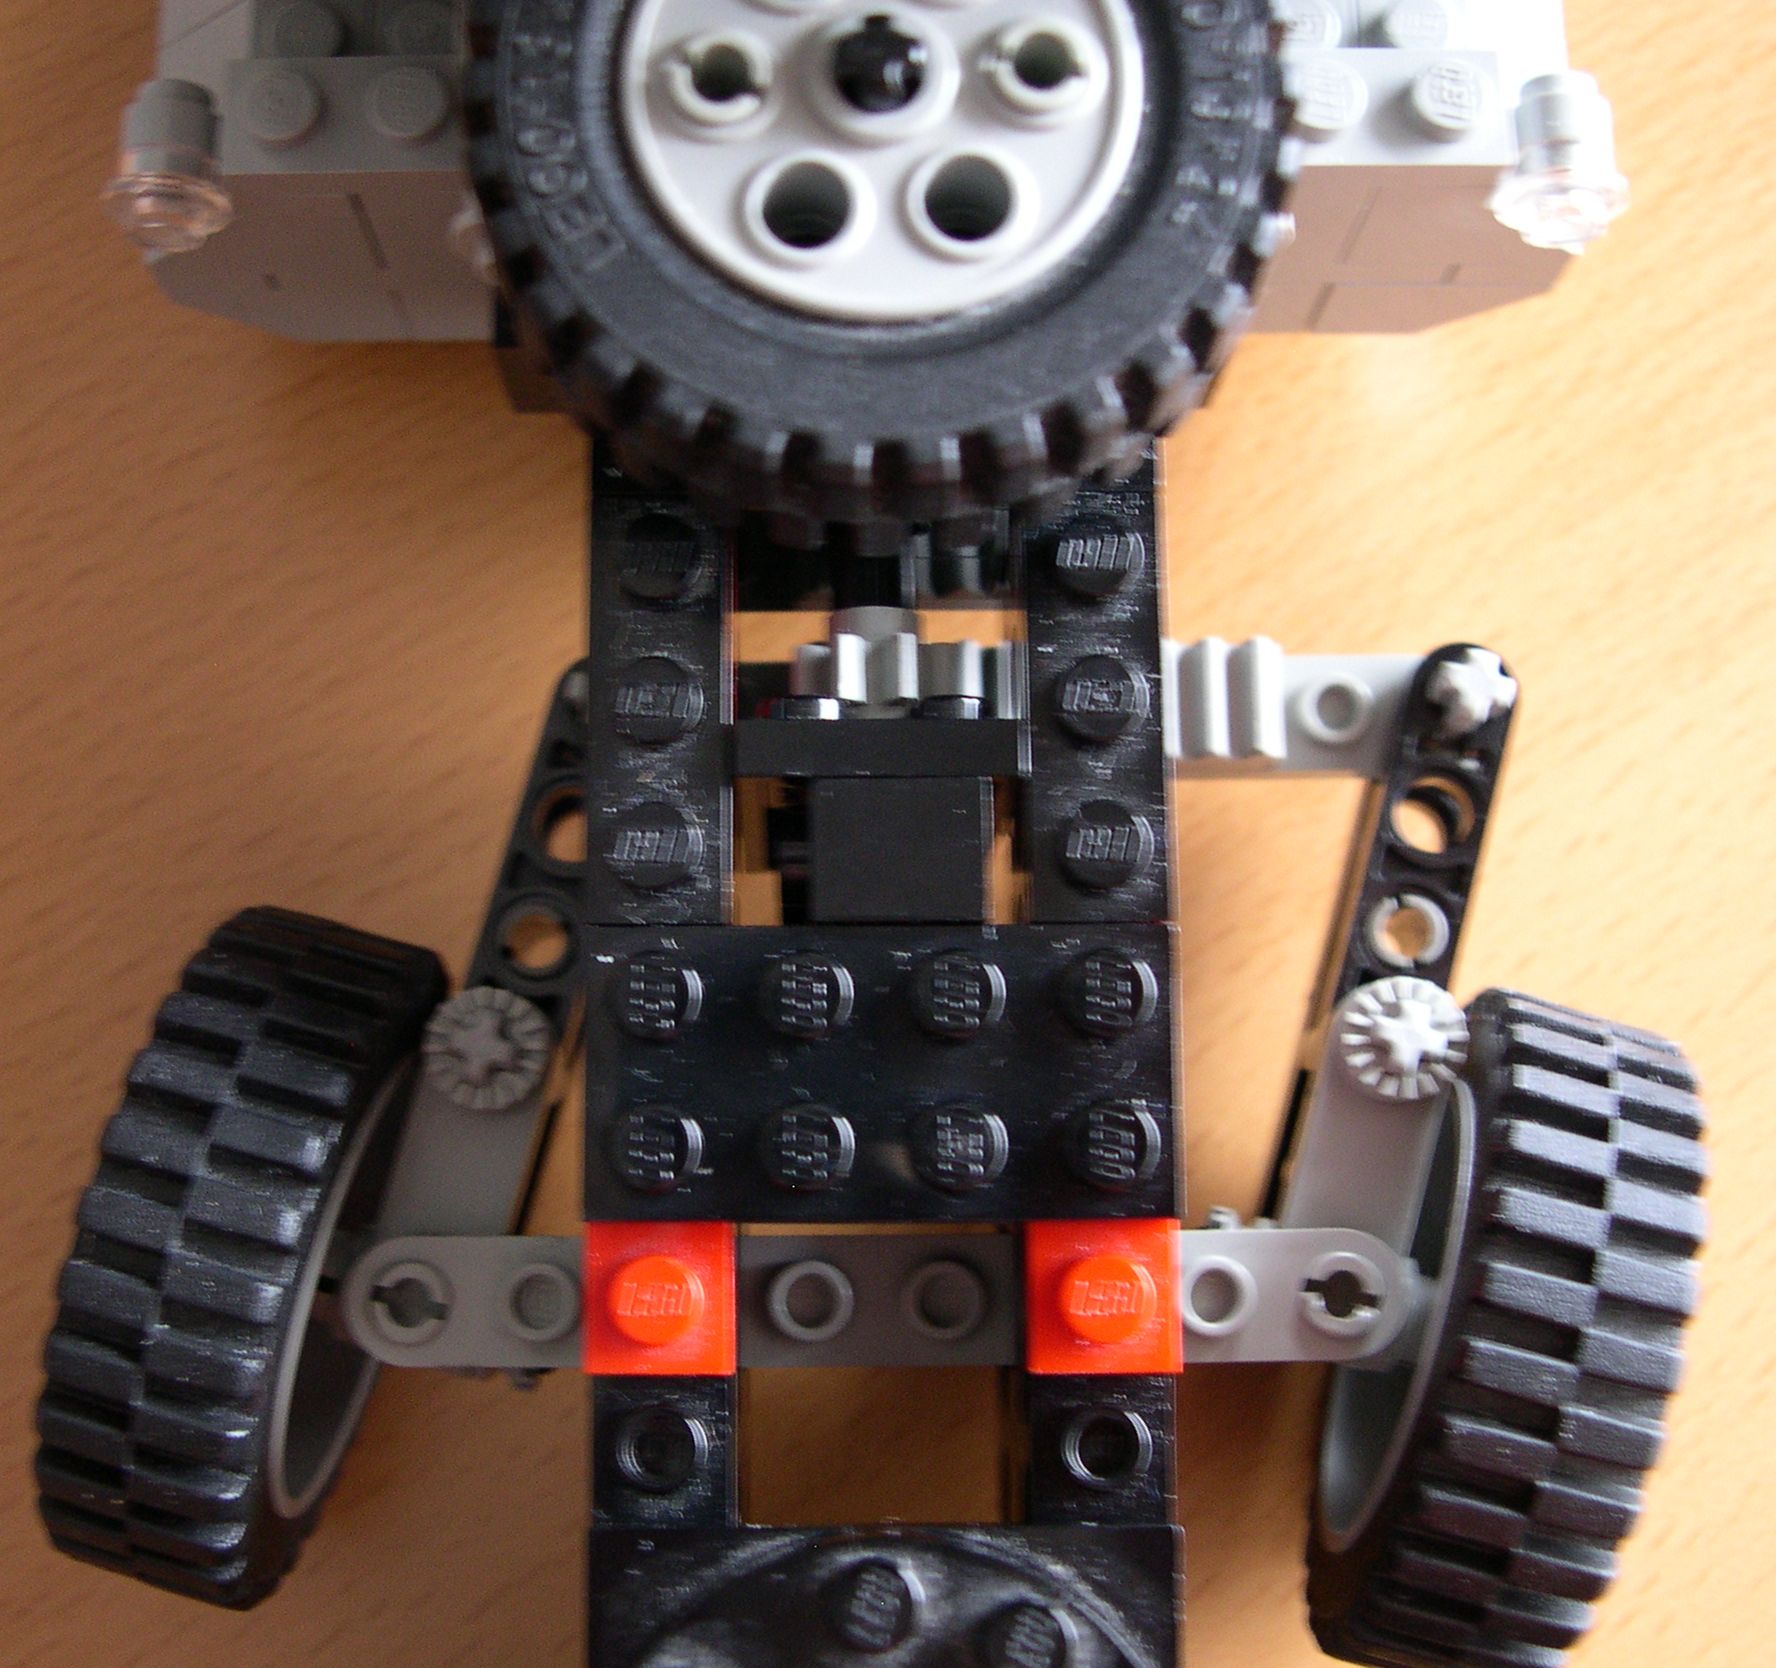
This motorized lego 4WD vehicle has had many versions while I’ve been learning lego gearbox building. Vehicle has been modified in many different ways during years but numbering follows gearbox versions. So, this lego 4WD vehicle is designed to move large aeroplanes on the airport area. Tow bar can be attached both rear and front side of the vehicle. Vehicle is flat so it can go under aeroplane’s wing. Tow bar can be also used to tow broken trucks. There is also winch at the rear of this vehicle so it’s capable to pull stuck trucks out of ditch. Depending on winching you can choose one, two or three running blocks so pulling force is multiplied to 2x, 4x or 6x. While vehicle is quite big I tried to make approximation of Ackermann steering to get smoother turning. When you turn inner wheel goes on circle of smaller radius than outer wheel. This means that inner wheel must turn to greater angle than outer wheel and this is where Ackermann steering comes in. In basic lego steering both wheels turn to same angle so there will be wheel slipping while turning and this causes lots of friction in heavy lego vehicles like this. For more information about Ackermann steering and how to get simple approximation of it can be found on Wikipedia article. While cabin is long in front it makes lots of weight to front wheels. So motor is located to rear to balance very uneven weight distribution. This was necessary especially in early versions when inaccurate steering geometry caused problems in tight cornering. Actually I don’t know what kind of transmissions aeroplane movers really have. It’s possible that they can even have hydrostatic transmission like excavators or some wheel loaders. But my lego vehicle’s transmission versions can be classified so that version 1 is tractor transmission, versions 2 & 3 are light or mid range truck transmissions and later designs are heavy or severe duty truck transmissions. A.1. Version history:
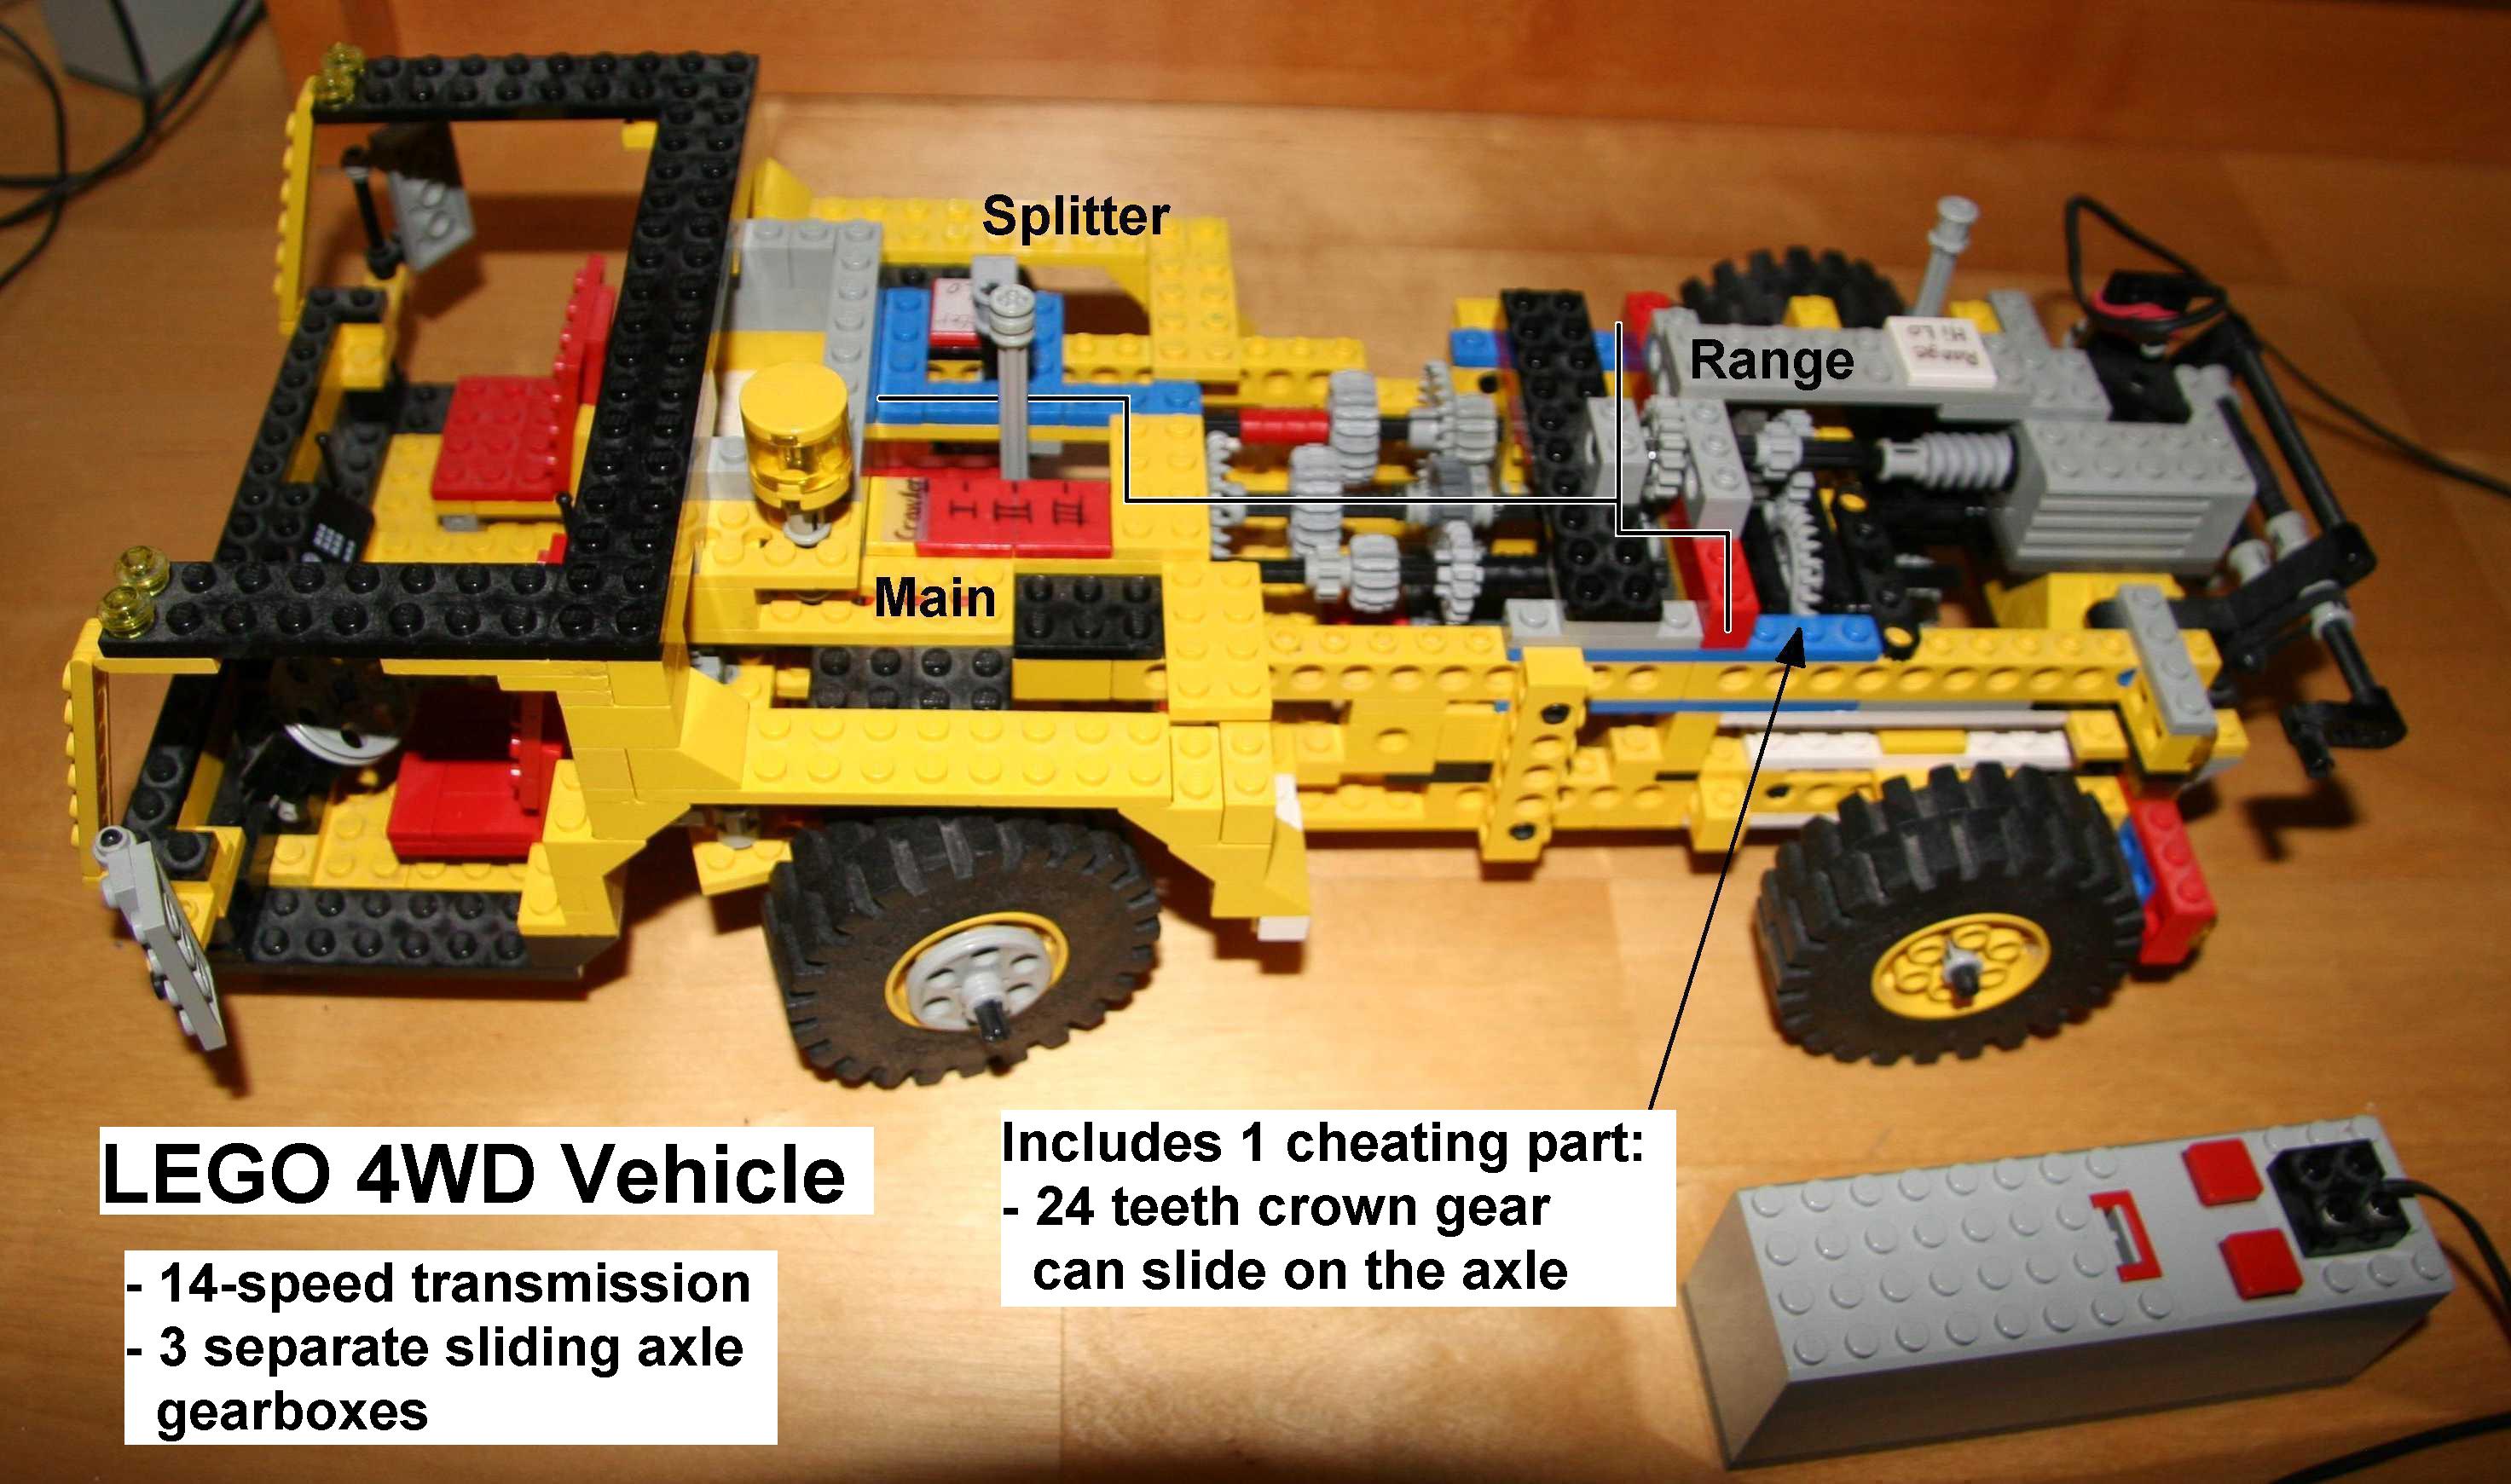
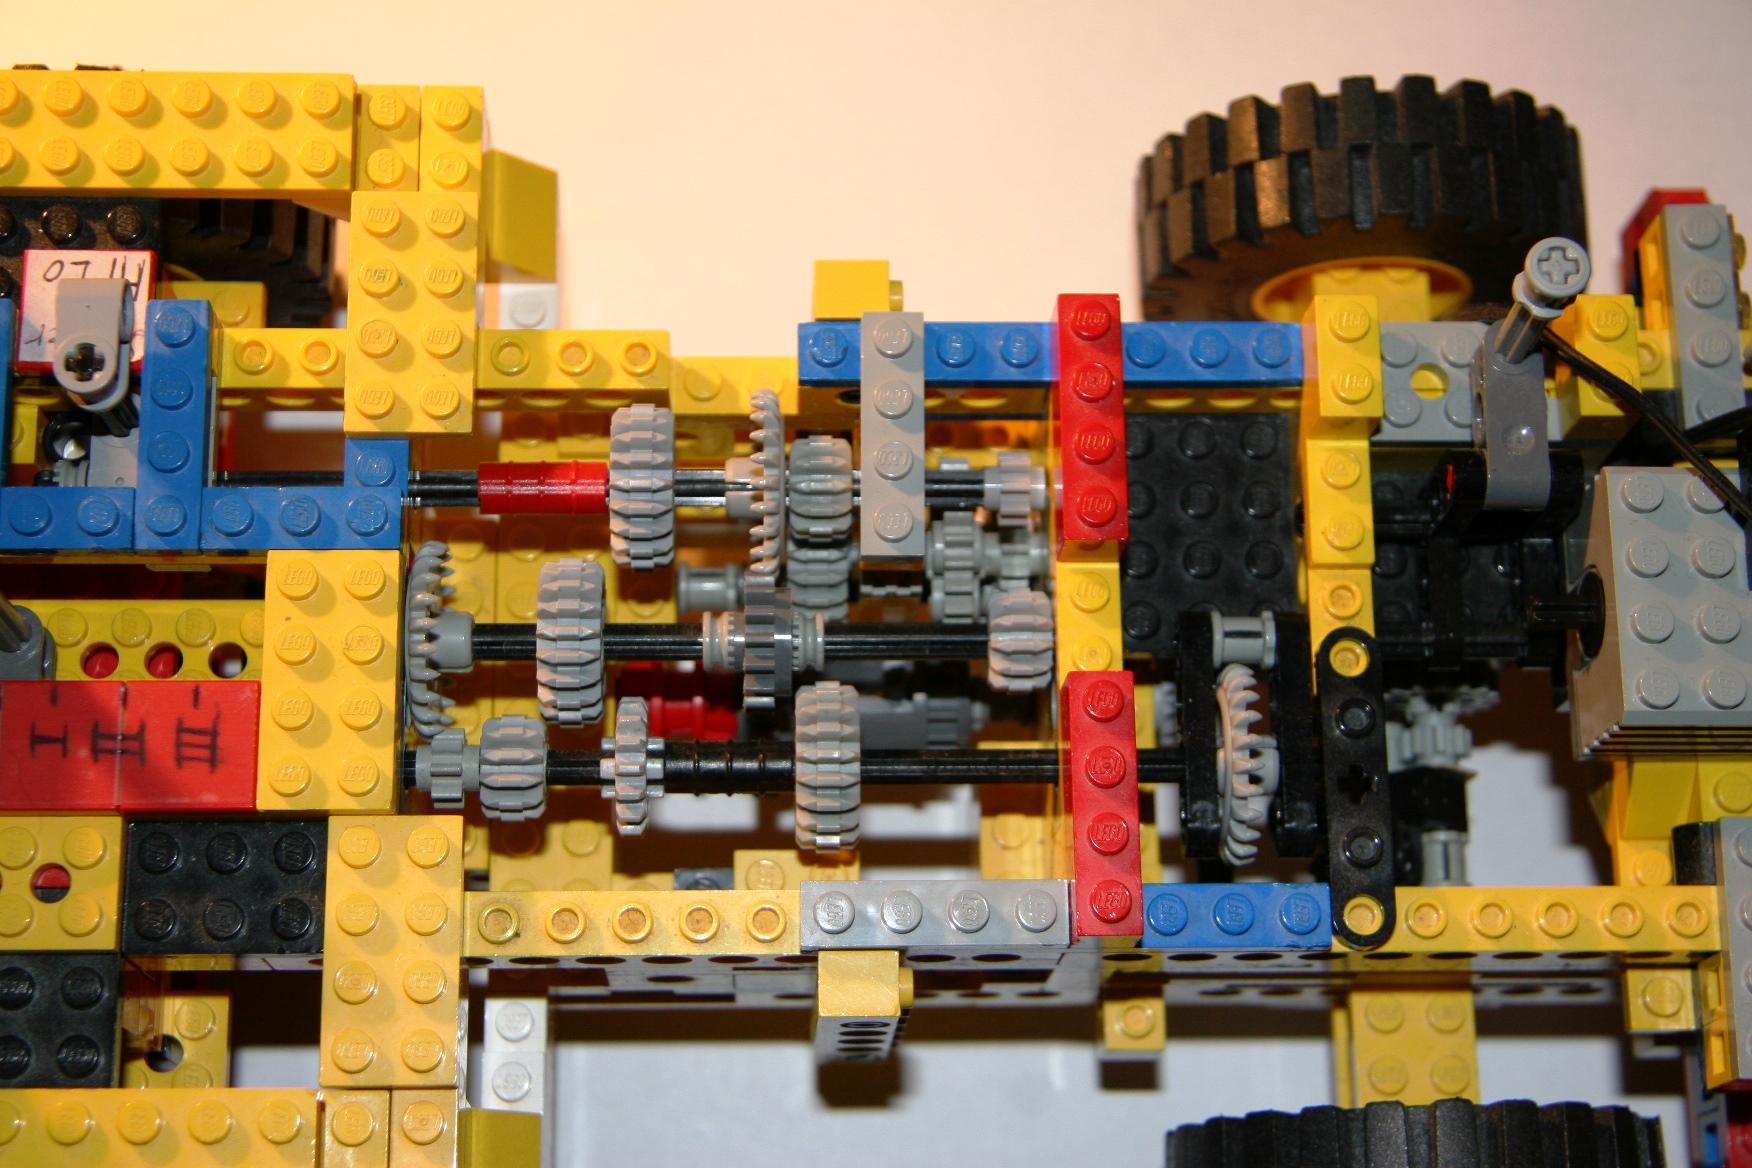
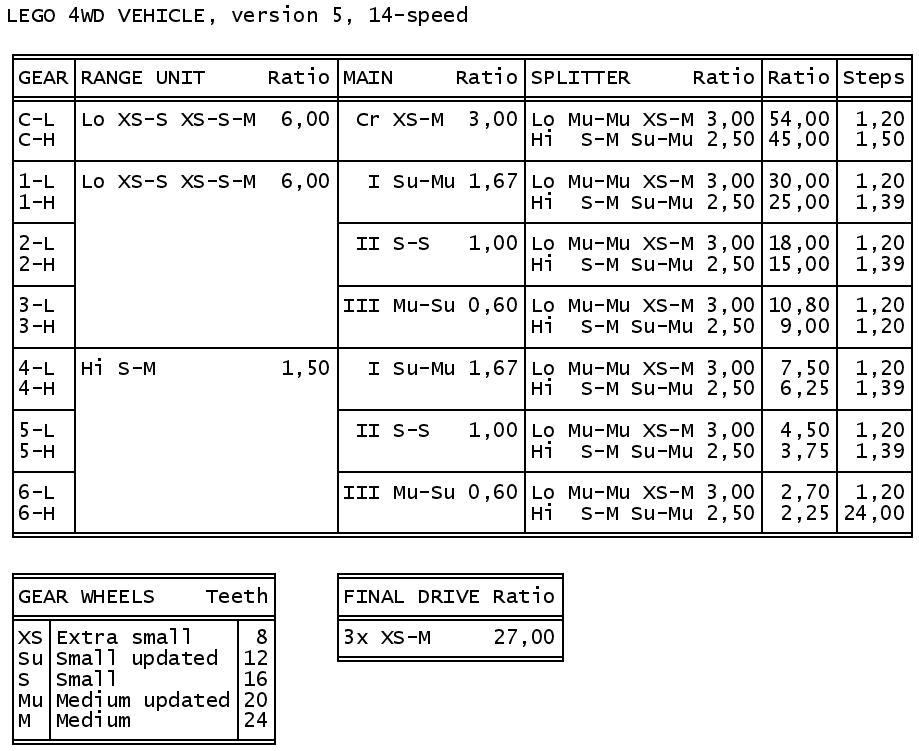
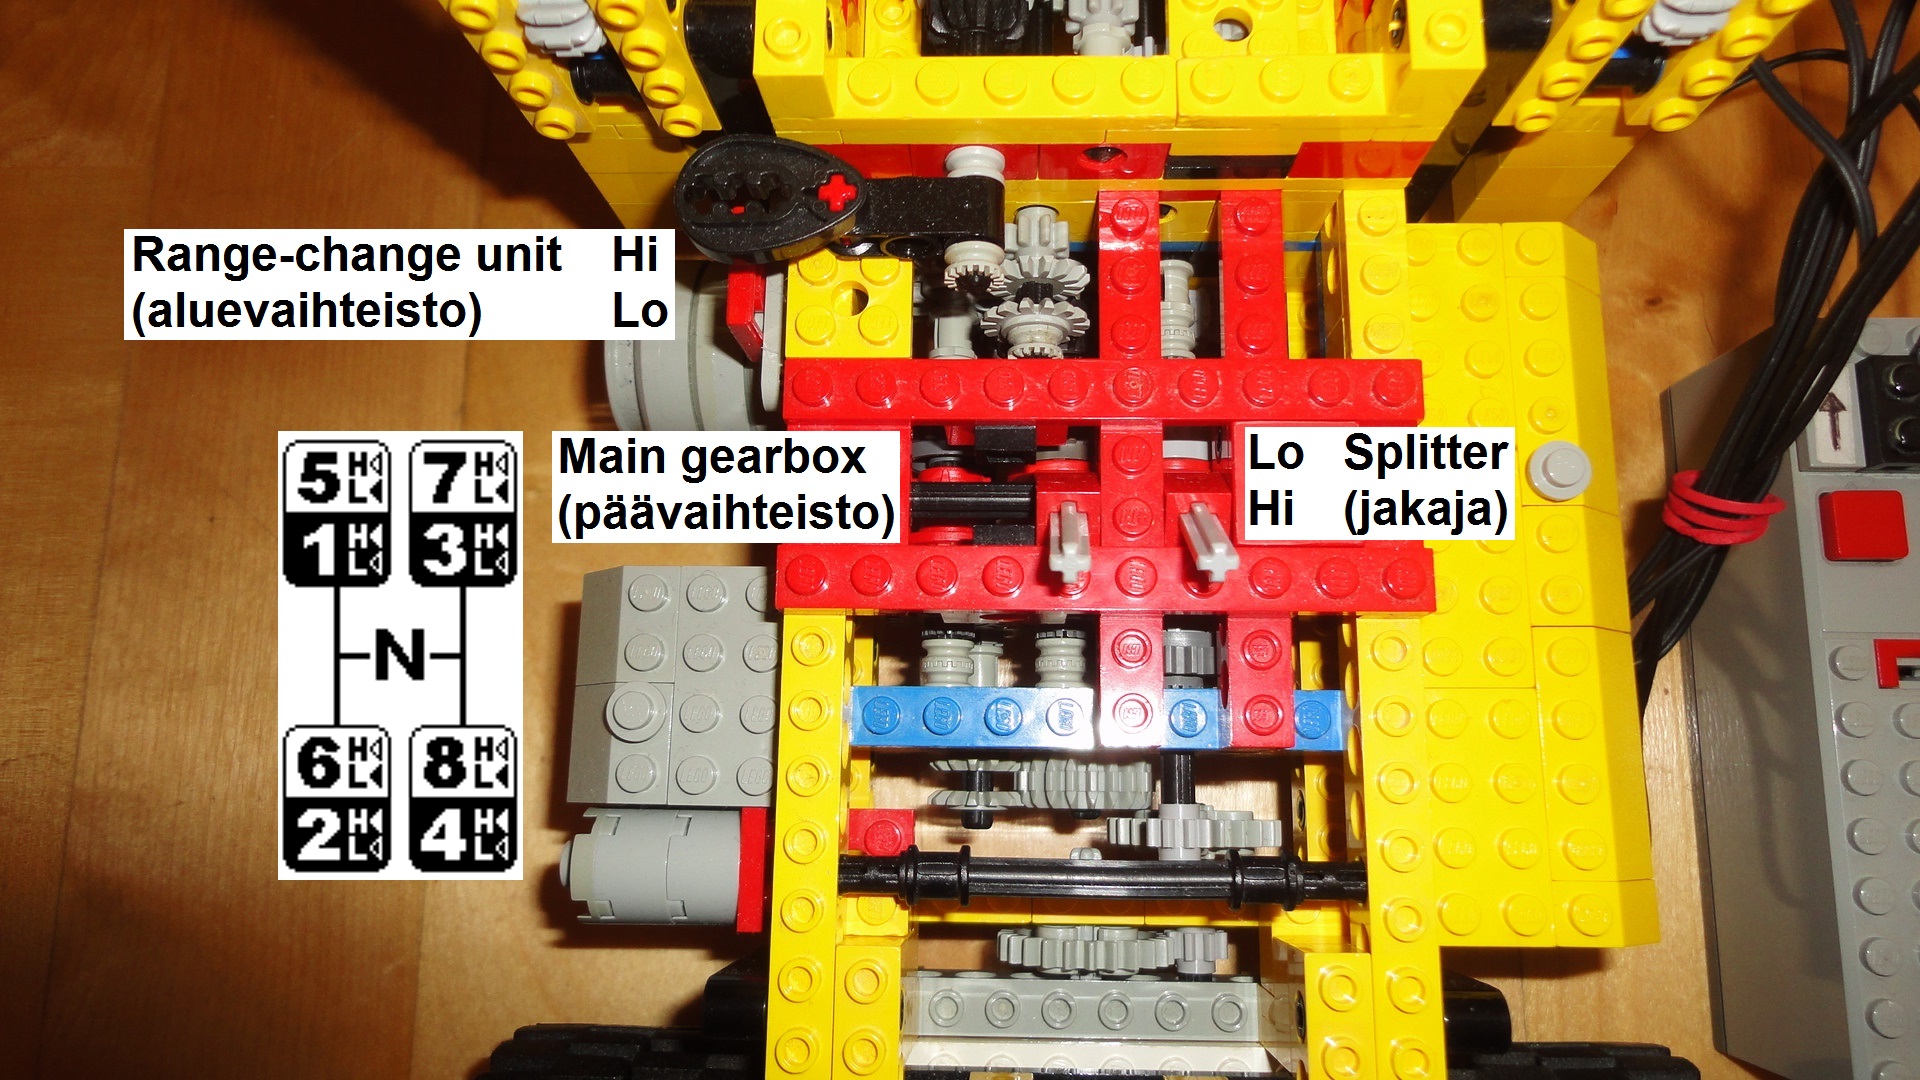
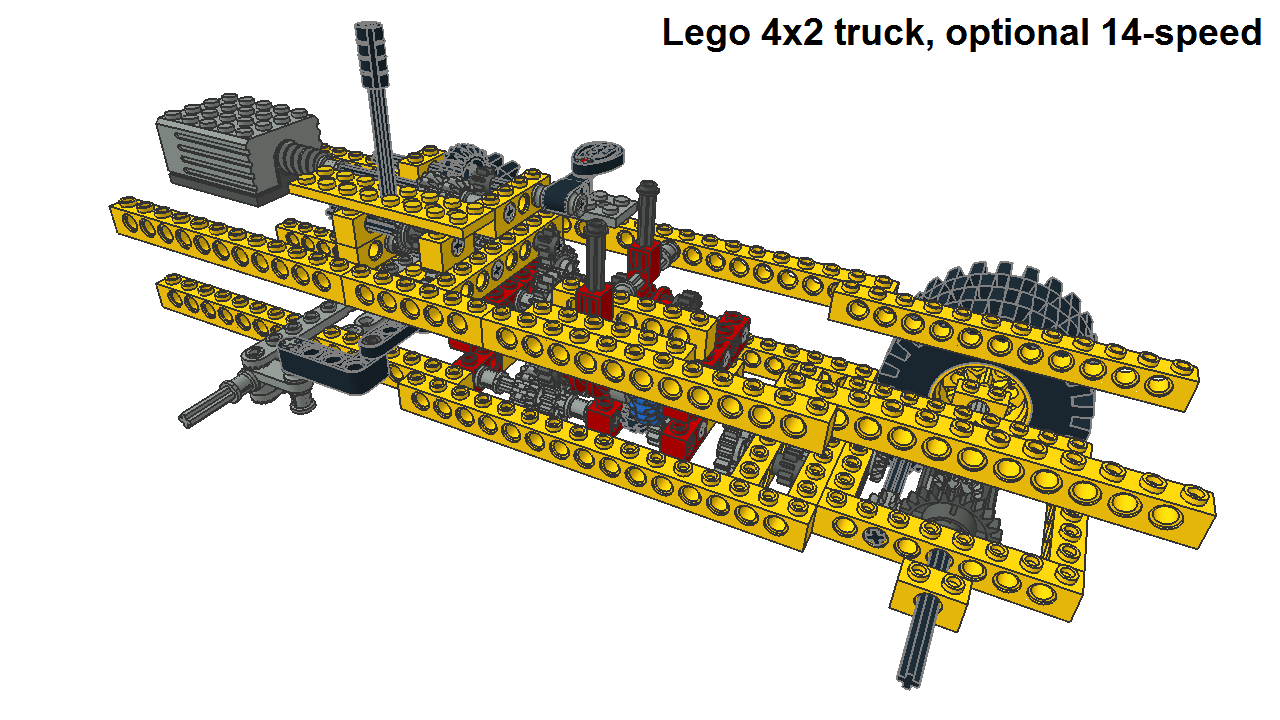
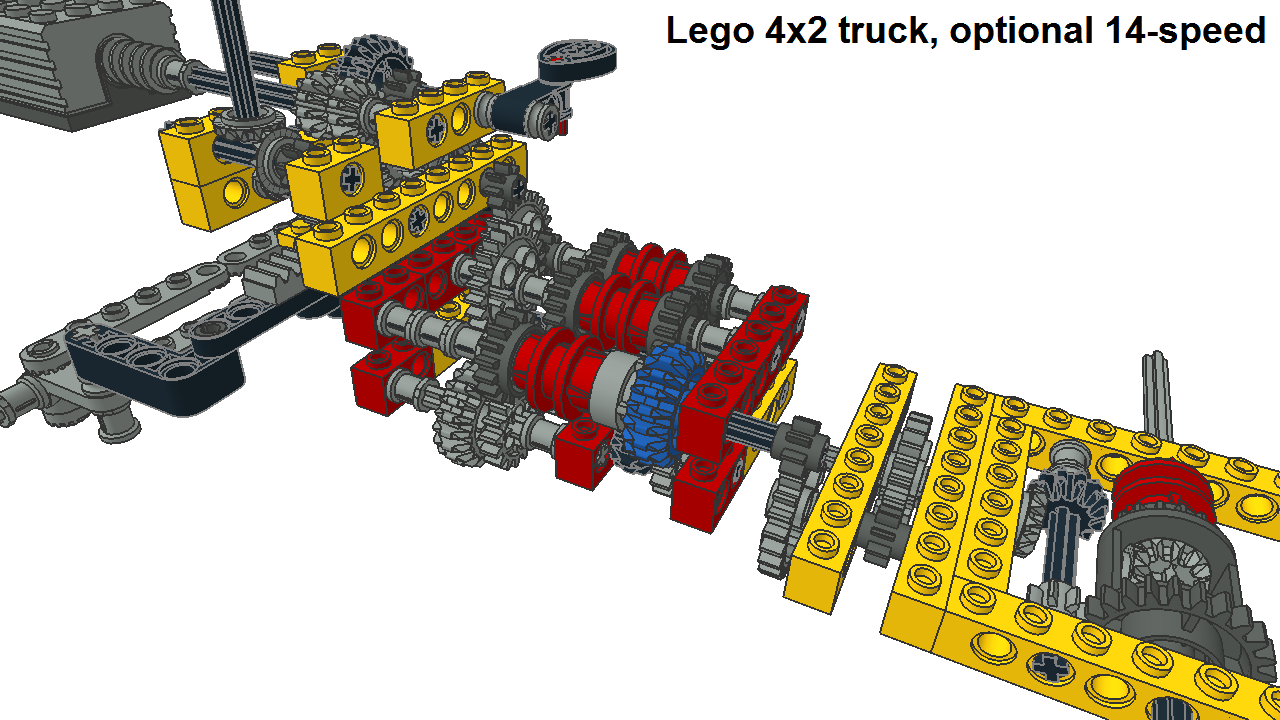
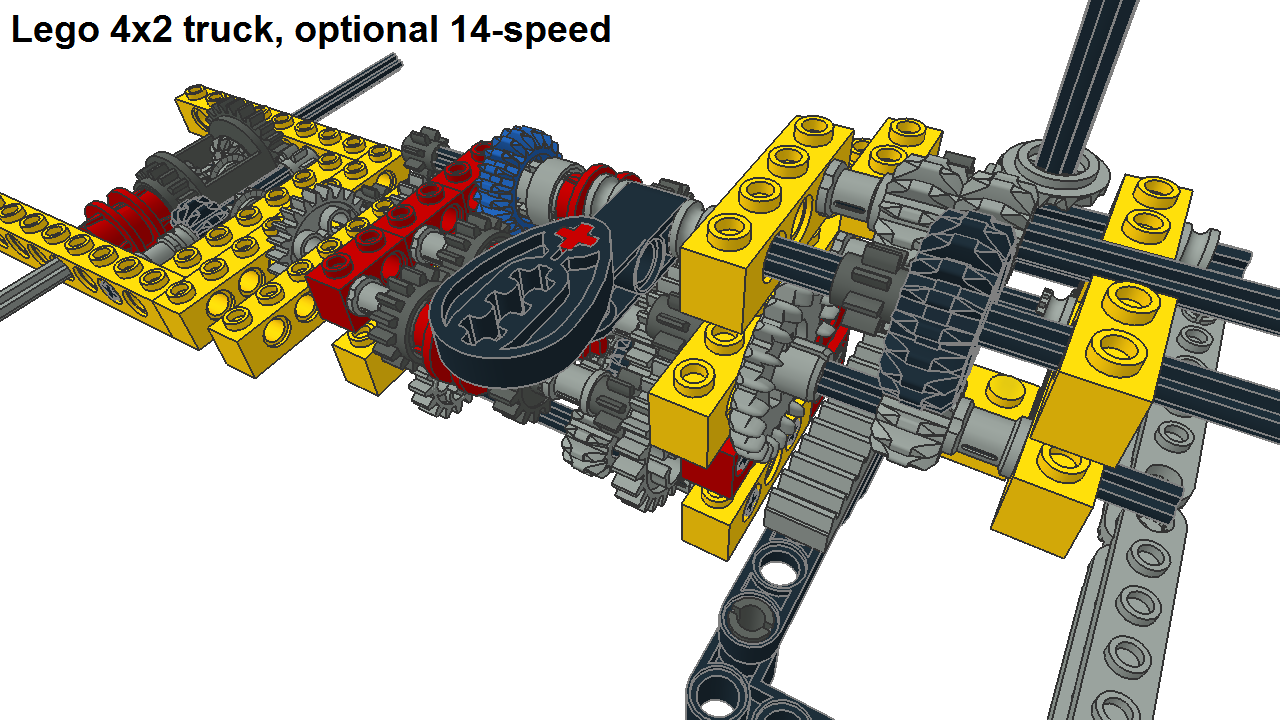
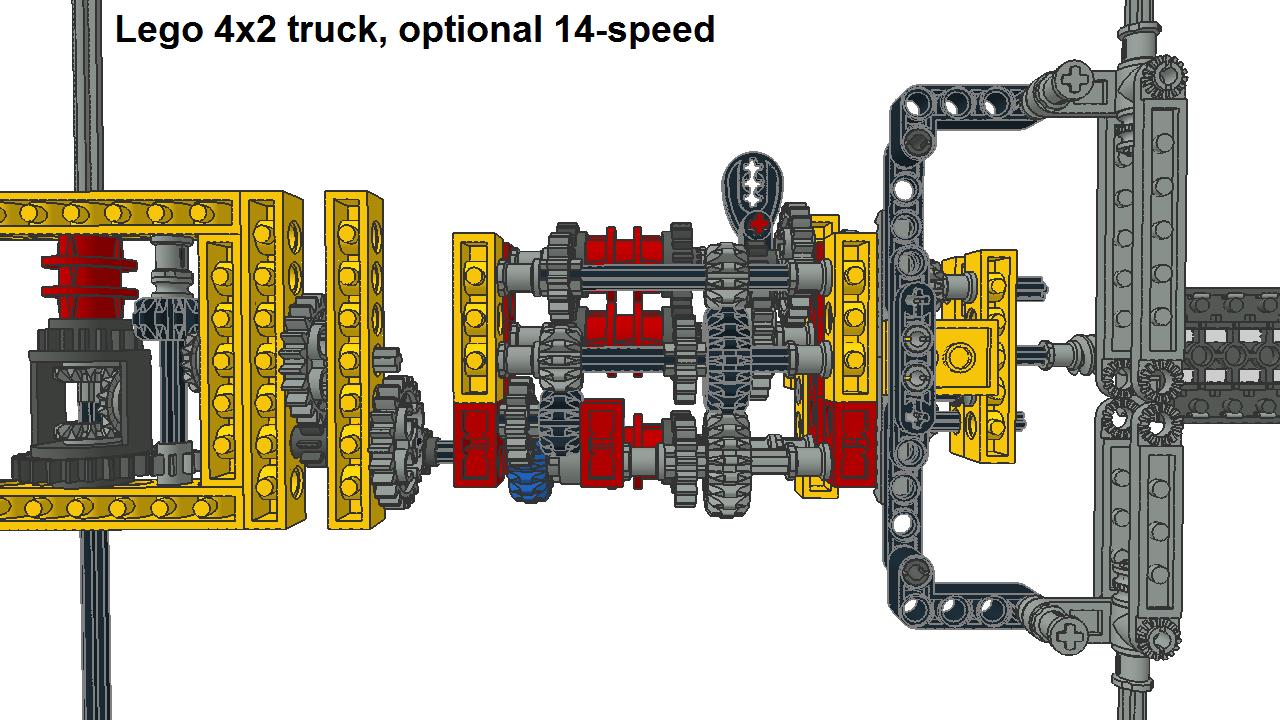
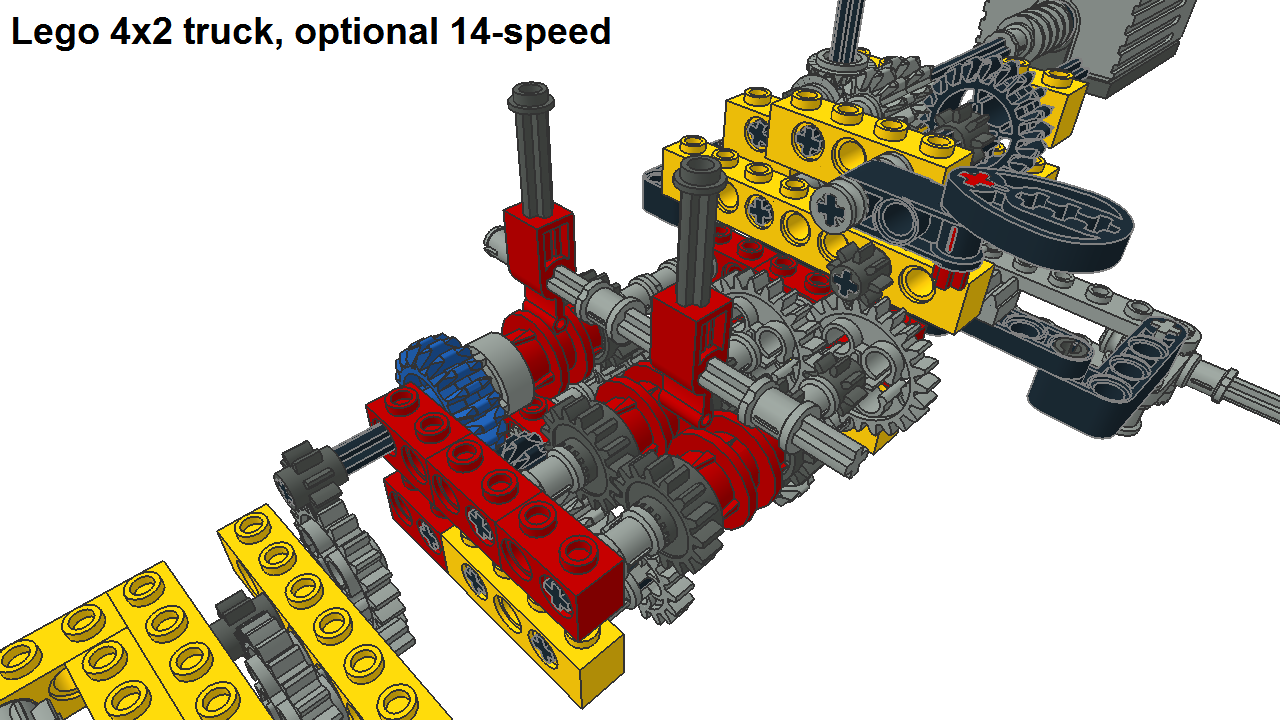
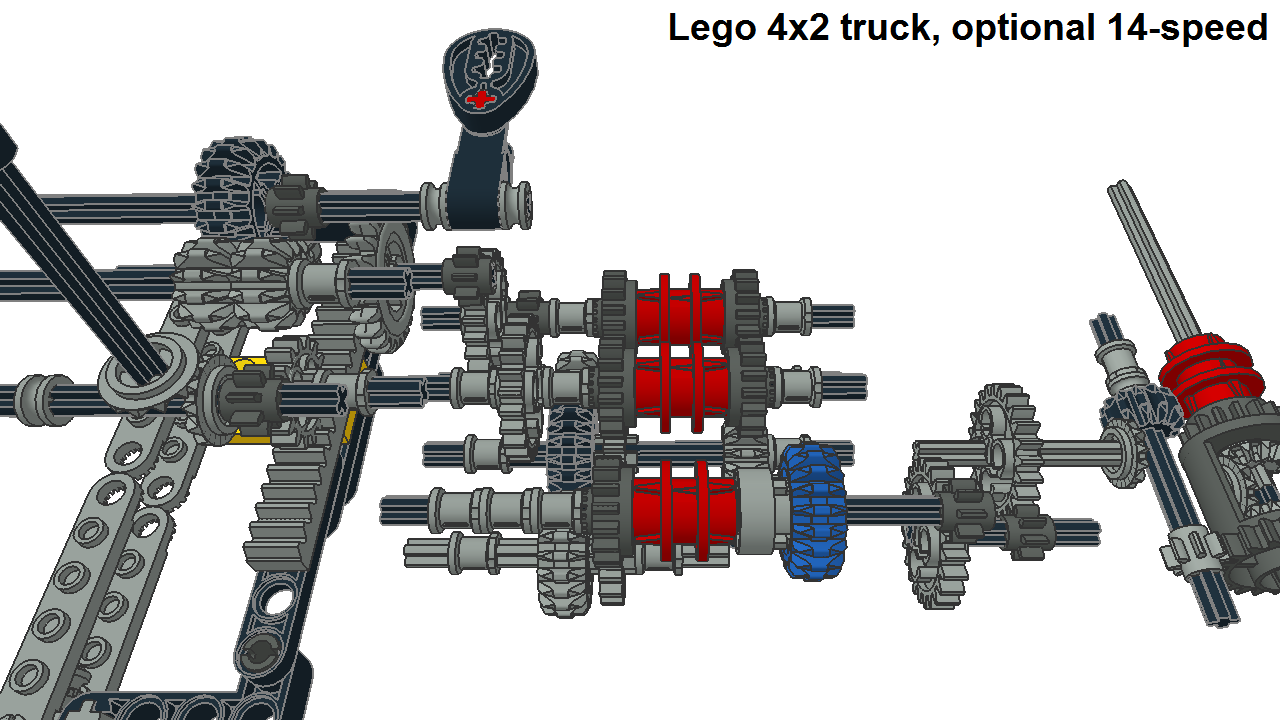
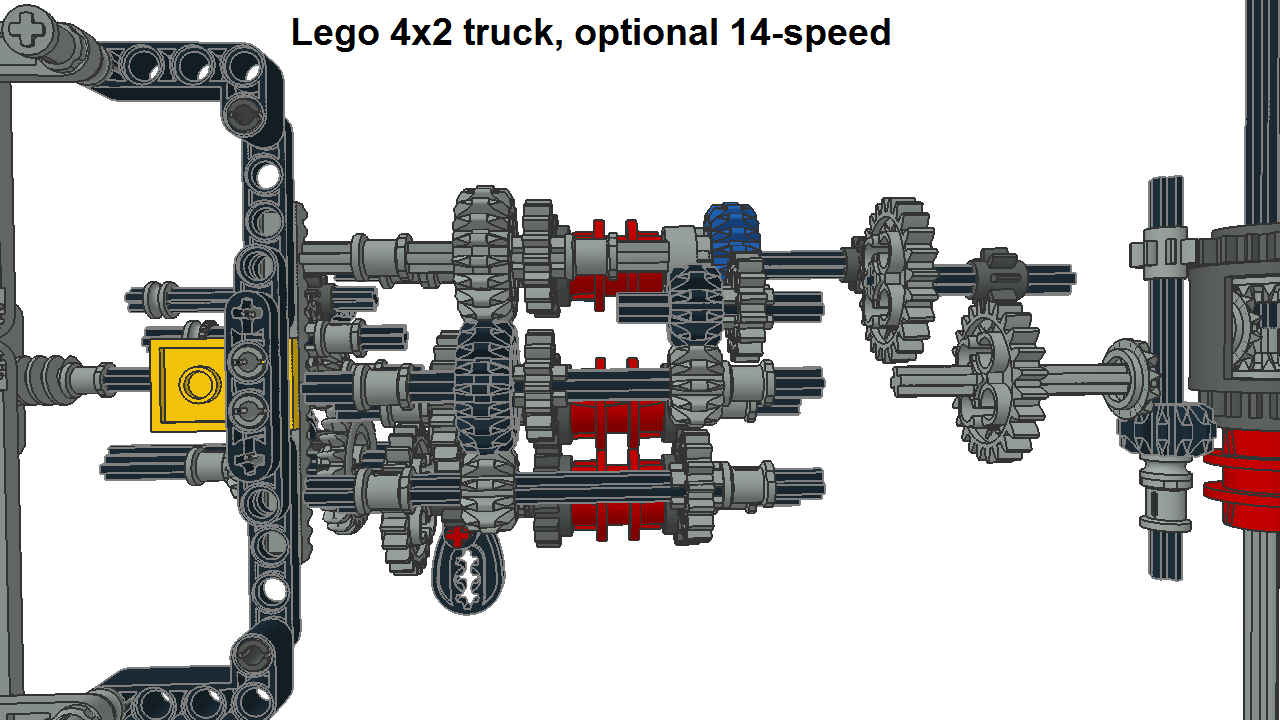
A.2. Version 5, 14-speed transmission:
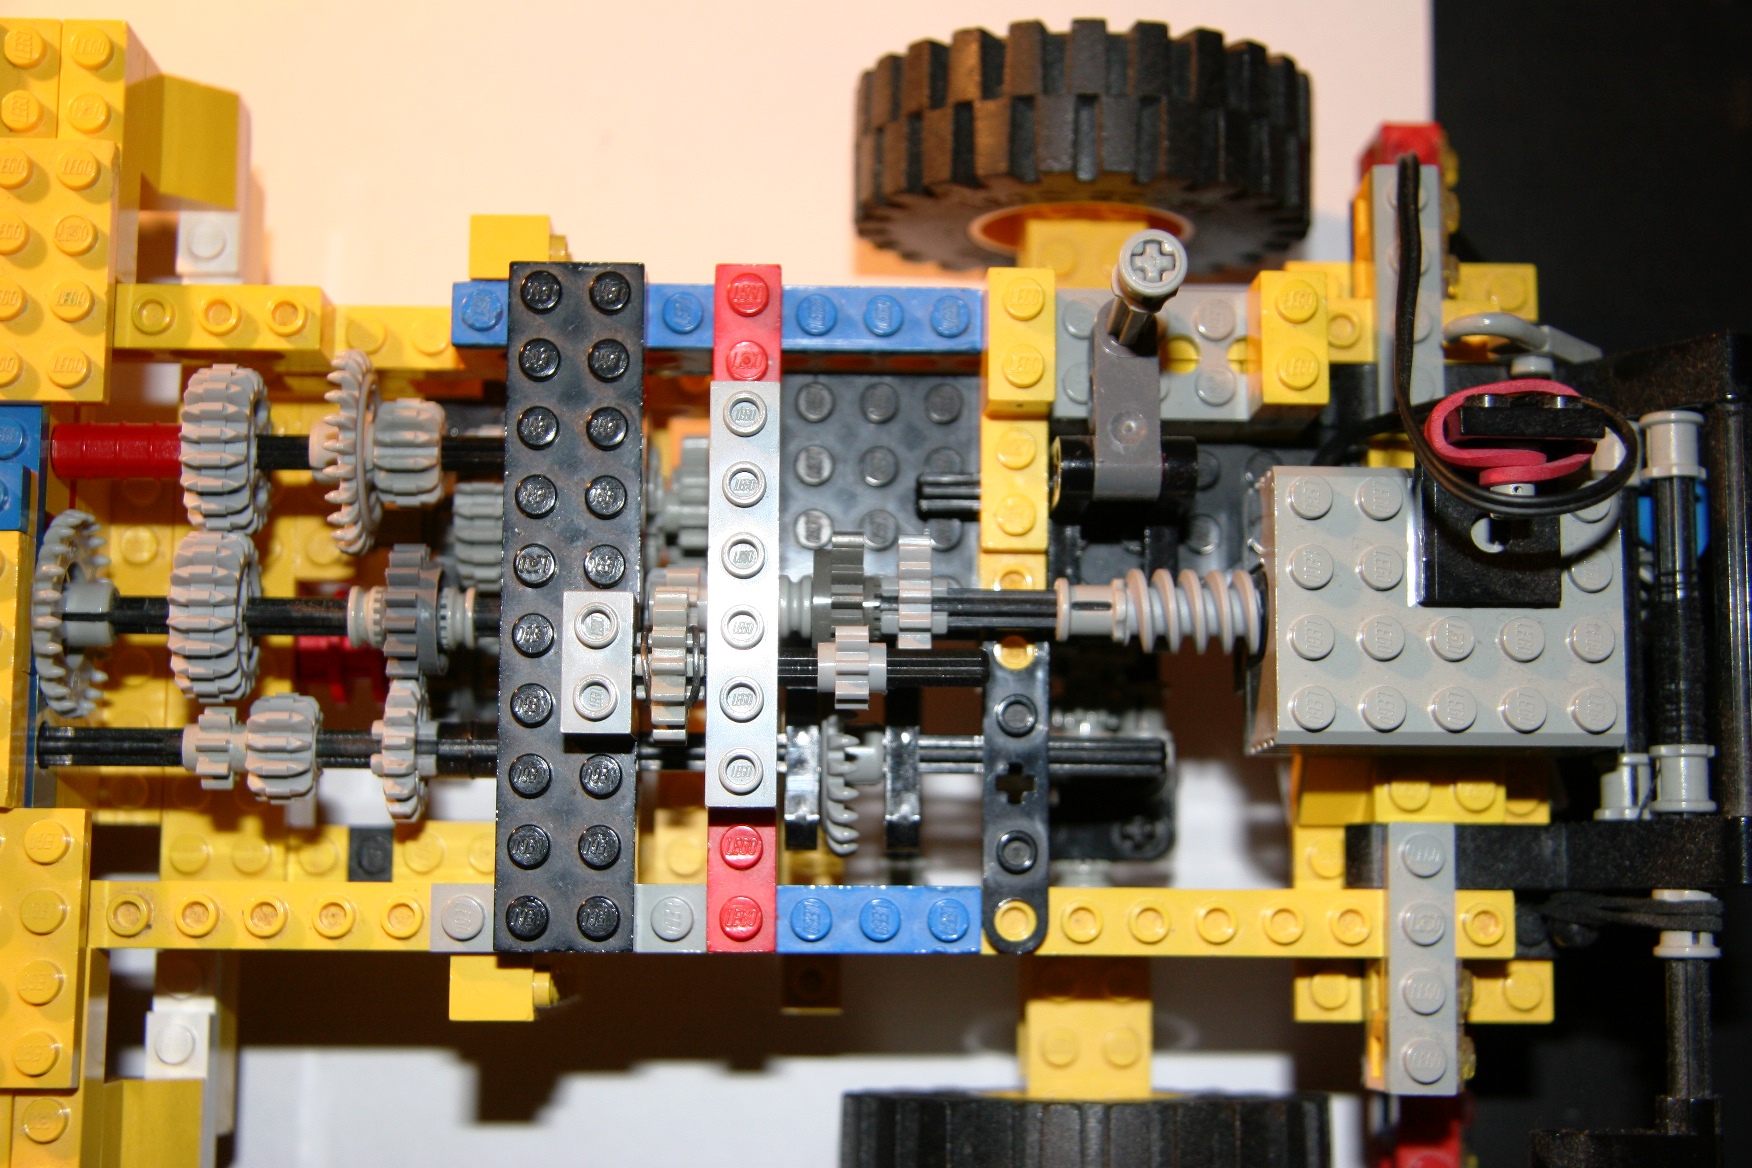
So old stuff that it’s dusty. No, year was 200x and I was about 30 years old. :-) This is my very first usable over 10-speed lego transmission that I’ve ever built. It’s a 14-speed transmission with 3 separate sliding axle gearboxes. 4-speed main gearbox and 2-speed splitter are taken from version 3 (8-speed) and main gearbox’s slowest gear is changed to crawler gear (C). New part is 2-speed range-change unit so overall gear ratio is large enough. Crawler gear is used in low range only so gears are: CL-CH-1L-1H-2L-2H-3L-3H-4L-4H-5L-5H-6L-6H. There is one cheating part in this transmission: 24 teeth crown gear can slide on the axle. It reduces number of axles while range-change unit’s sliding gear is on main gearbox’s sliding axle.
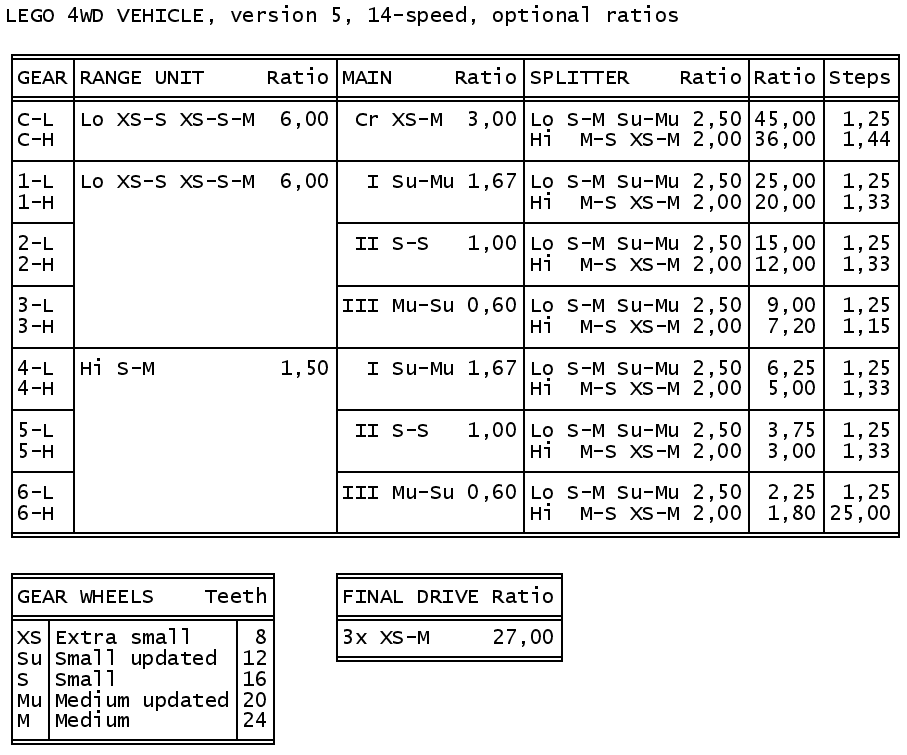
Gear steps are not very good in this transmission but you can do quite easy modification in splitter: Forget current Lo’s gear pairs Mu-Mu XS-M and use Hi’s gear pairs S-M Su-Mu as new Lo. Then use gear pairs M-S XS-M as new Hi. You need to change axle joiner’s location on sliding axle by alternating axle lengths. Check picture Optional ratios for more info. A.3. Version 7, 13-speed transmission:
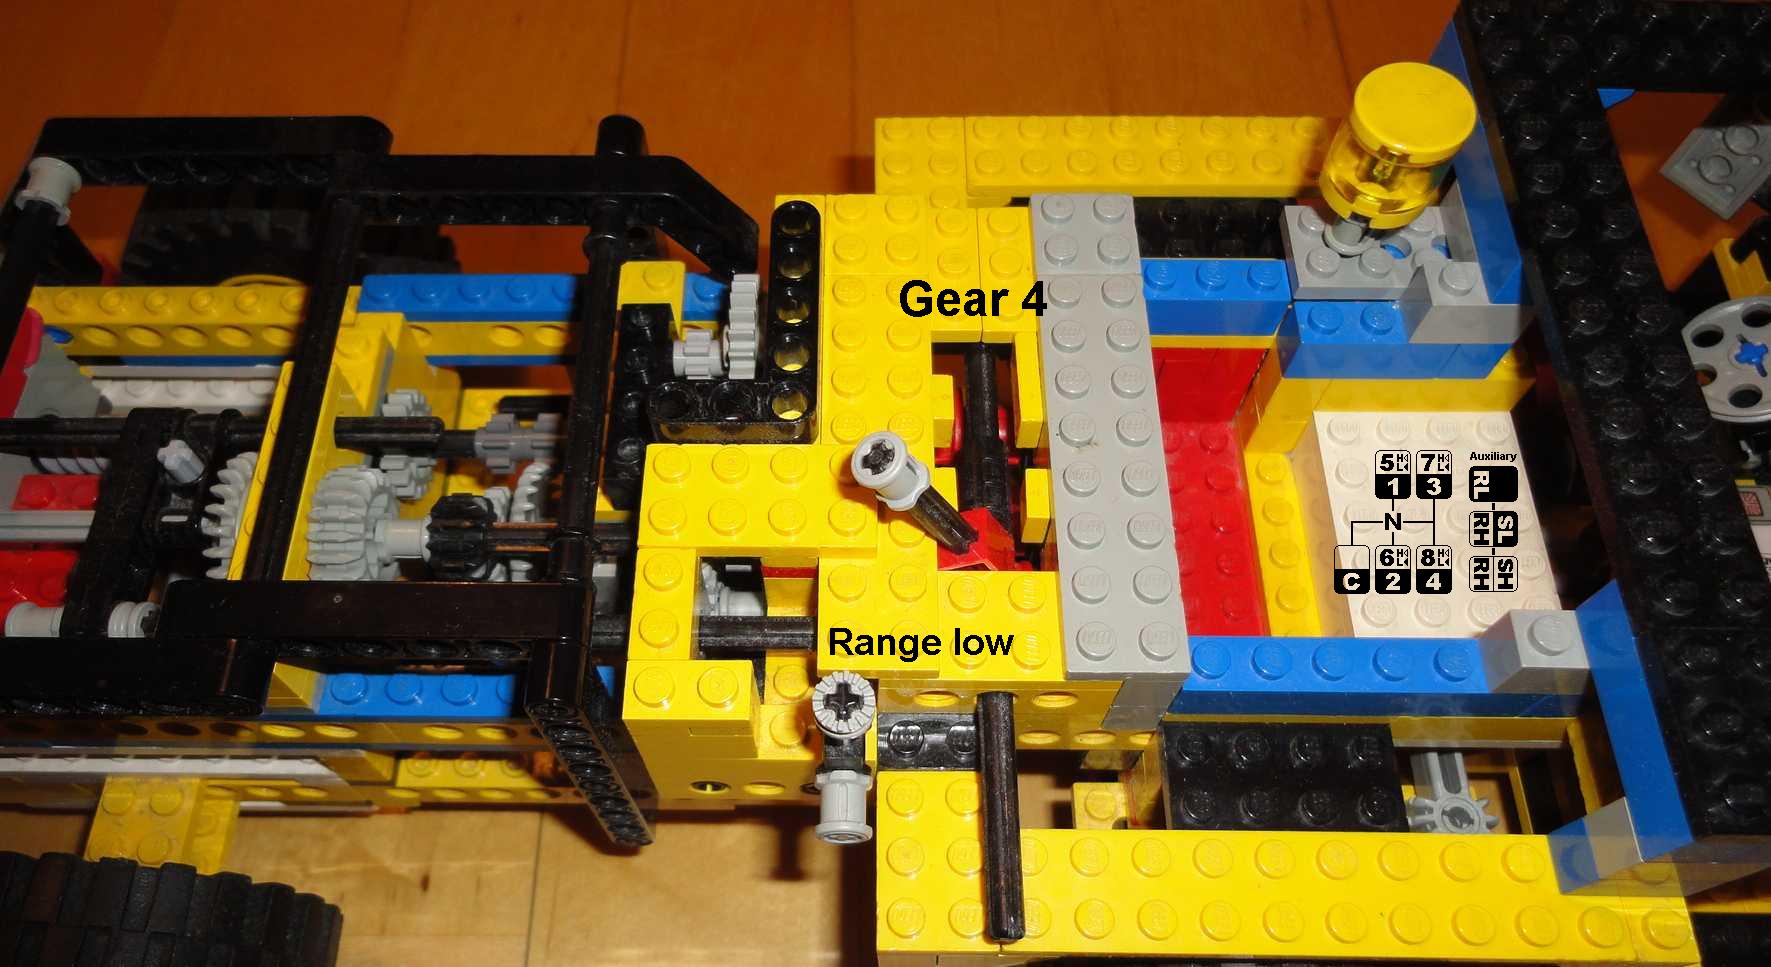
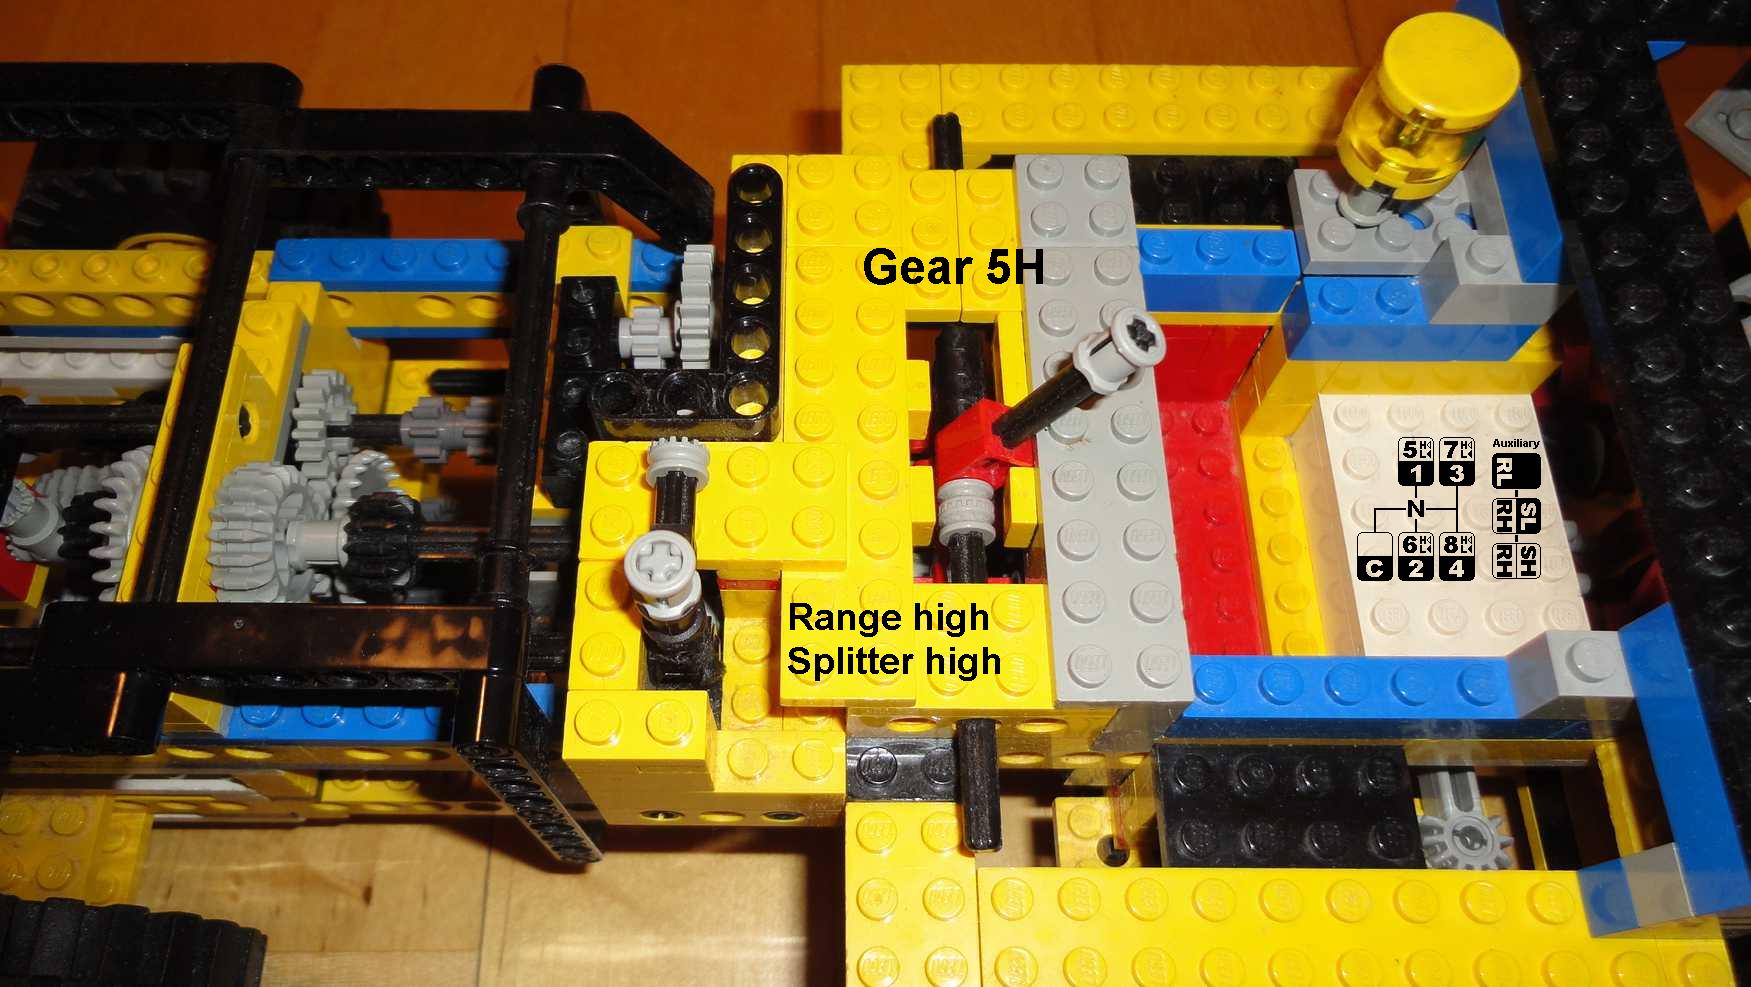
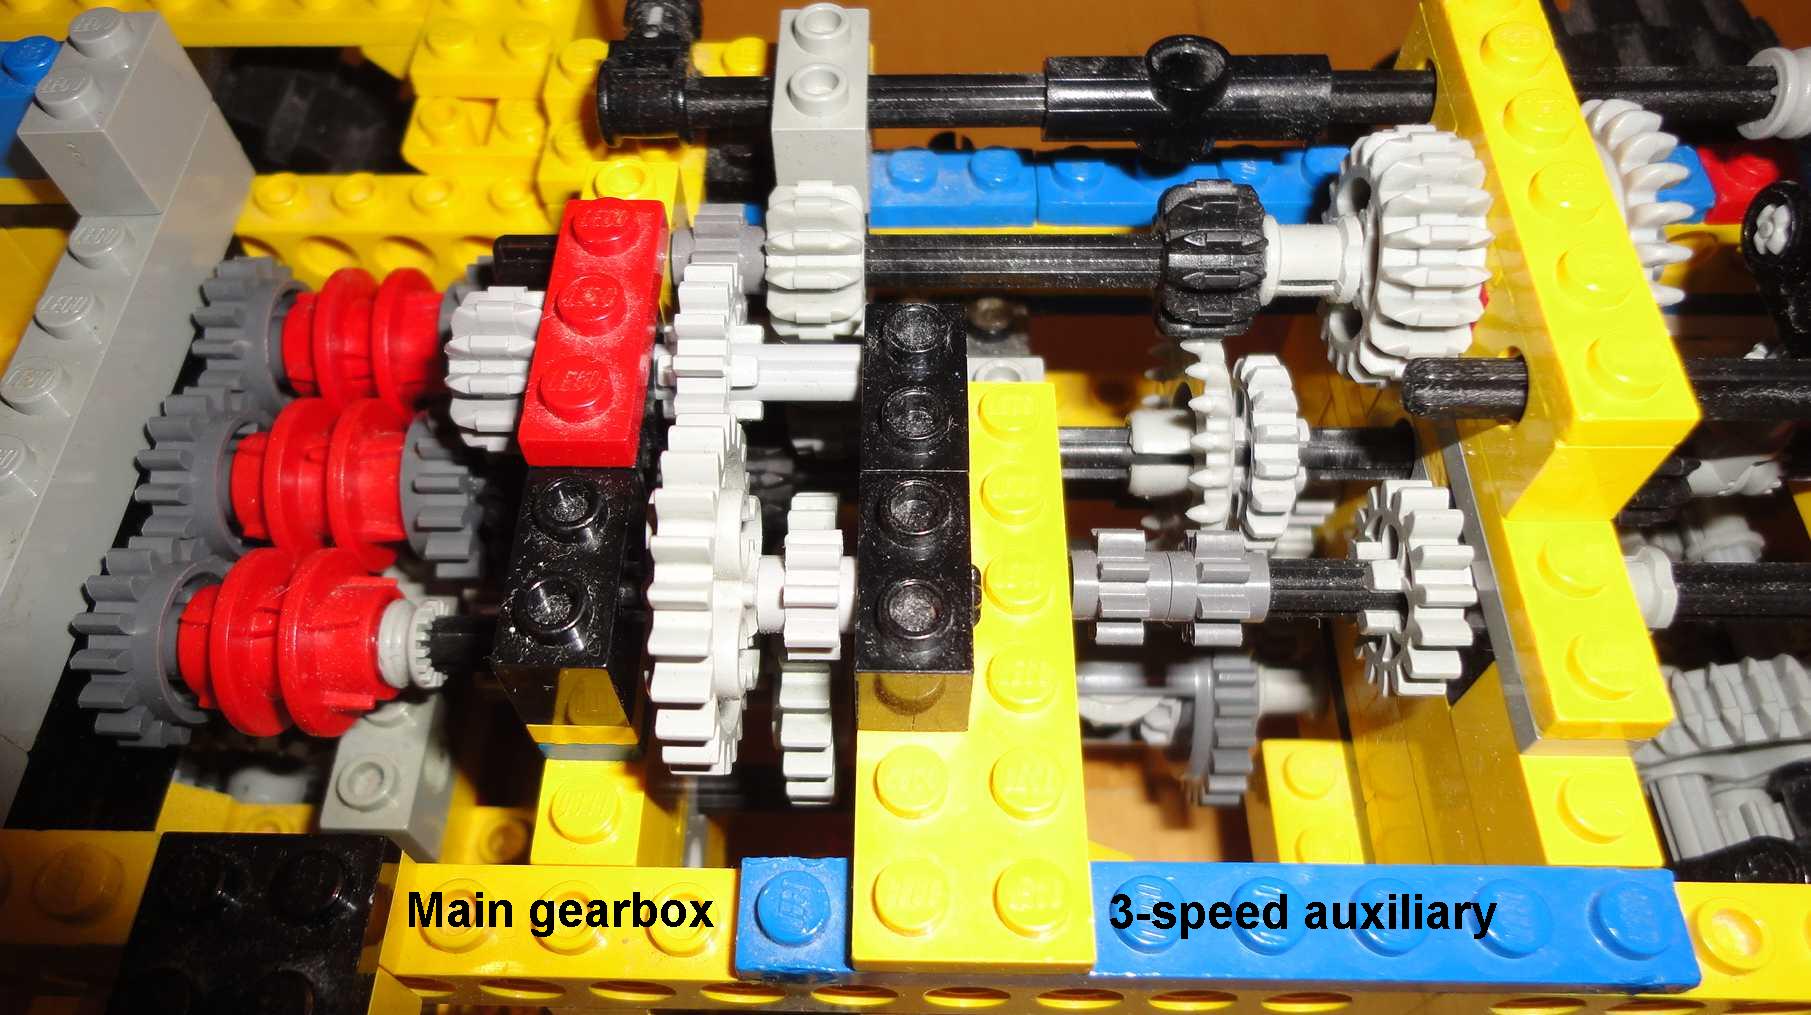
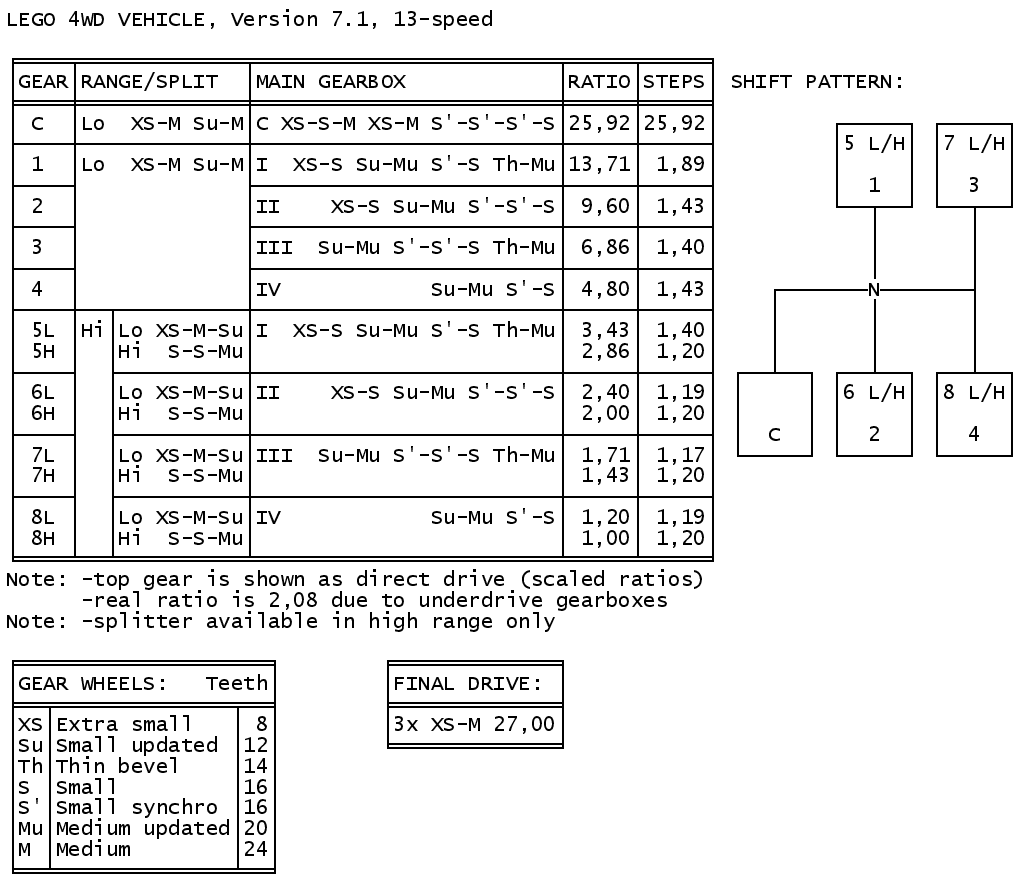
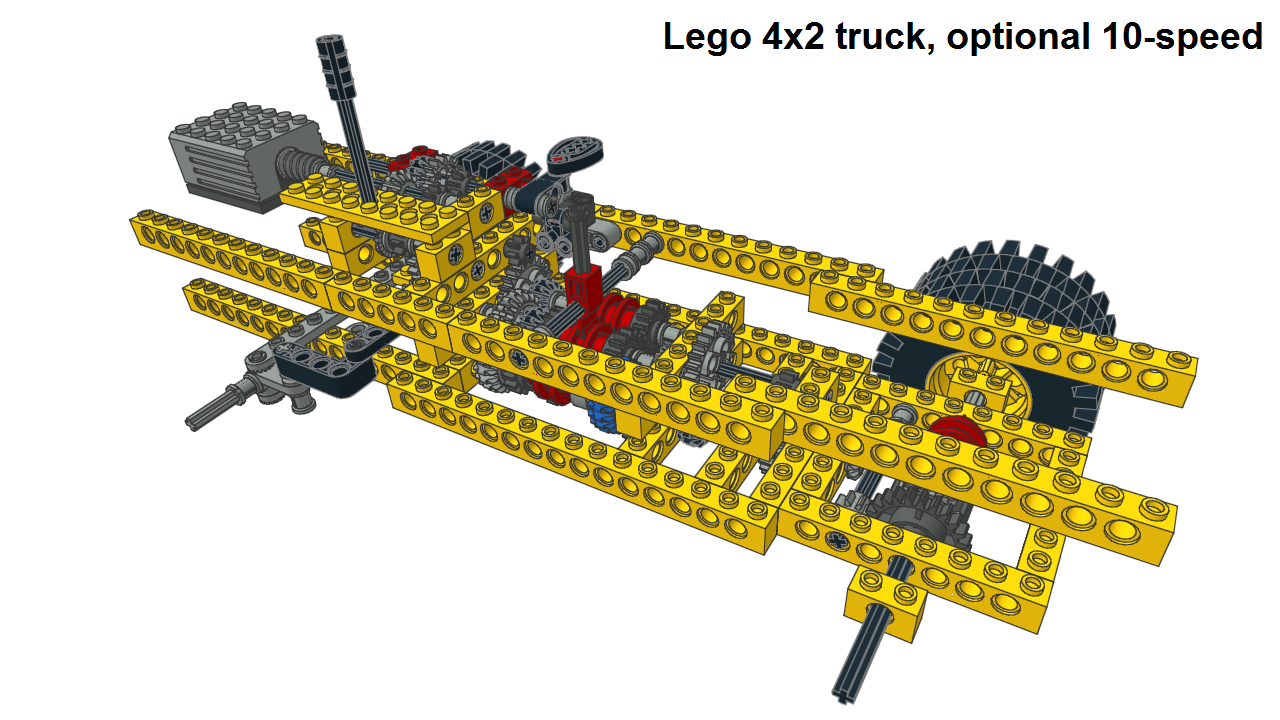
This version contains 13-speed transmission with 5-speed main gearbox (4+crawler) and 3-speed auxiliary gearbox (compound splitter/range-change unit). Splitter unit is available in high range only. This gives progressive-like gear steps while there is larger step between crawler and 1st gear, basic steps in low range gears 1-4 and halved gear steps in high range. So gears are: C-1-2-3-4-5L-5H-6L-6H-7L-7H-8L-8H.
Actually I should call this Lego 4WD vehicle ver 7.1 because I have modified crawler gear before I took the pictures. Now crawler gear is faster so the gear step between crawler and first gear is not so huge any more. More info about this 13-speed transmission before crawler ratio change is in chapter C.1. 13-speed transmission, my first version on main page. A.4. Version 8, 5x4 twin stick transmission:
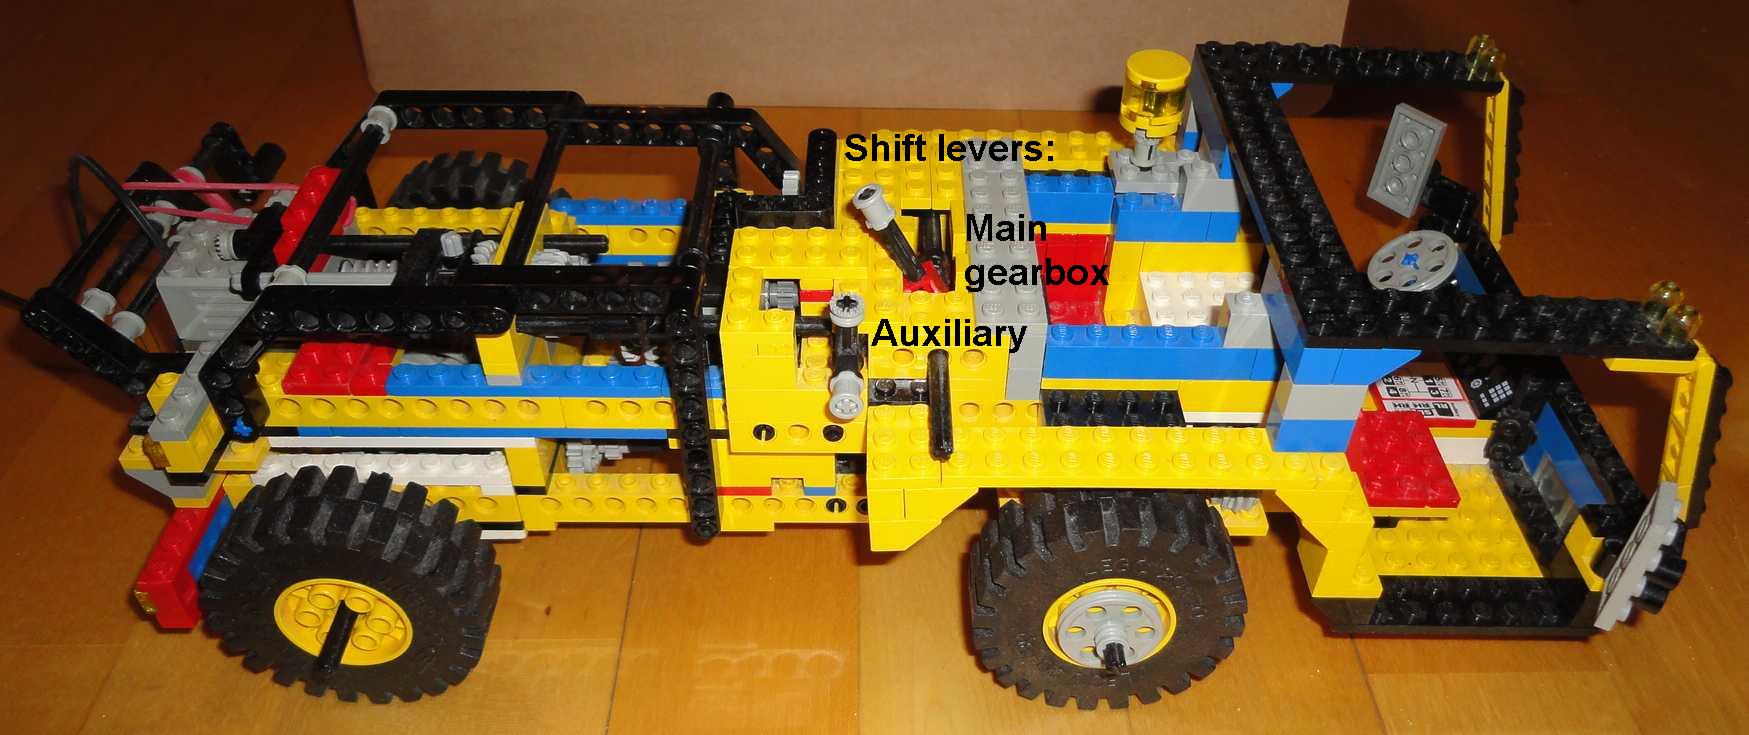
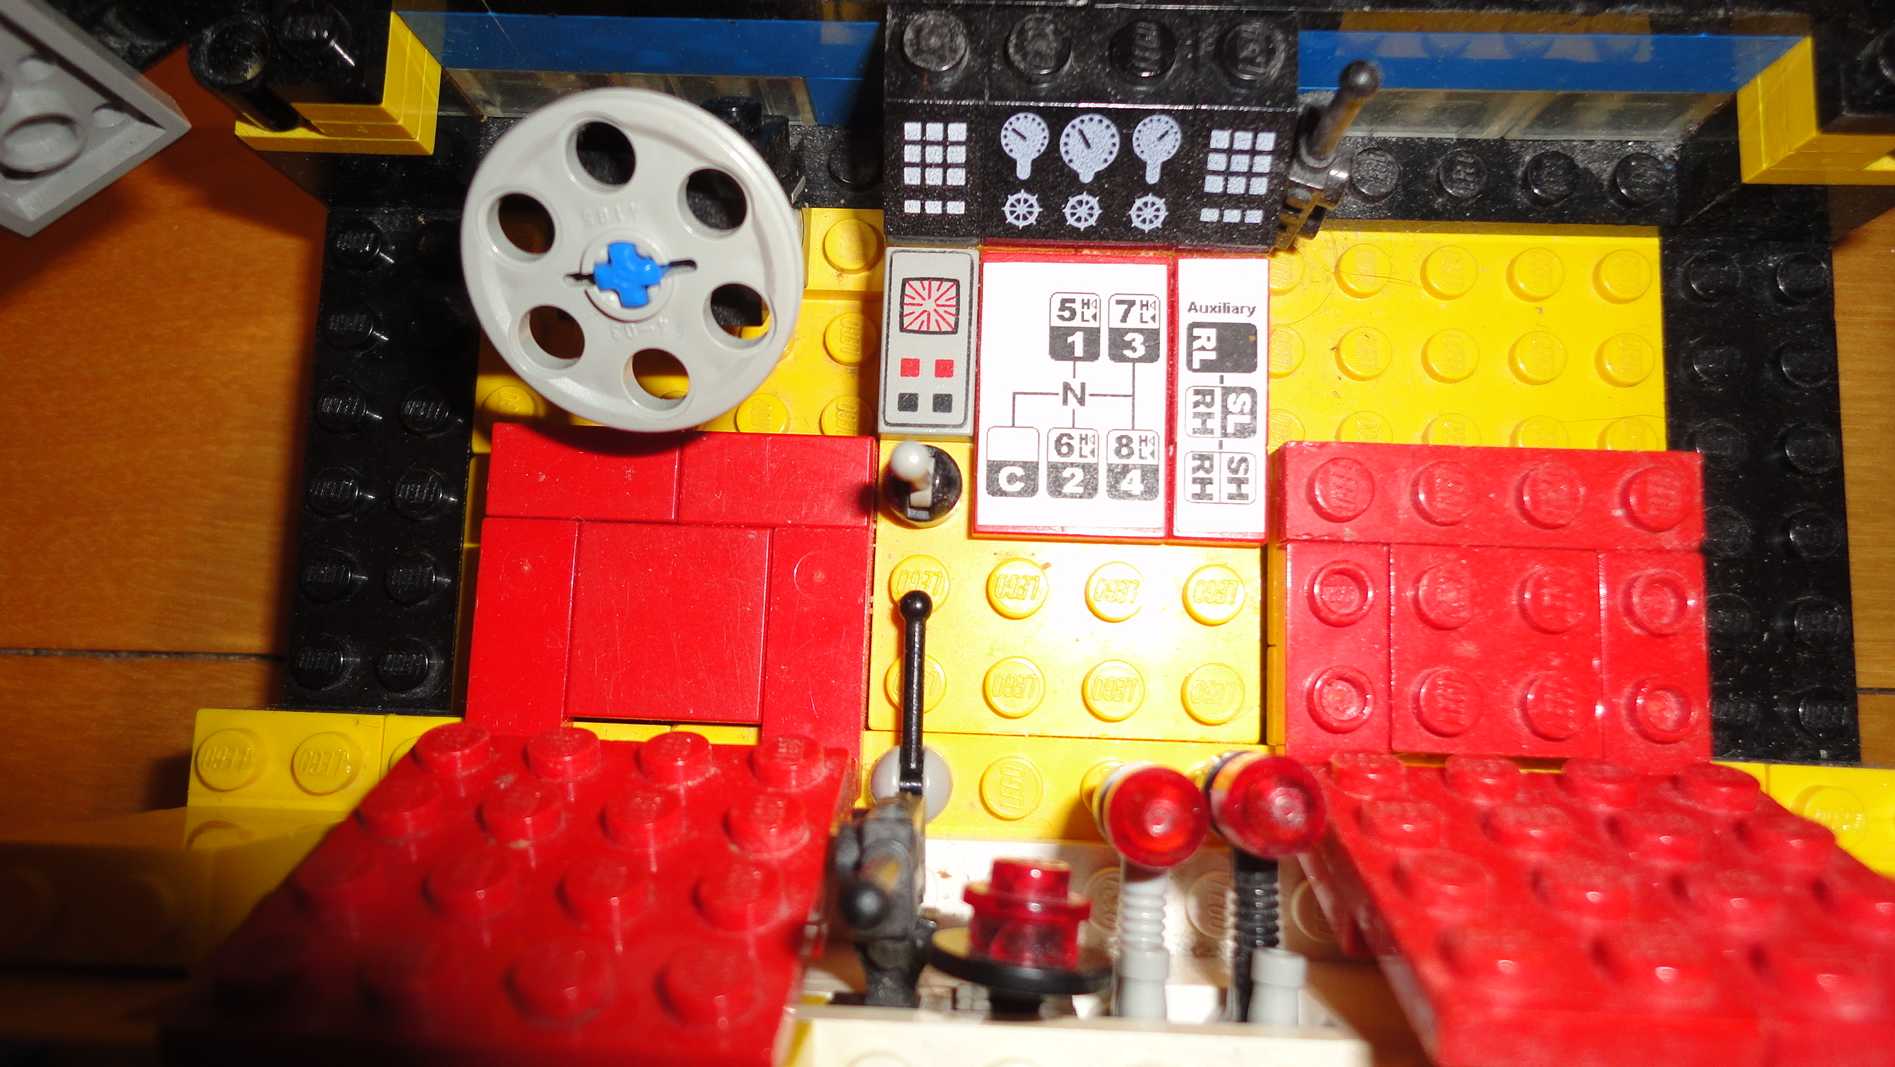
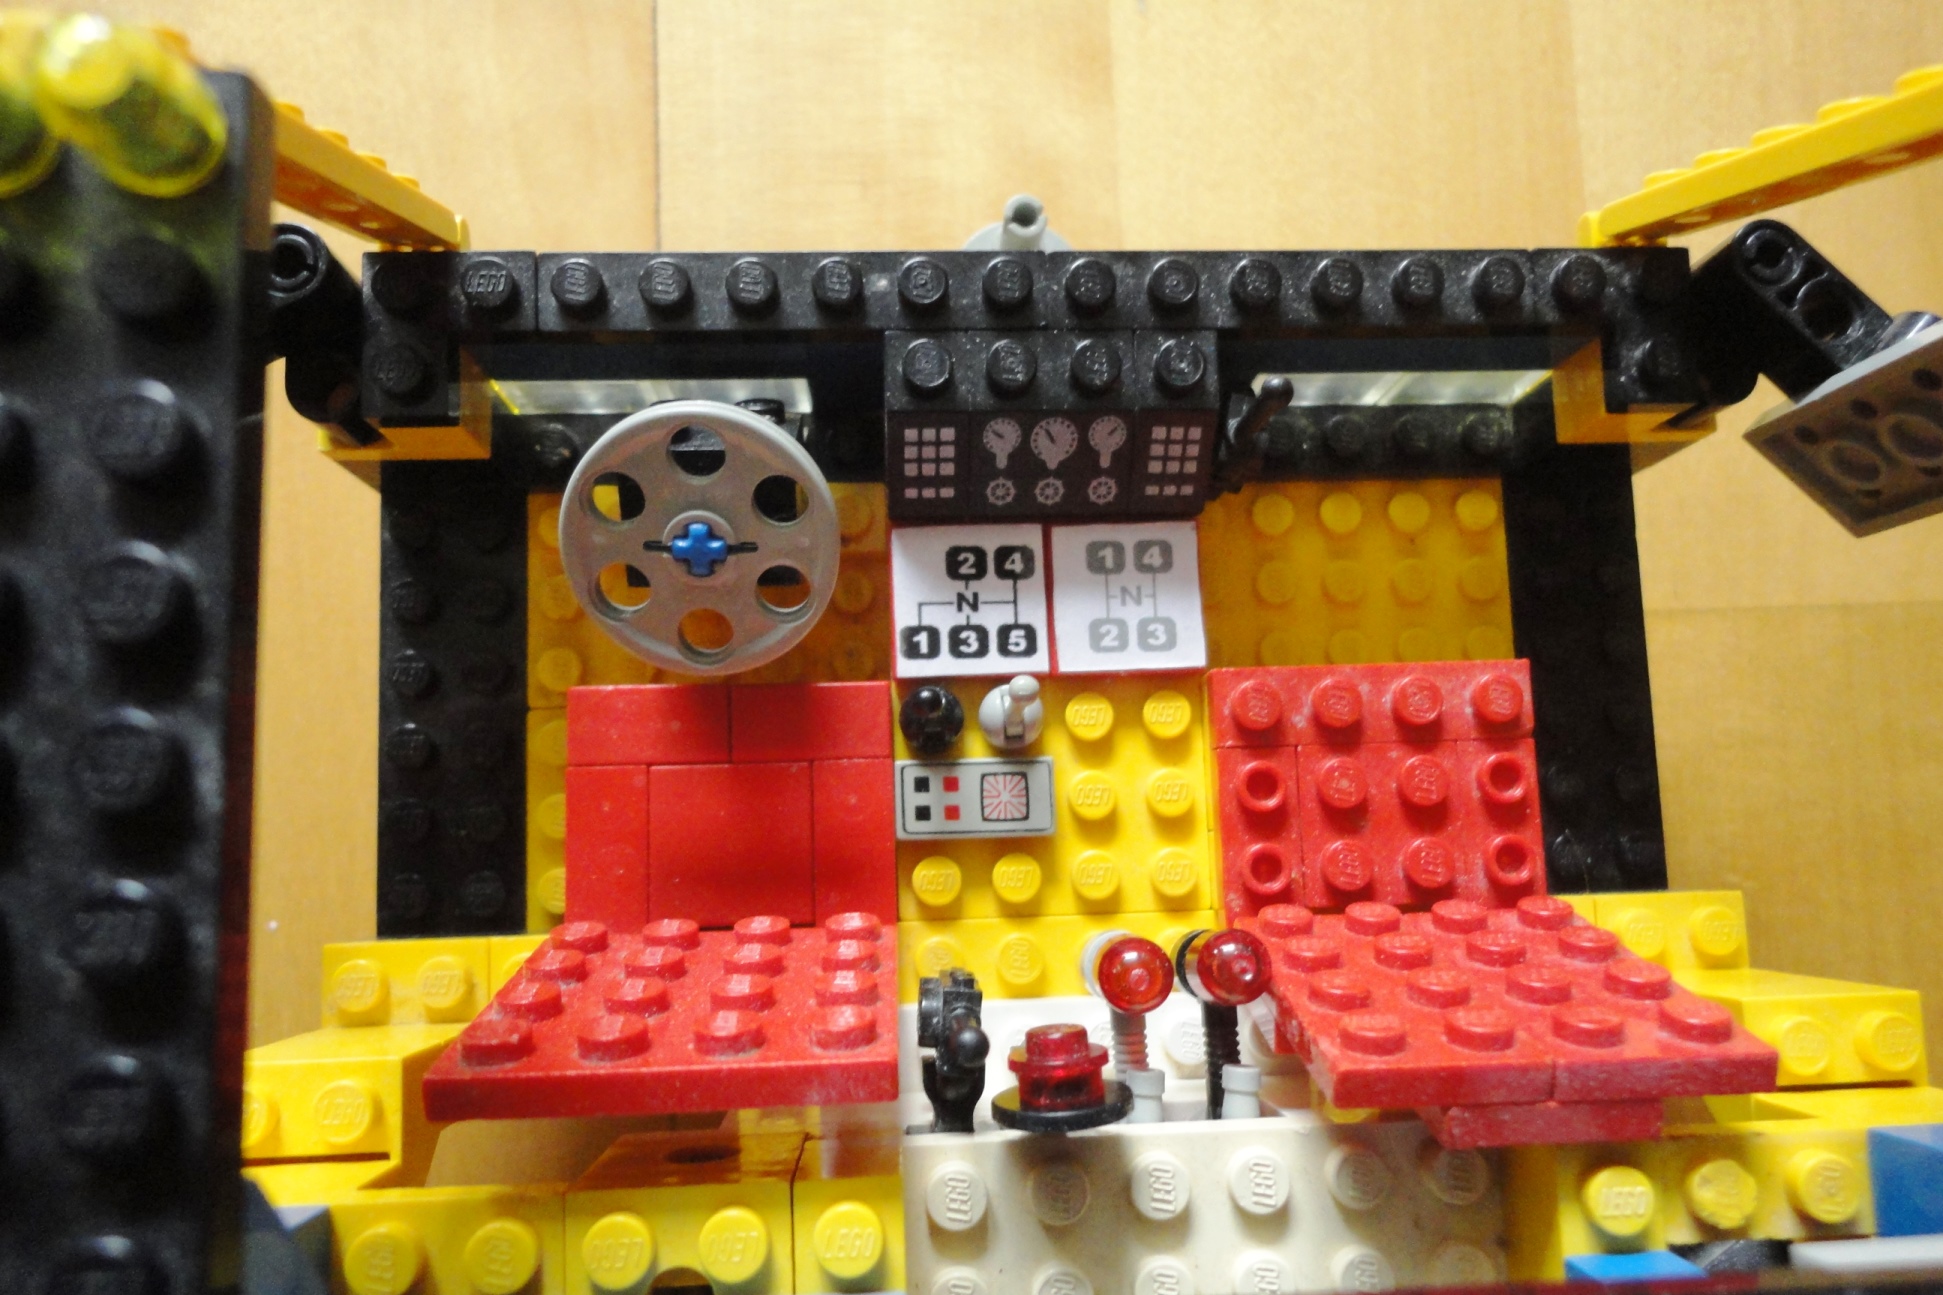
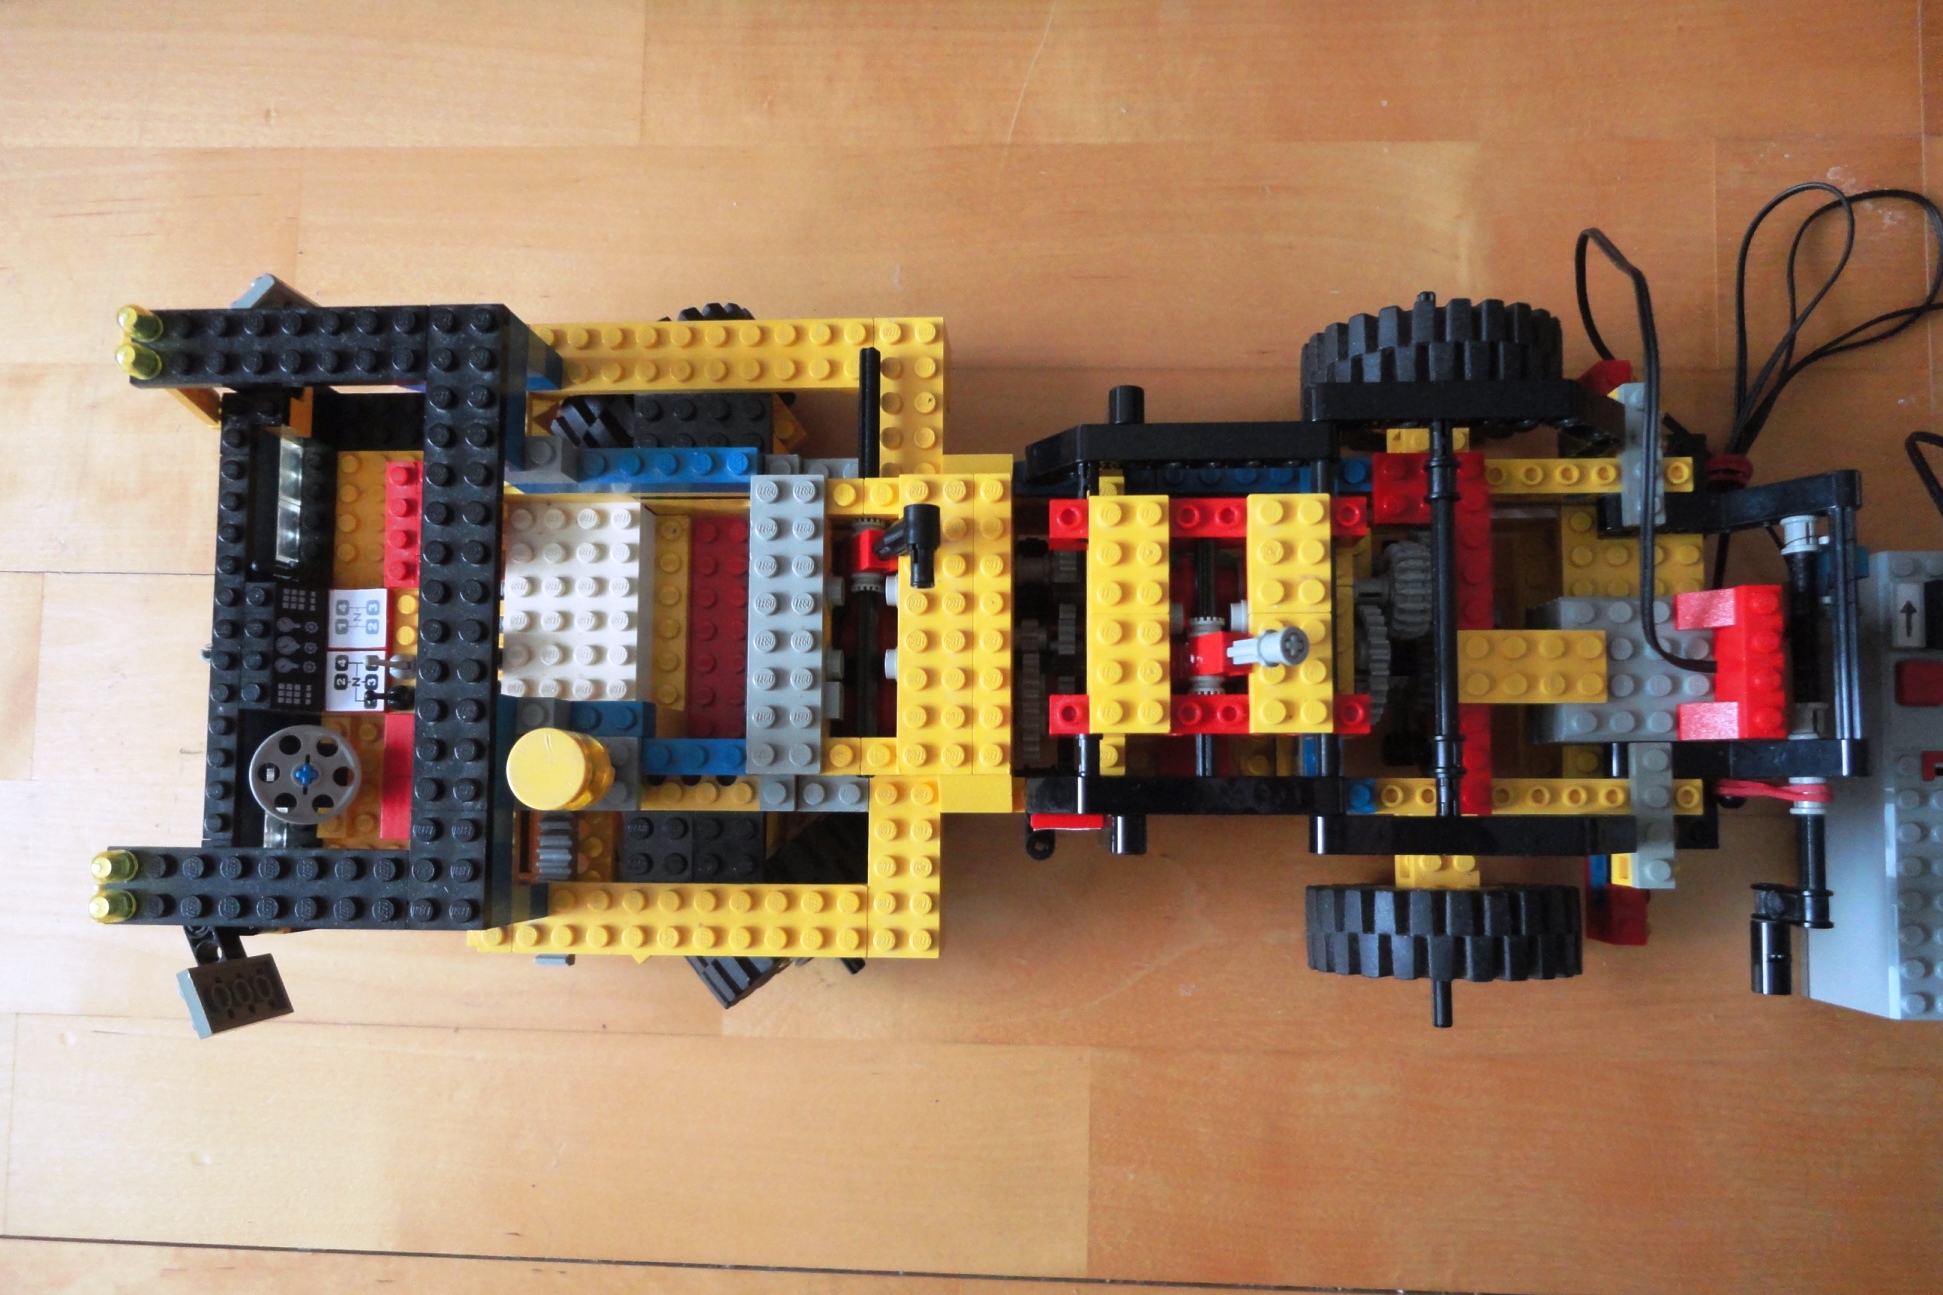
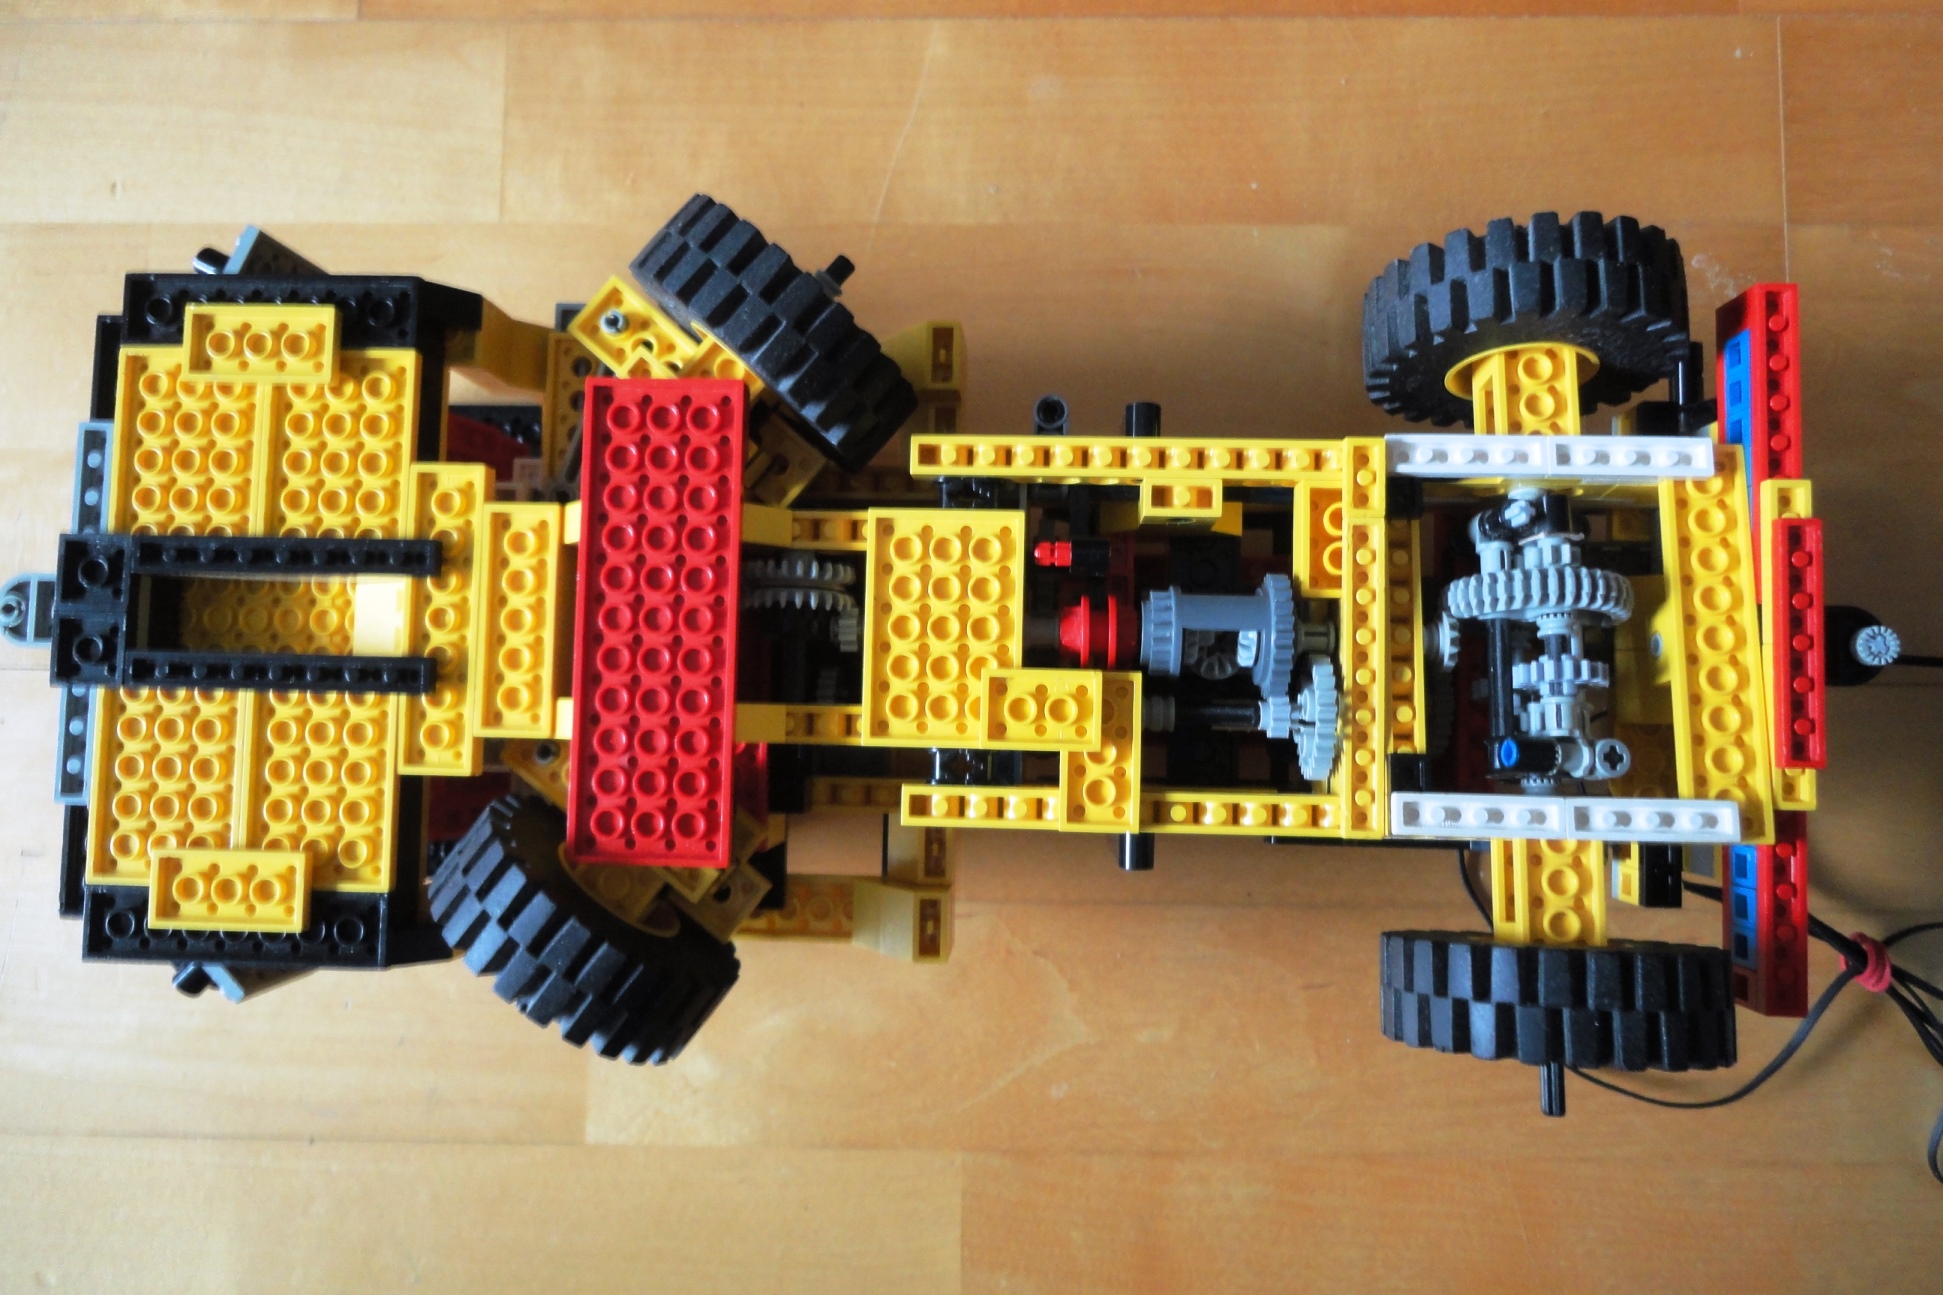
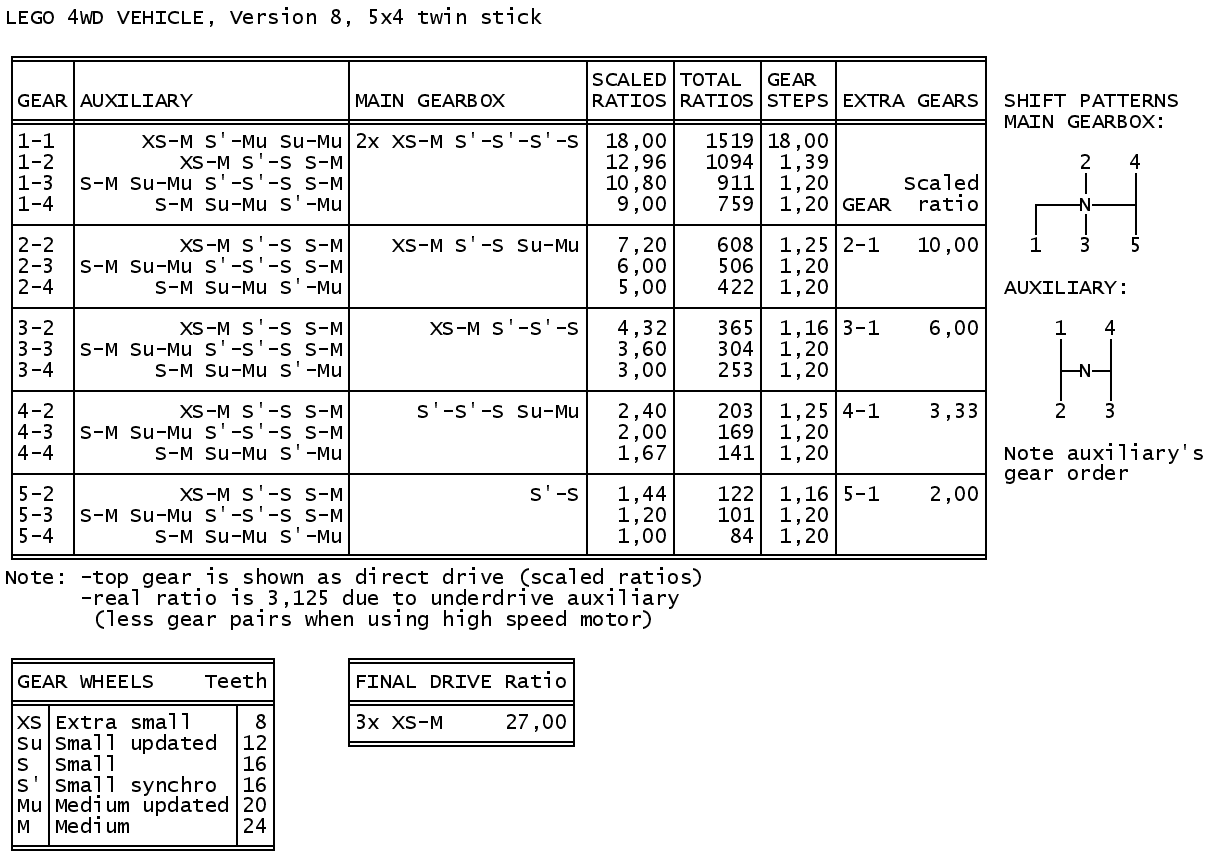
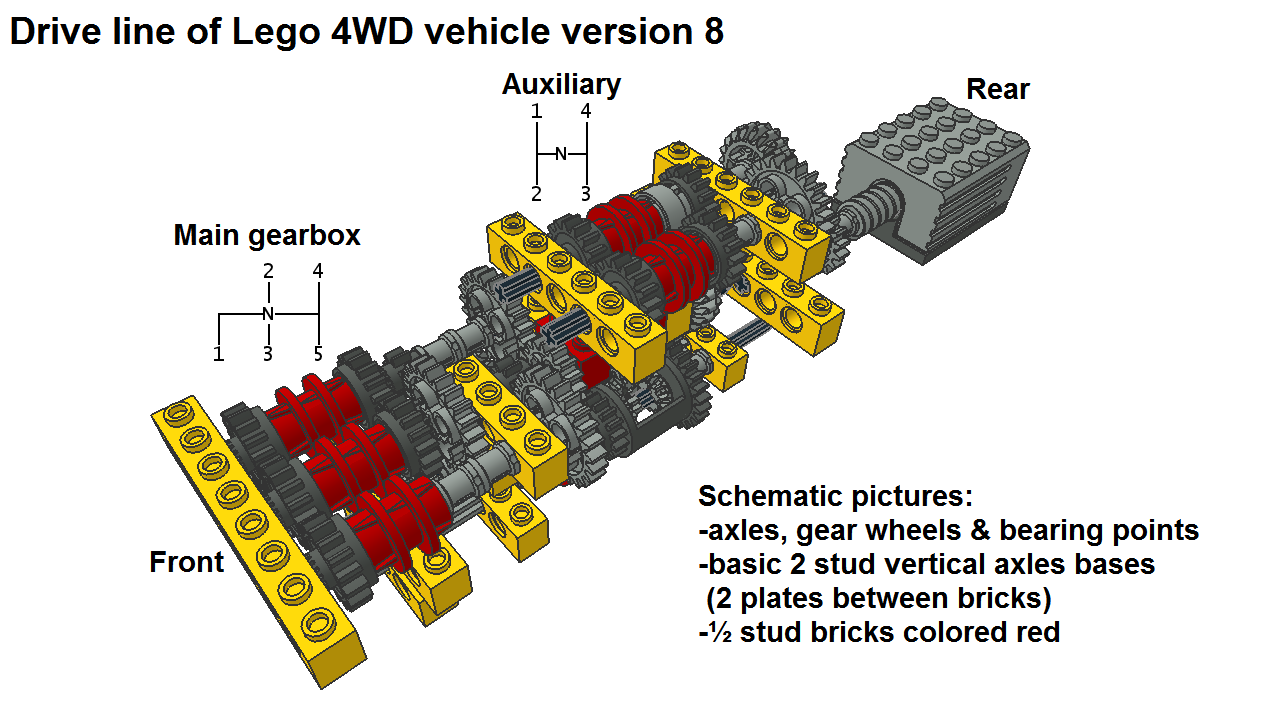
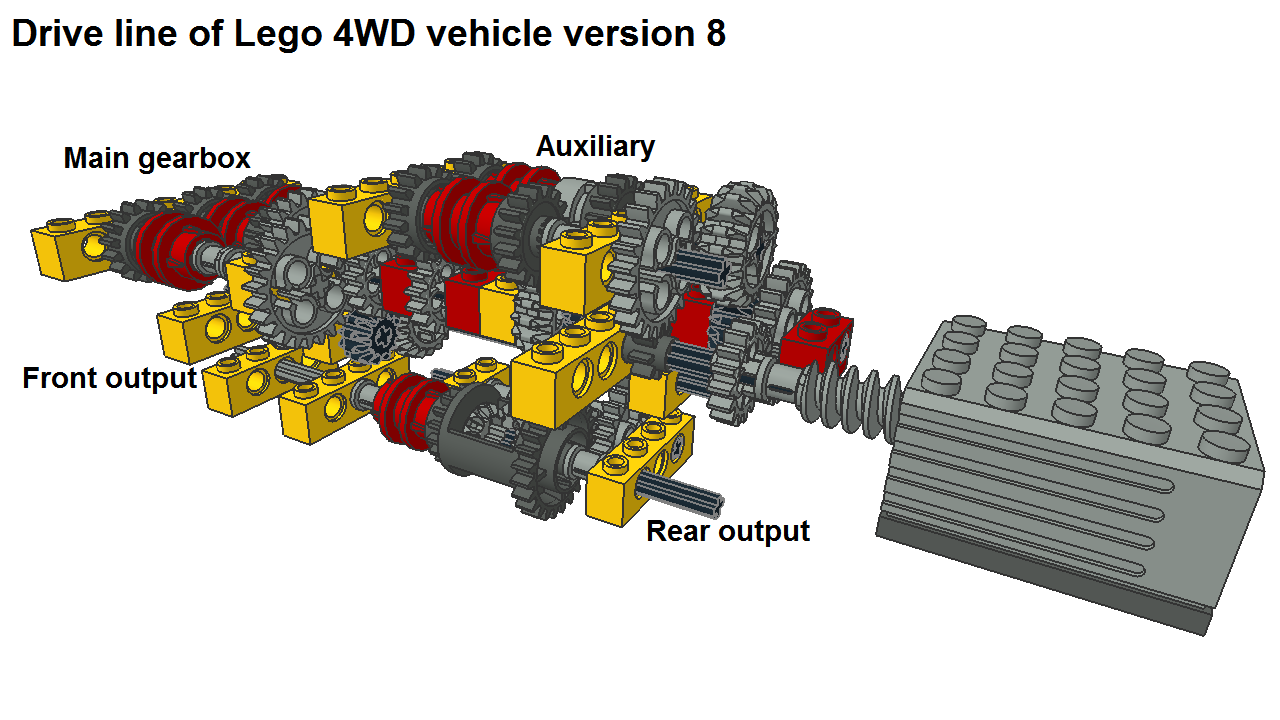
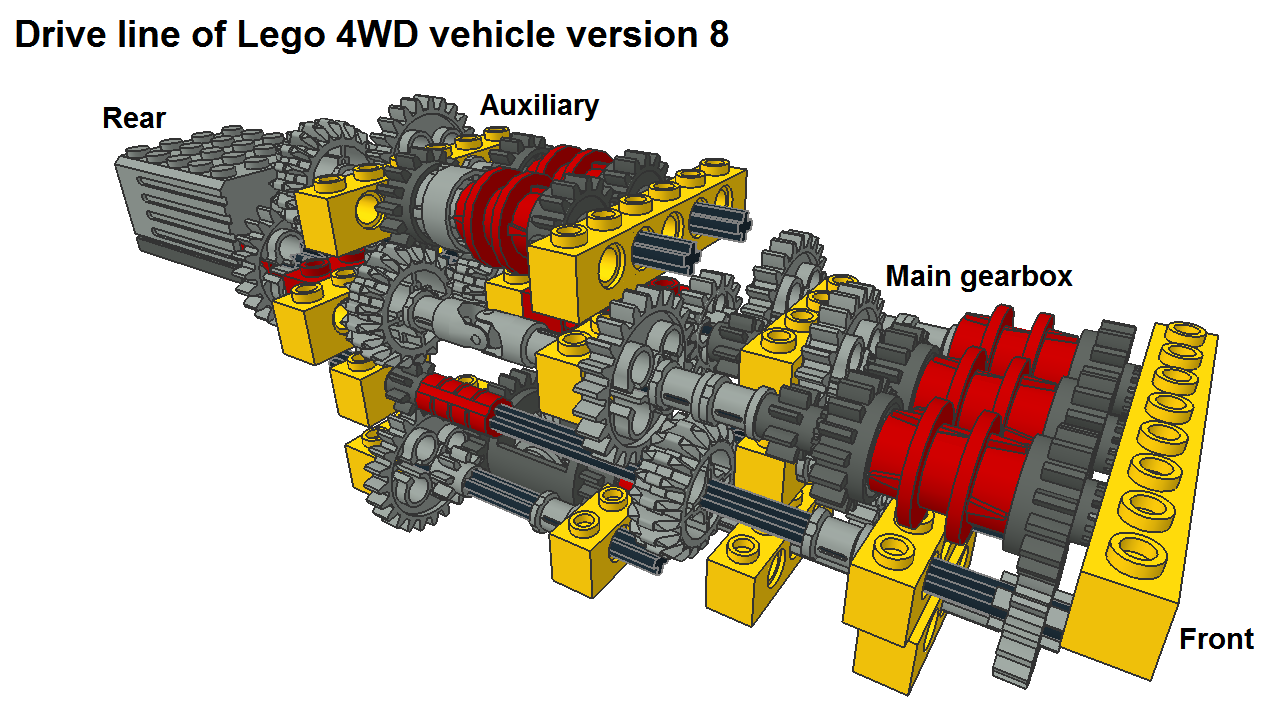
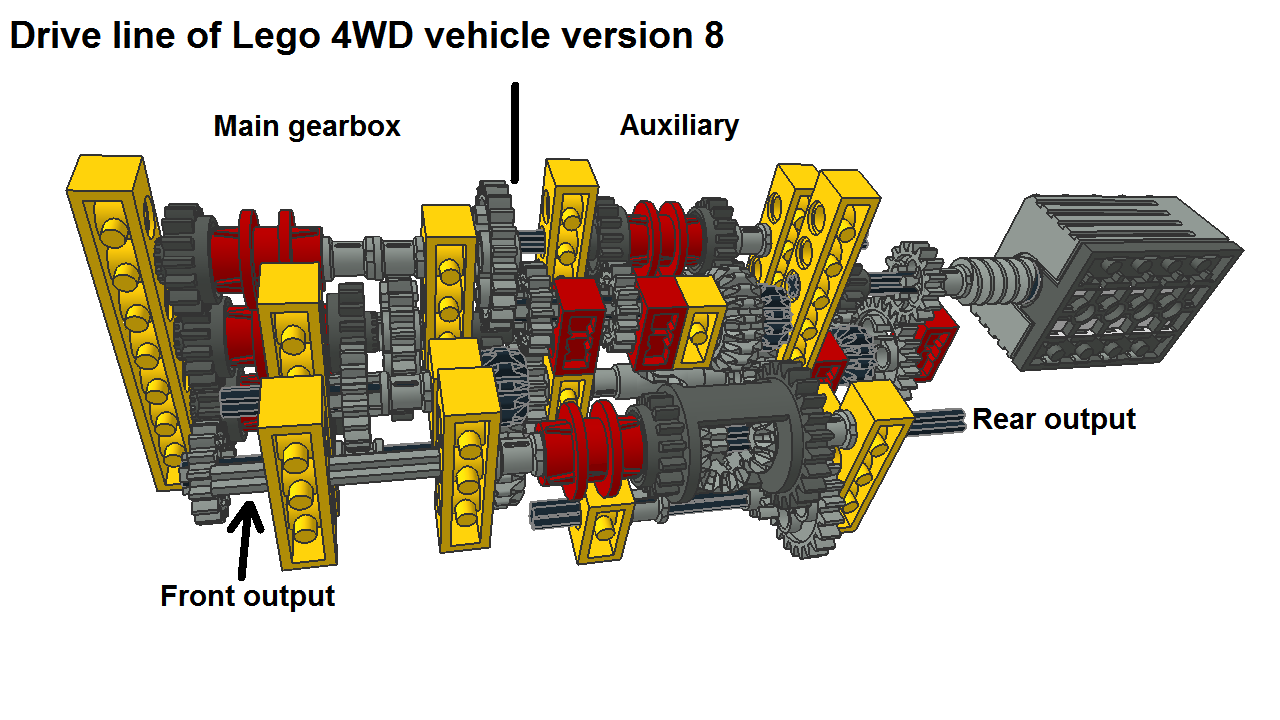
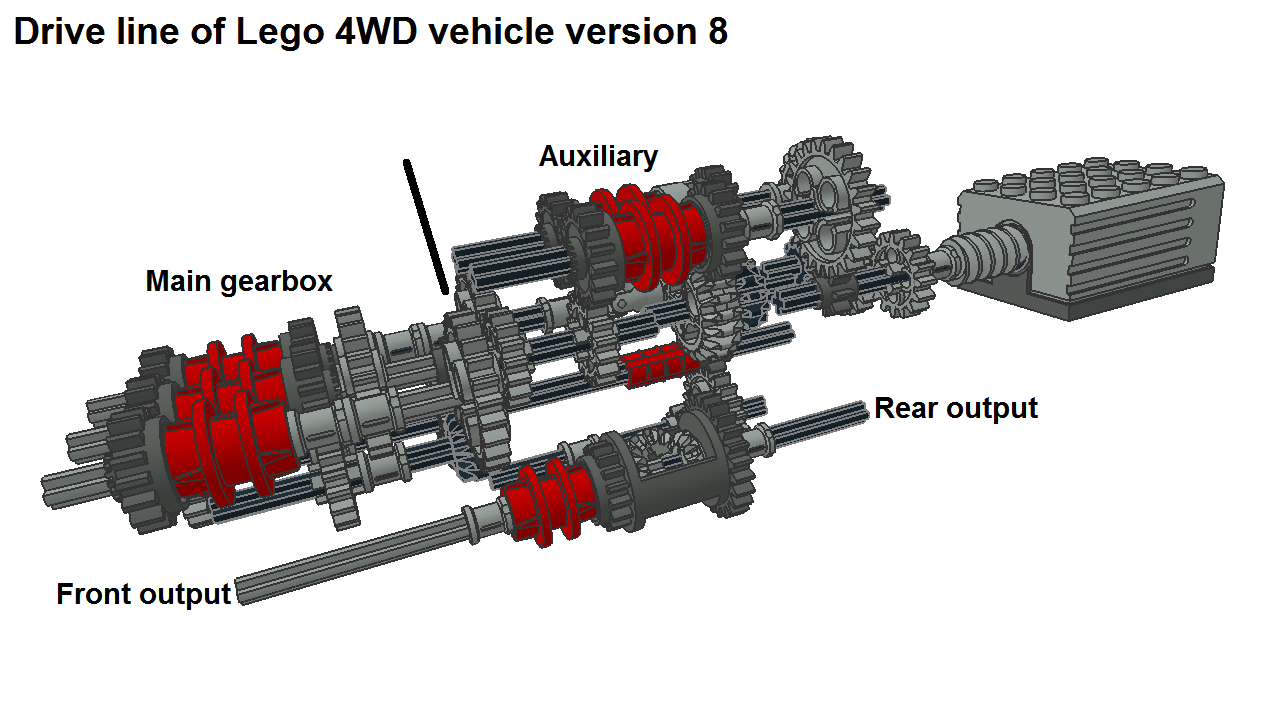
This Lego 4WD vehicle version 8 has good old-fashioned 5x4 twin stick transmission. 5-speed main gearbox has black shift lever and 4-speed auxiliary grey shift lever. Main modifications are in transmission, otherwise this version 8 is quite close to previous version 7.
There are also schematic pictures of vehicle’s drive line. They show axles, gear wheels and where bearing bricks are put but frame is not complete. Vertical axle bases are all basic 2 studs (2 plates between bricks). Basic bricks are colored yellow and 1/2 stud bricks red to make easier to figure out the structure. While this vehicle has 5x4 twin stick transmission it’s not the easiest design to use, here is brief introduction. 5-speed main gearbox has large gear steps while it covers the whole speed range. These large gear steps can be splitted with auxiliary’s gears 2nd, 3rd and 4th. So for example after gear 2-2 (main-aux) you upshift to 2-3 and 2-4, then next gears after two stick shift are 3-2, 3-3 and 3-4. Complete gear order can be checked from picture Ratios. Auxiliary’s 1st gear is for crawling speeds or move off in difficult conditions. And that’s not all, like in real twin stick transmissions auxiliary’s gears 3rd and 4th are swapped in shift pattern. It’s also worth to check chapter N.5. More about twin stick transmissions on main page. In previous chapter N.4. 5x4 twin stick version II is overdrive sister design of this transmission. Gear steps and overall gear ratio are identical in these lego sisters but overdrive design on main page suits better to lego builders. B. Lego 4x2 Truck 16-speed: Inspirers: DAF XF 95 truck + ZF Ecosplit transmission
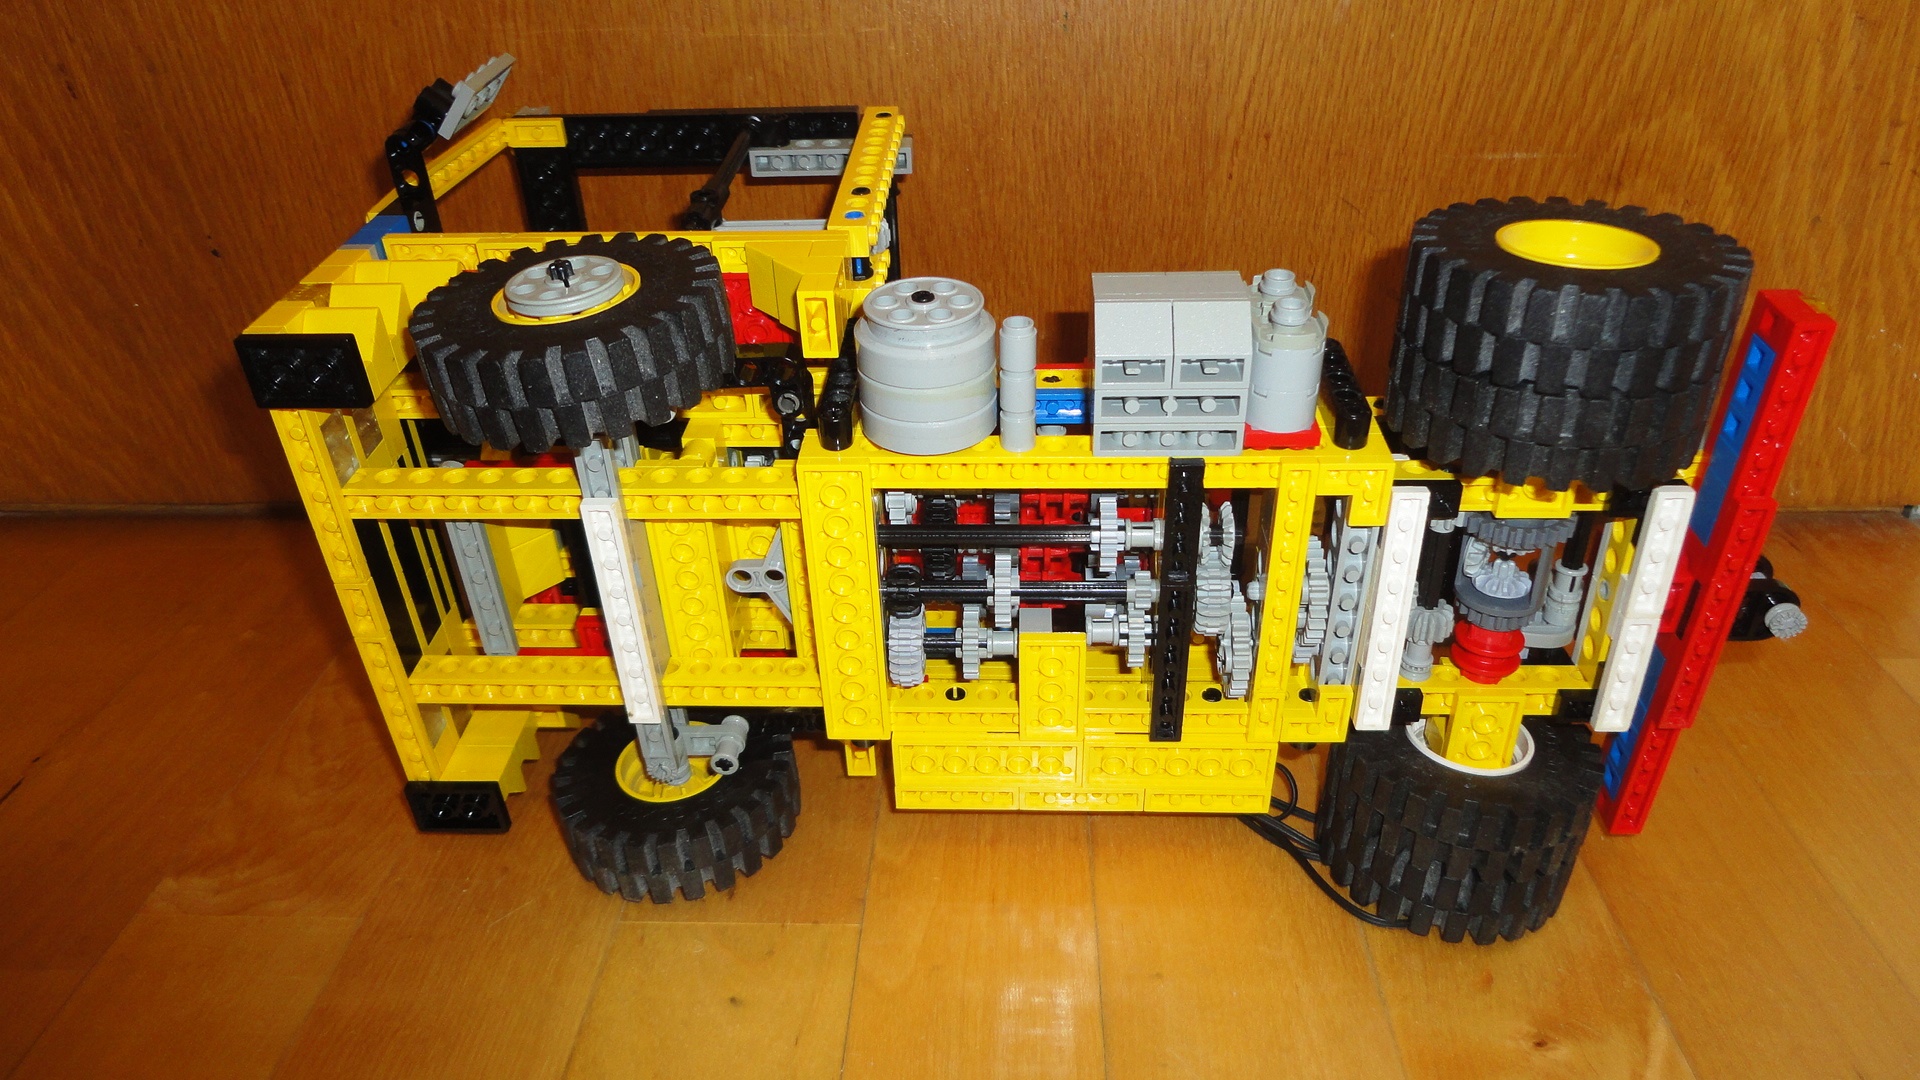
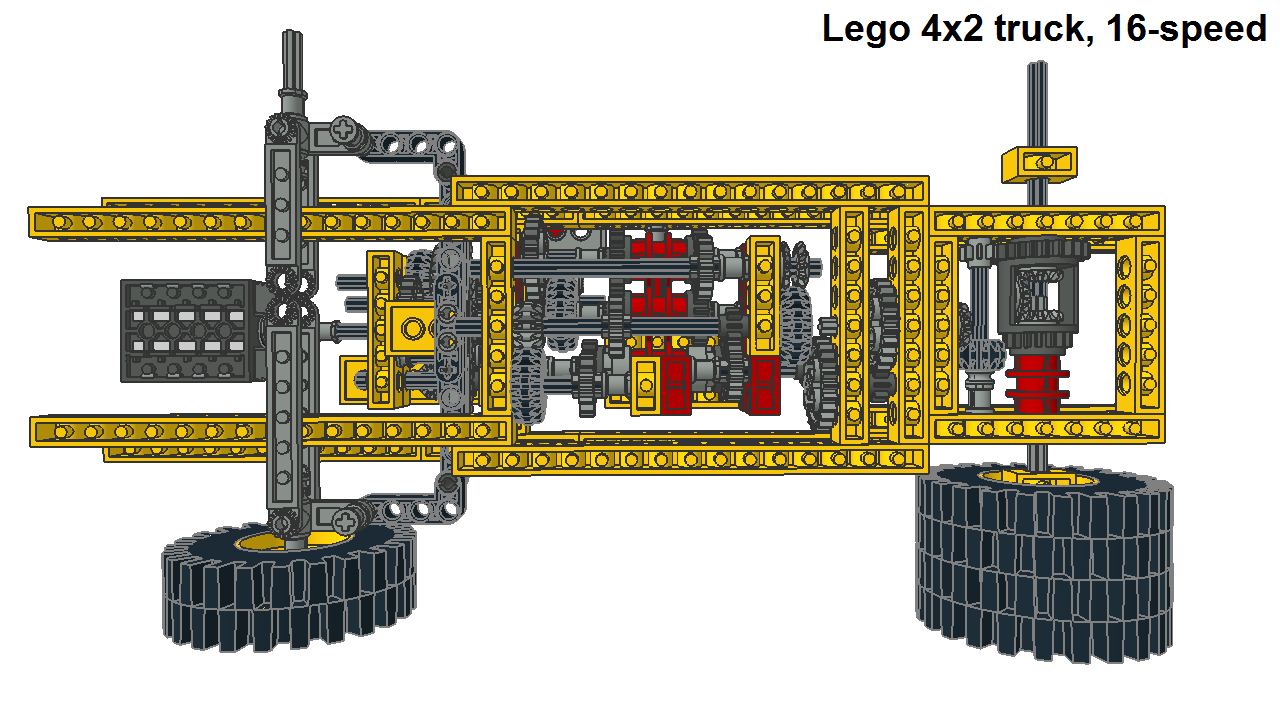
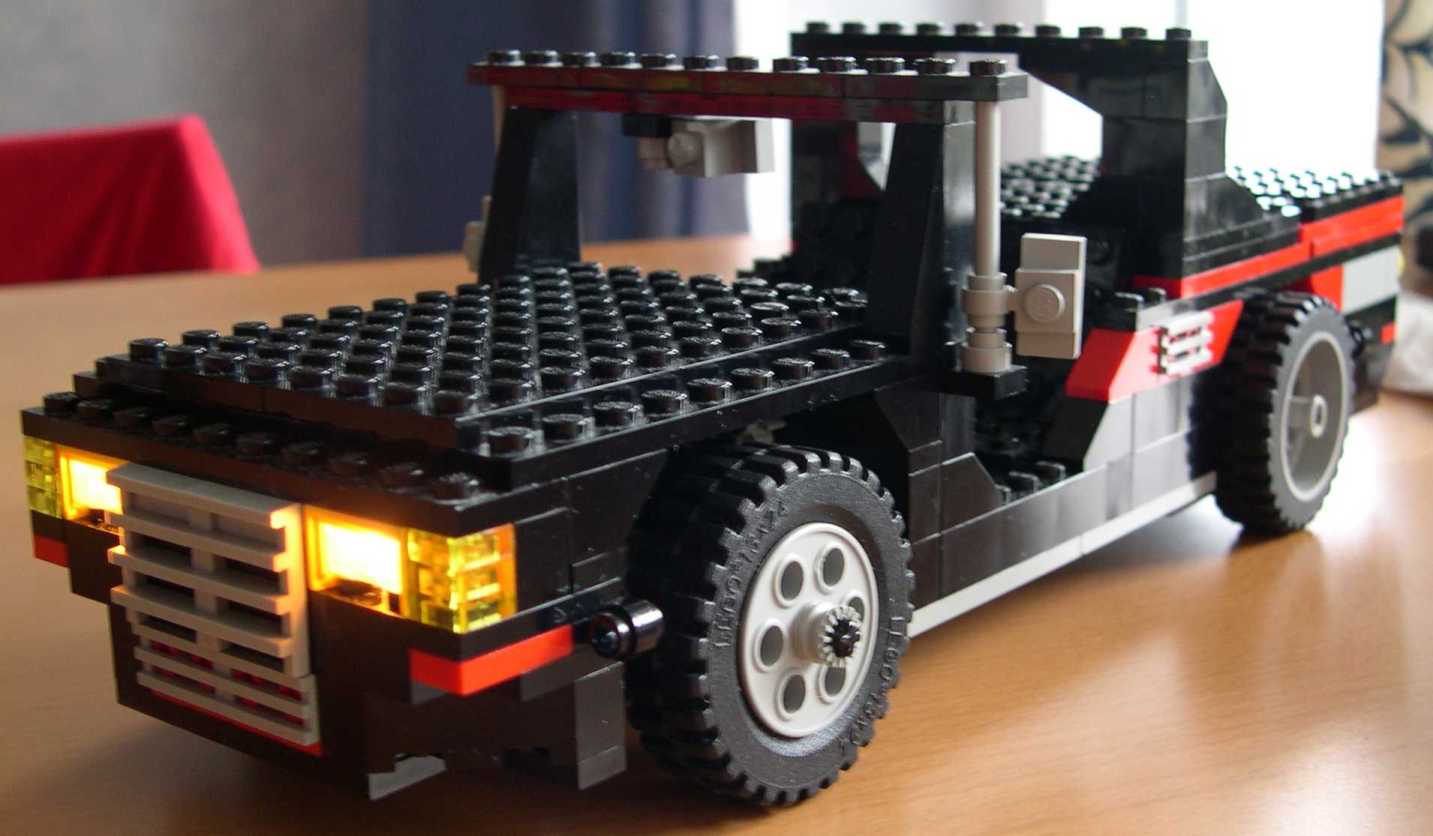
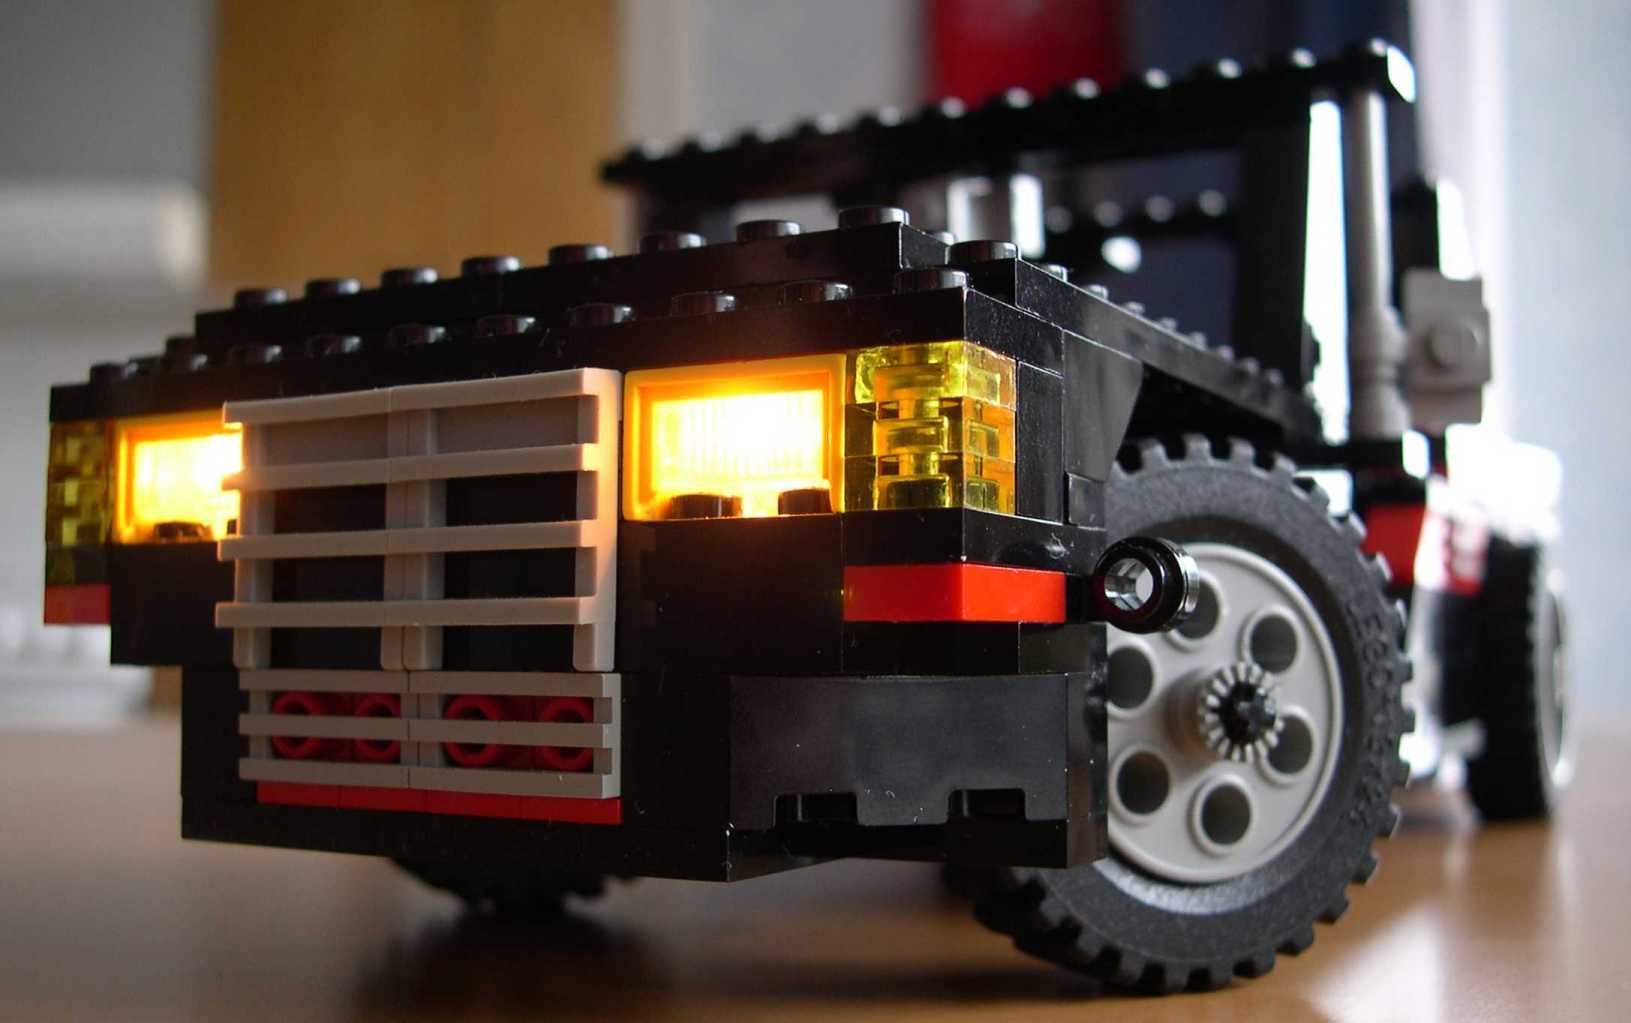
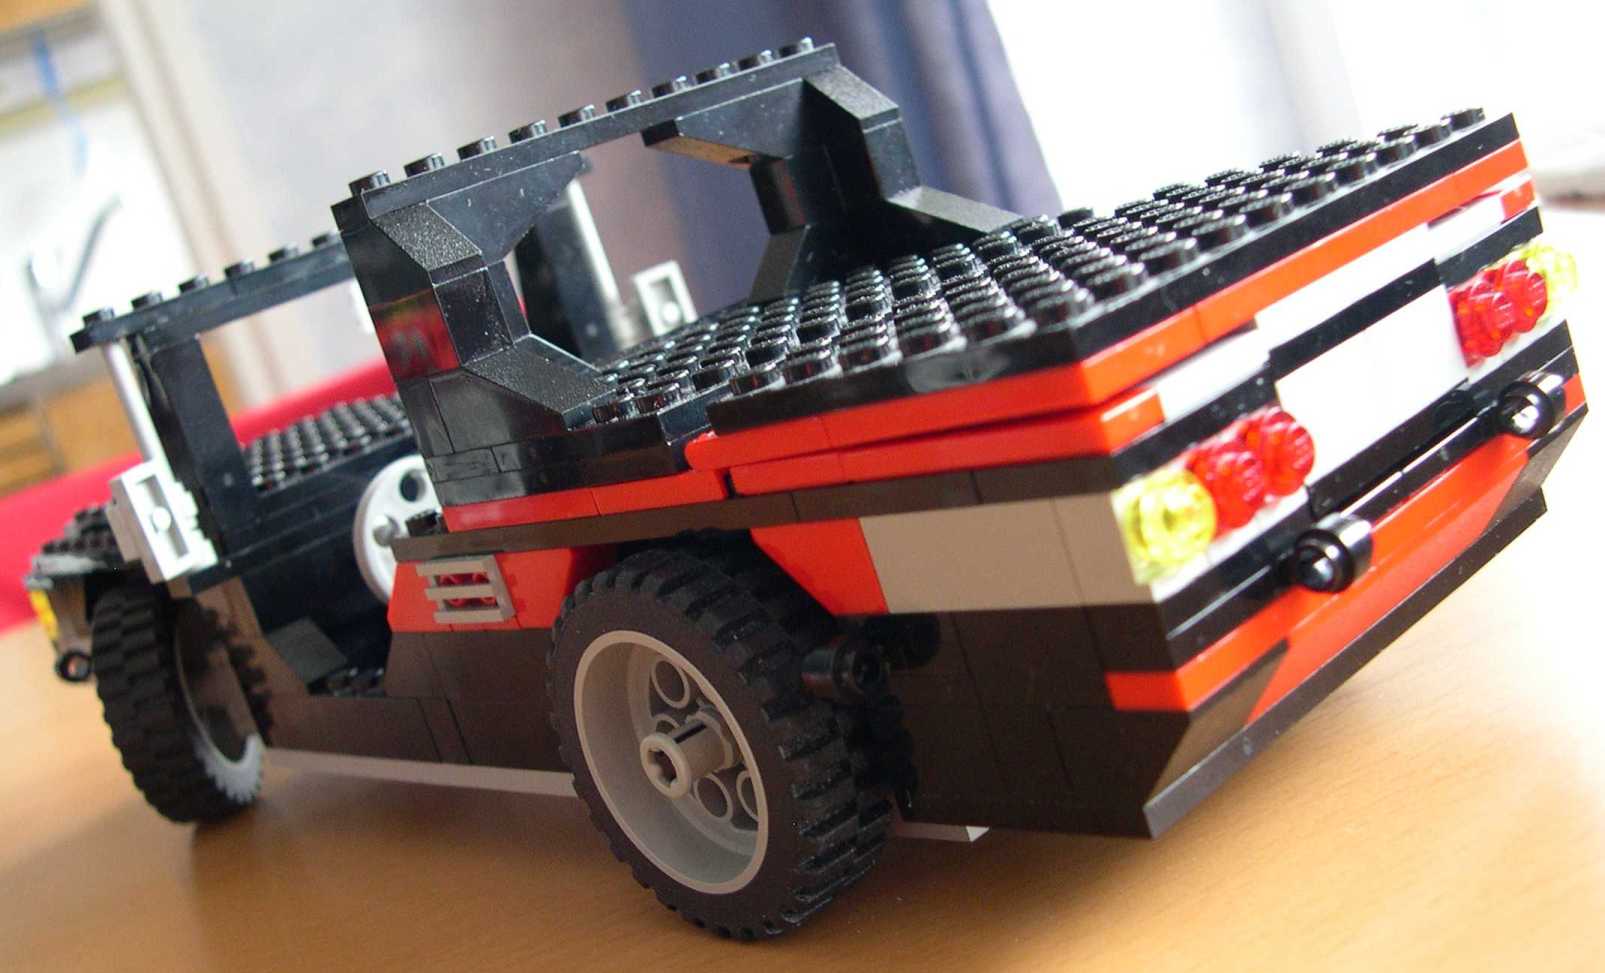
Dis was ö daf job... Well, my goal was to build lego technic 4x2 tractor truck that has 16-speed transmission inspired by ZF Ecosplit. So I had to check which European trucks use 16-speed version of ZF Ecosplit. Lego truck is not fully detailed design but it looks a little bit like older DAF XF 95 so that became inspirer. Also Iveco and MAN trucks have quite similar look as DAFs but DAF’s look was closest with this lego truck. Mercedes this lego truck can’t be while Mercedes has own 16-speed transmissions with different ratio set.
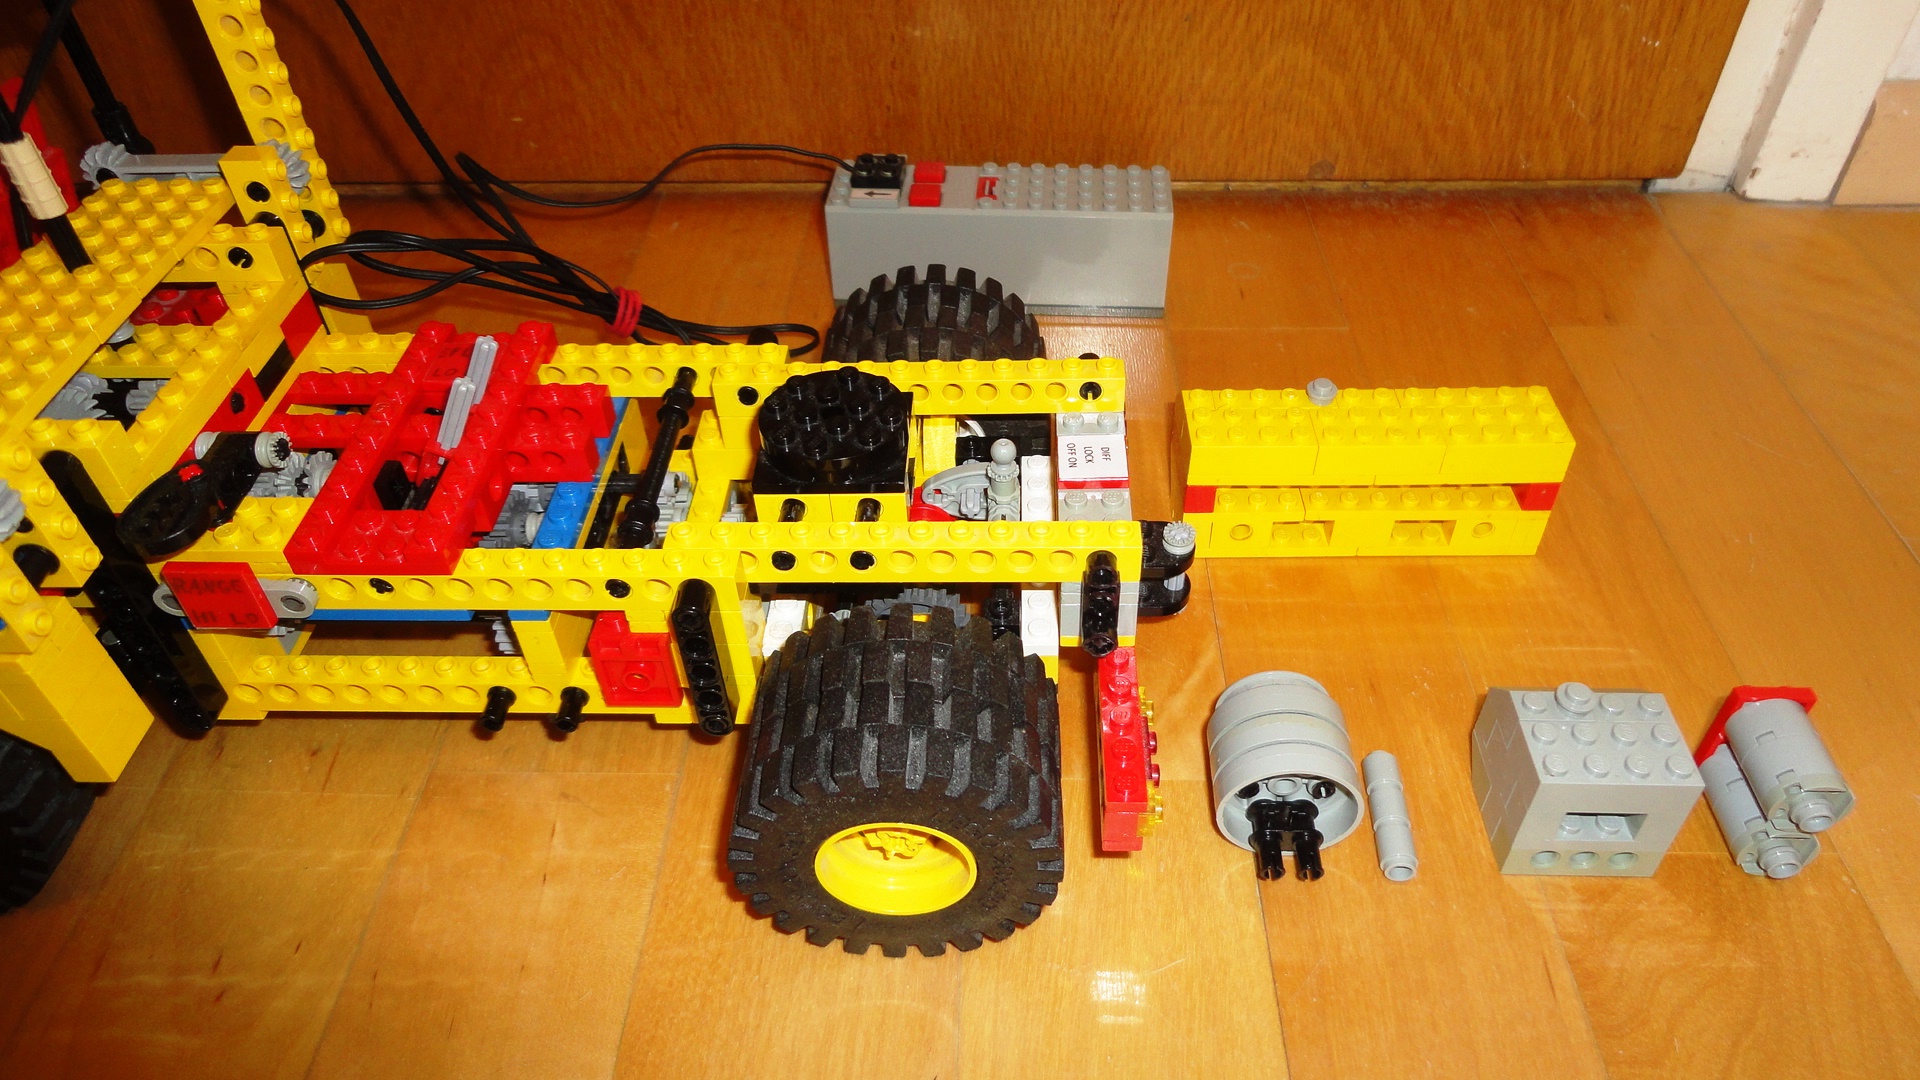
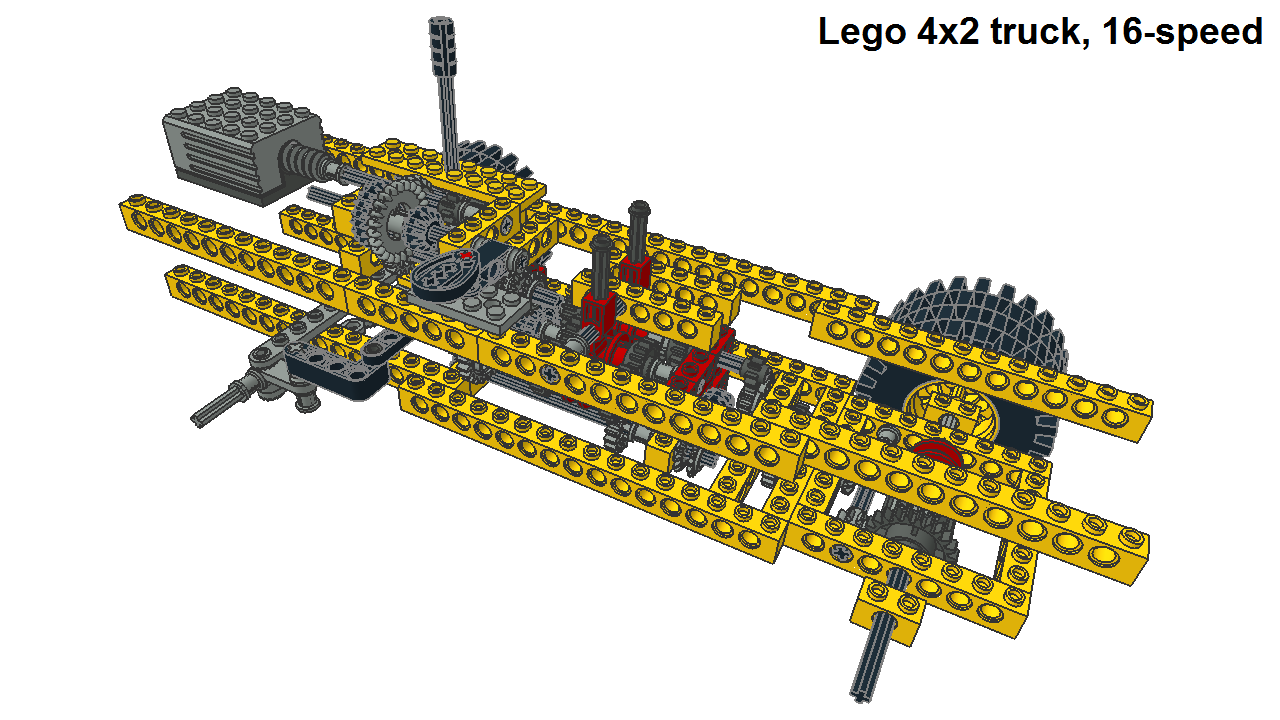
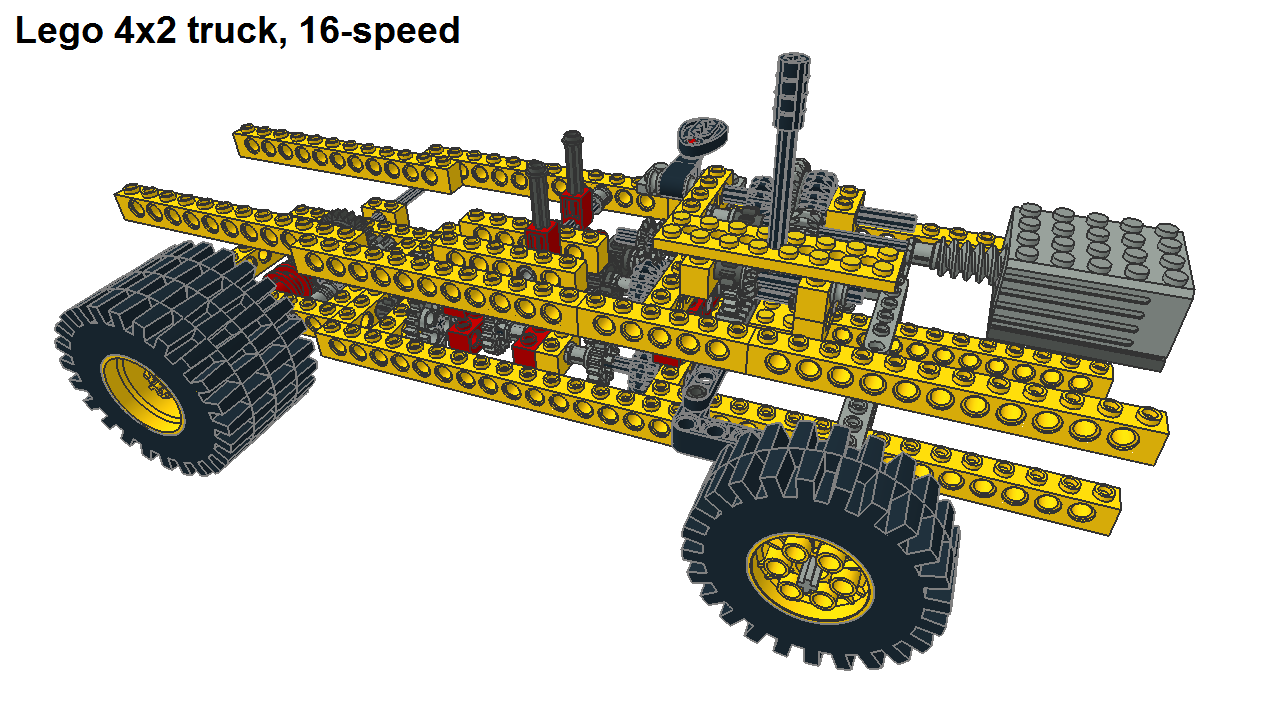
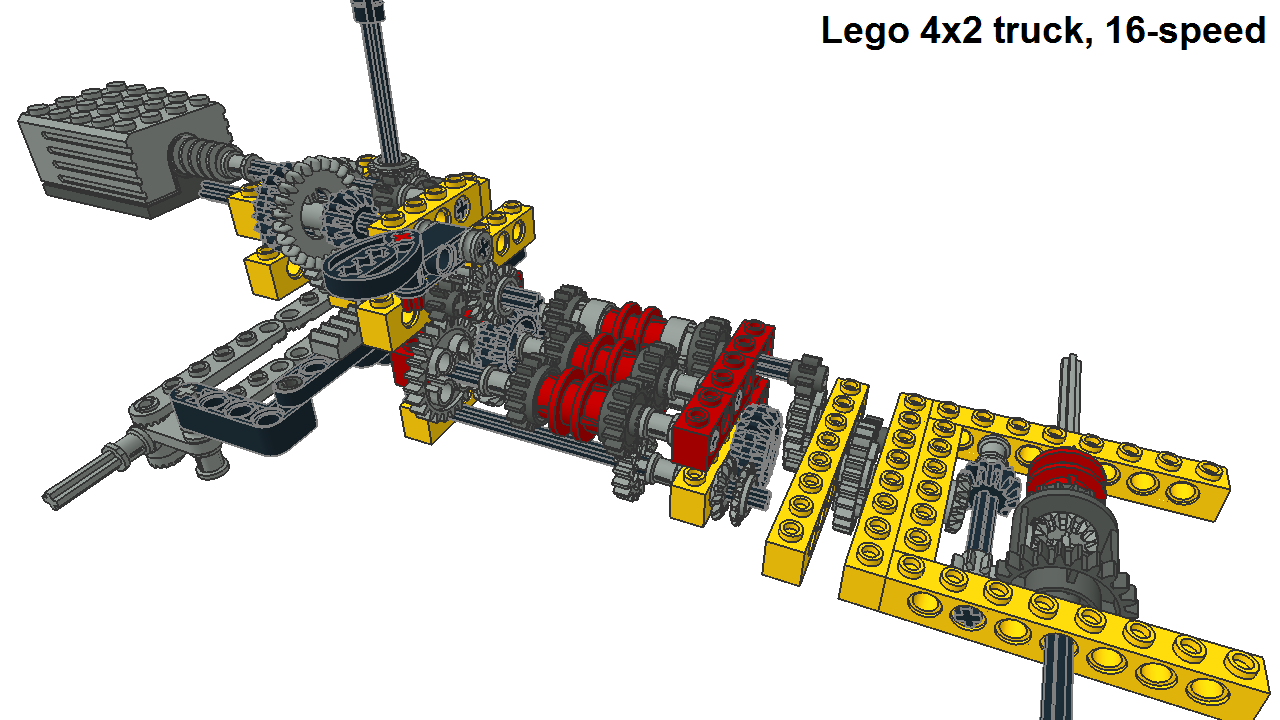
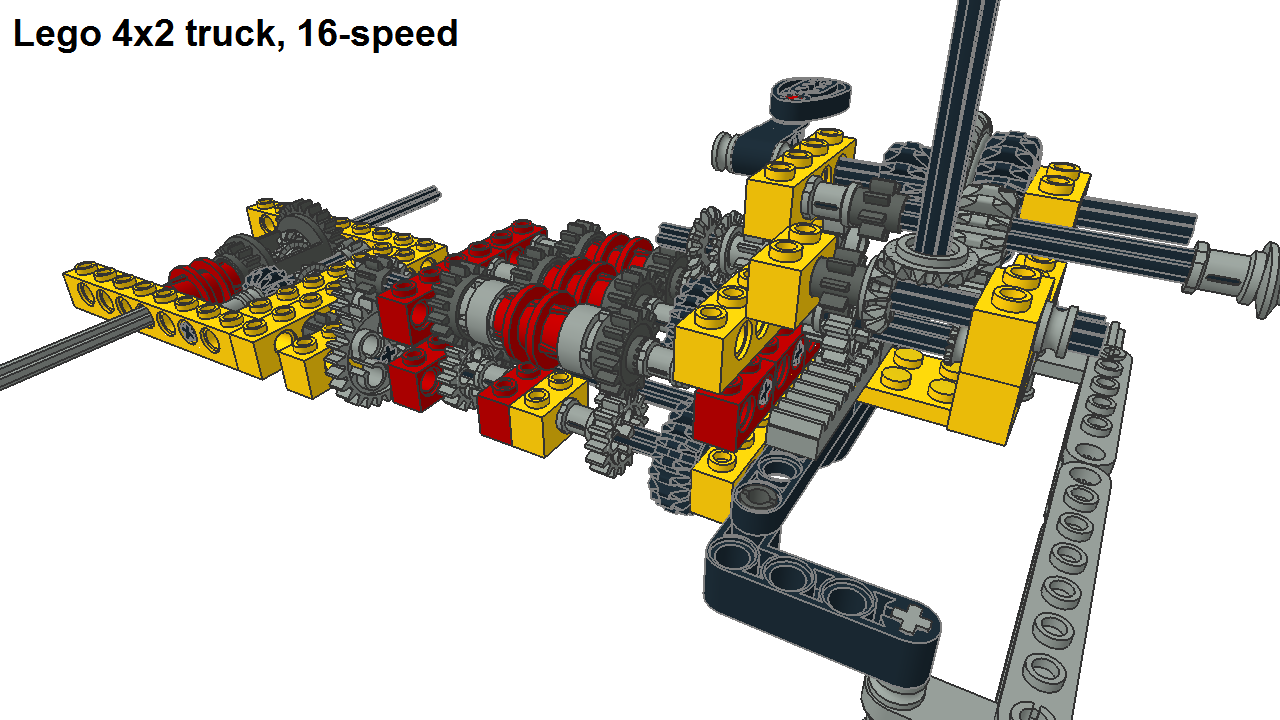
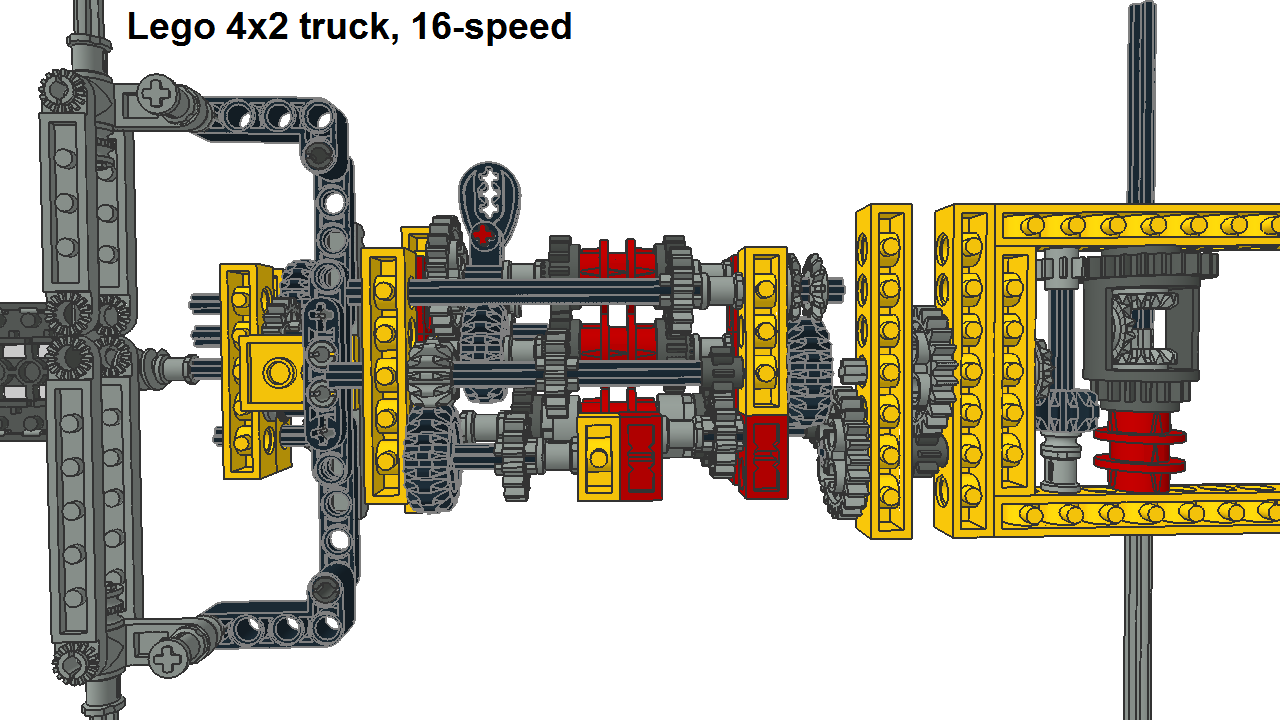
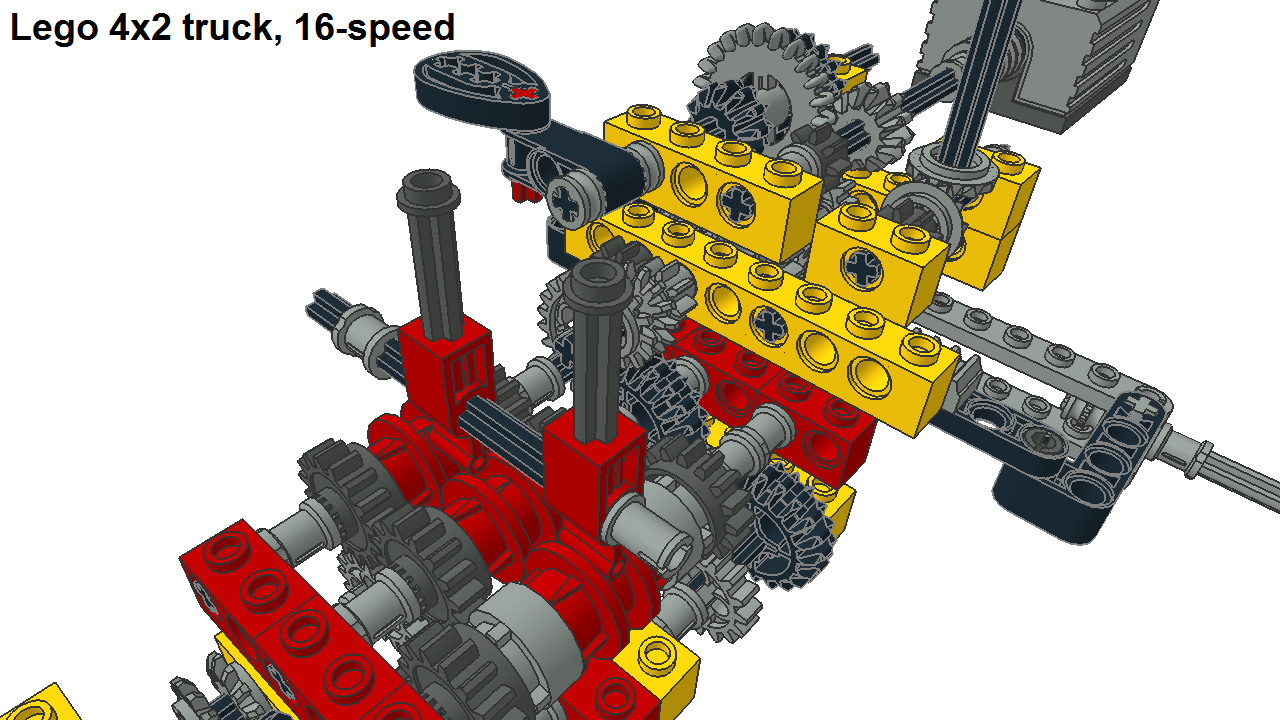
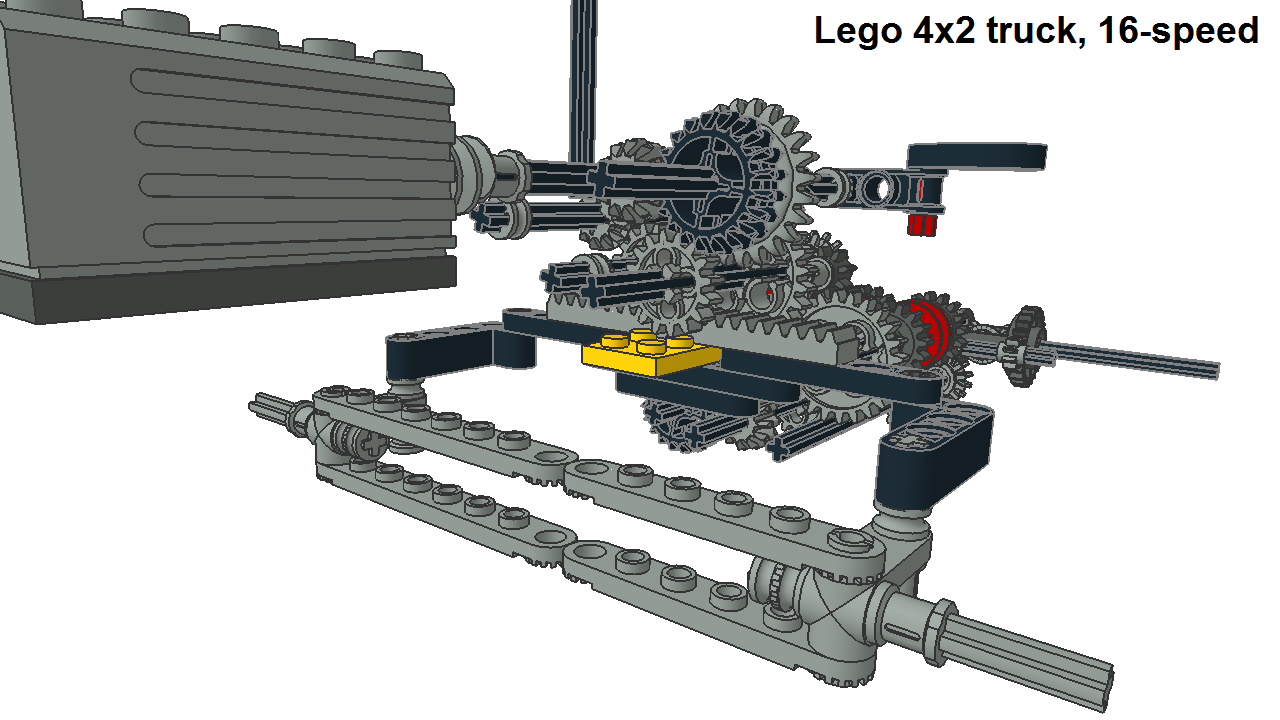
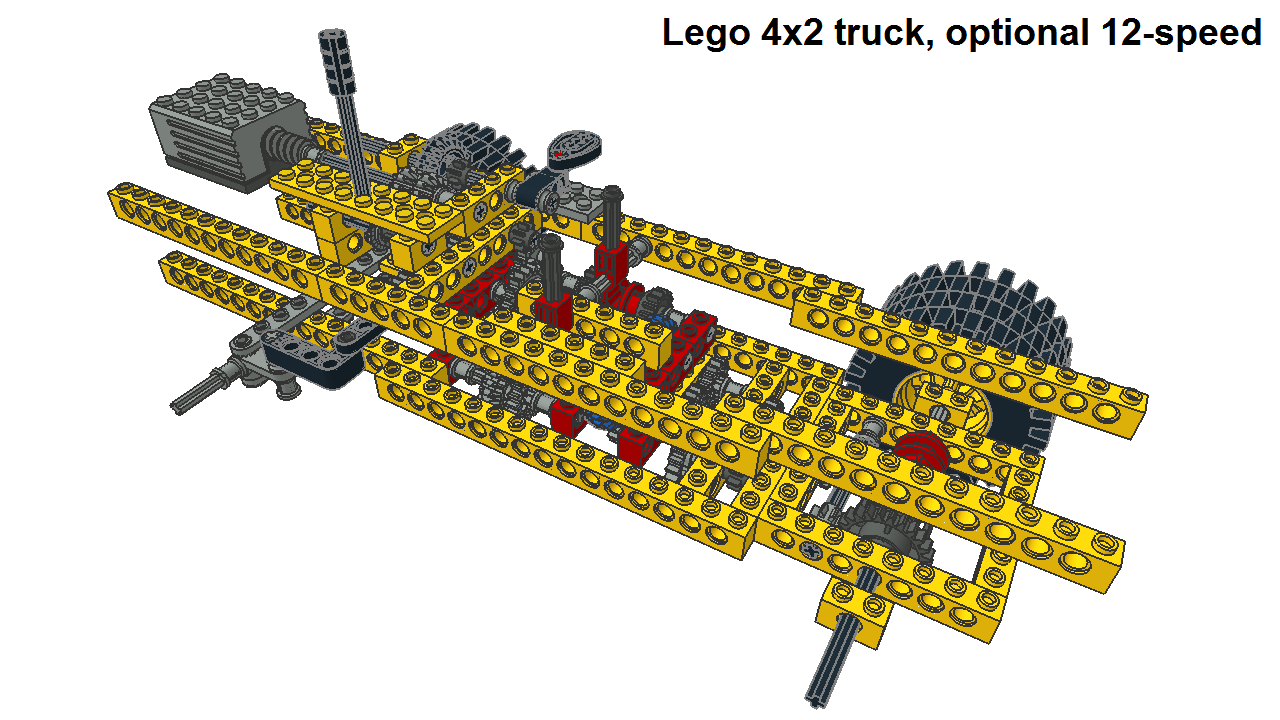
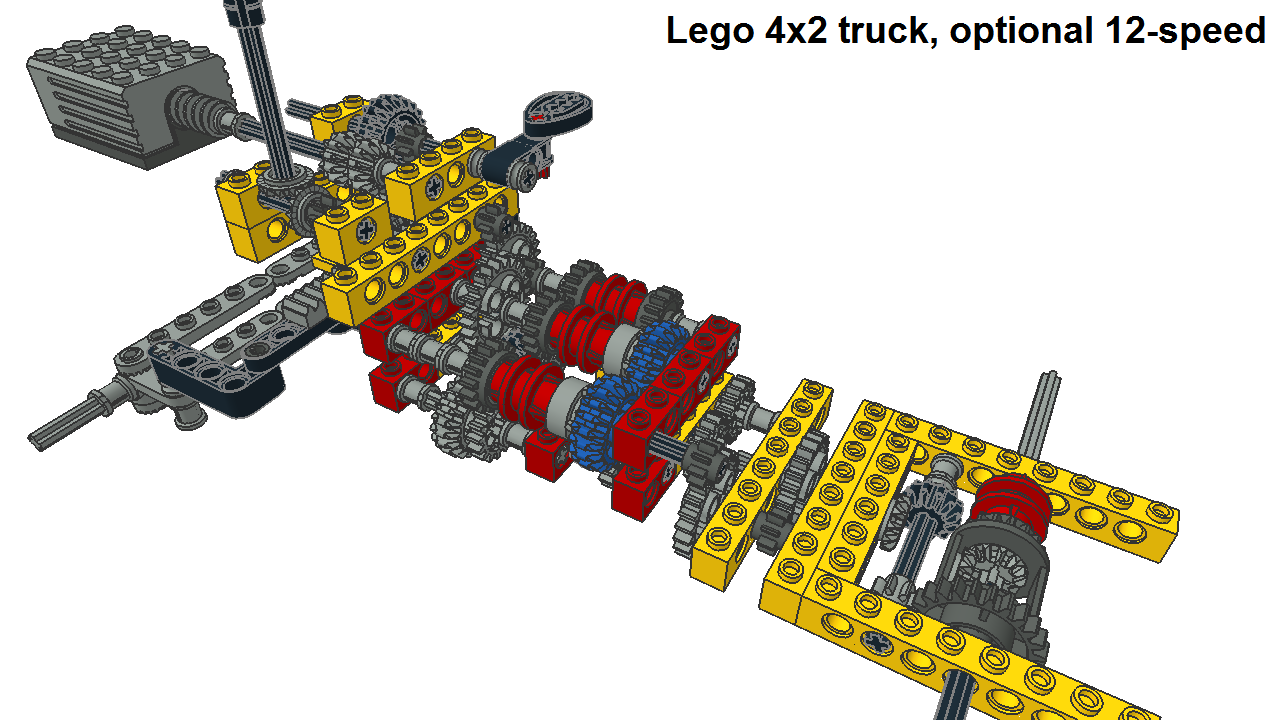
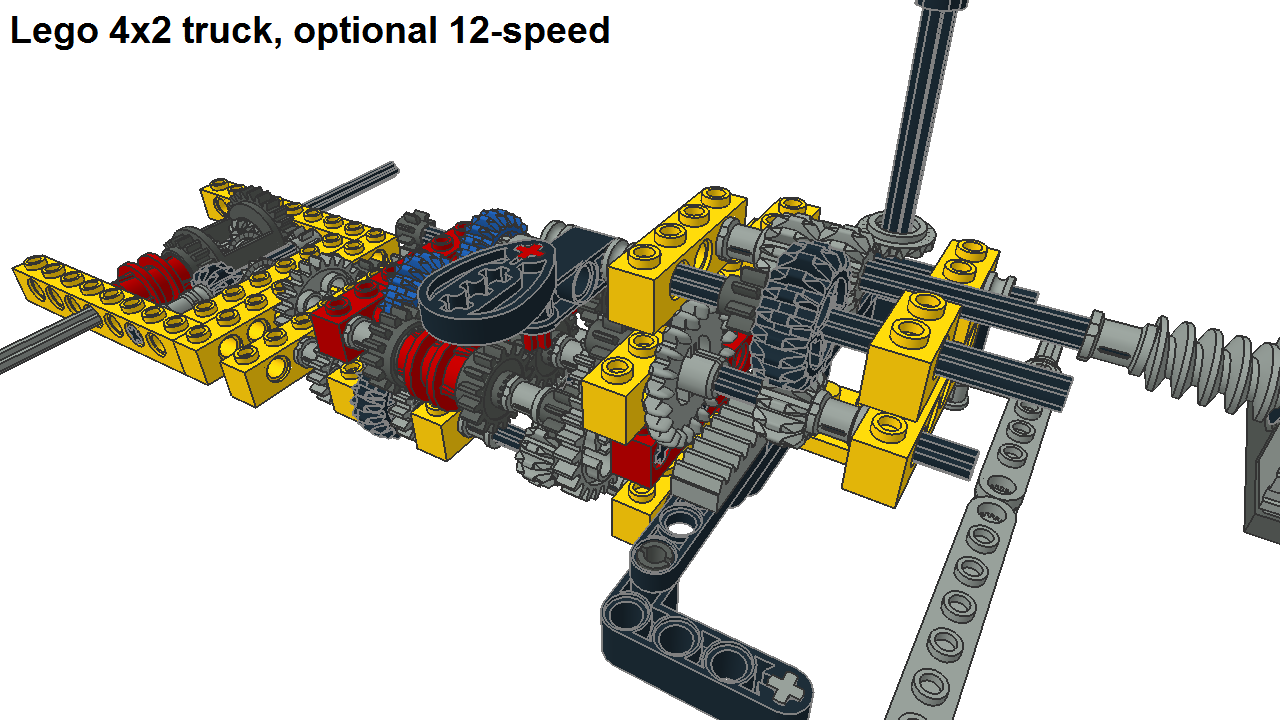
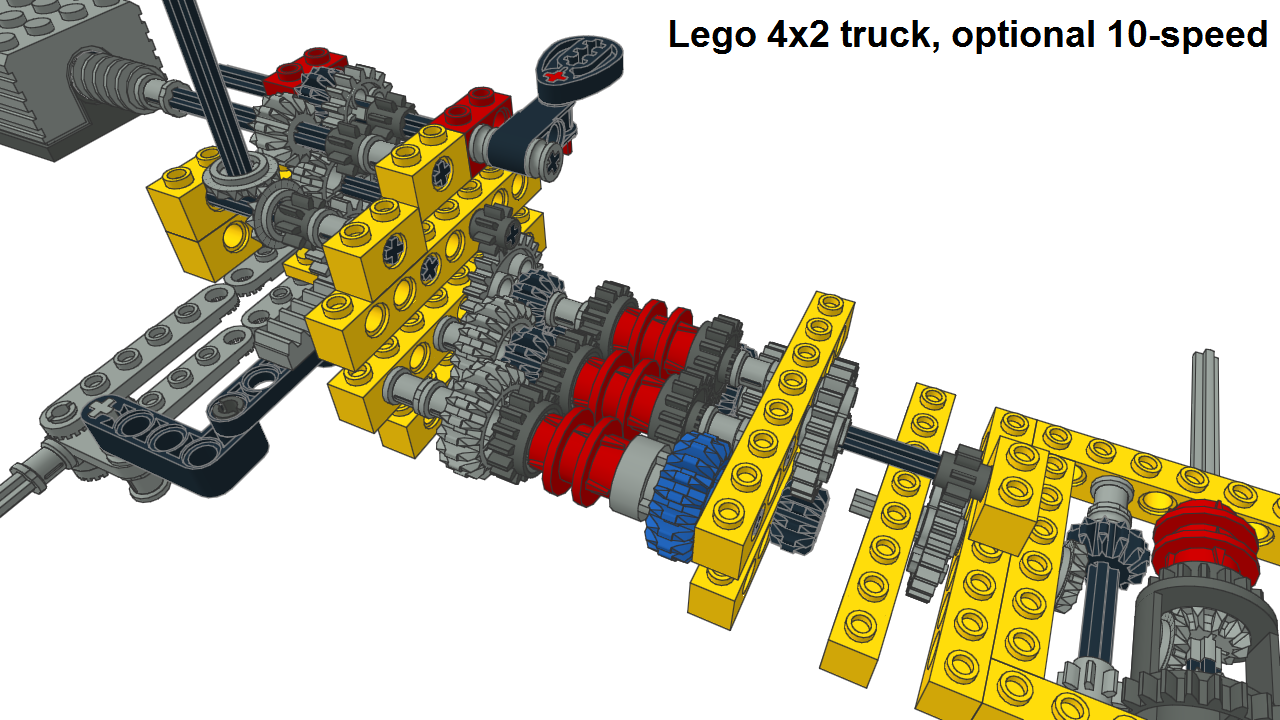
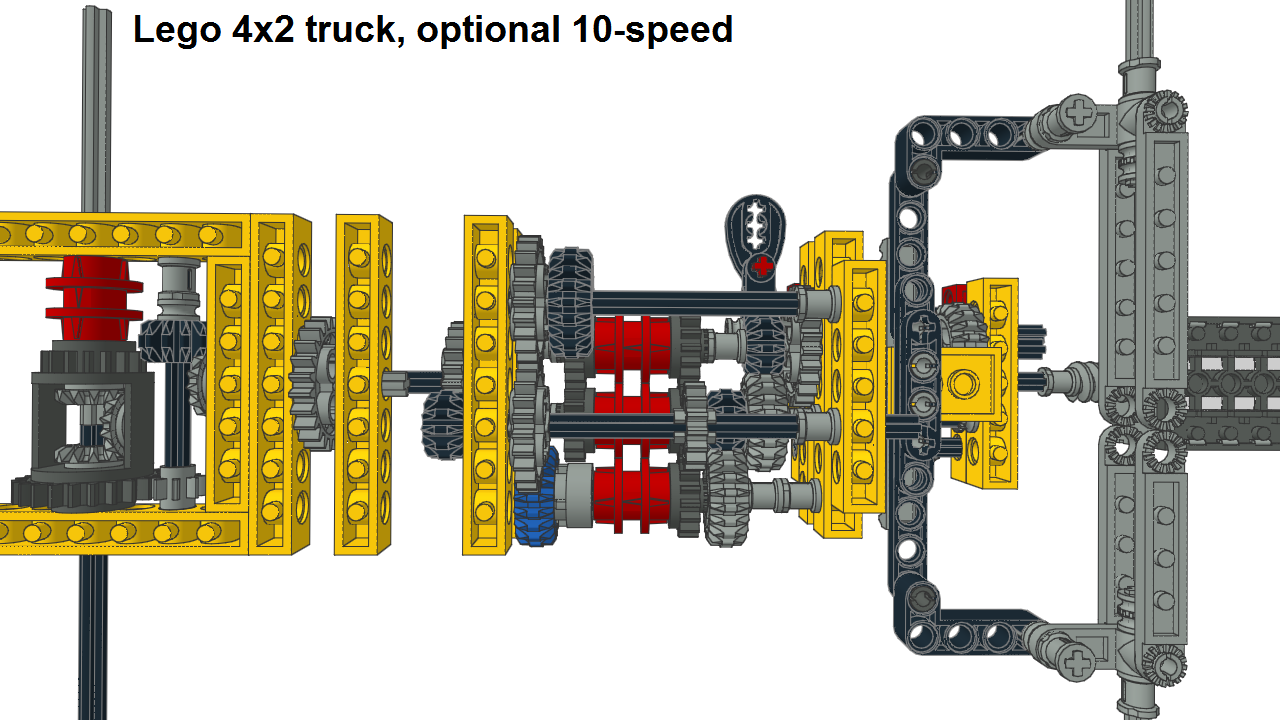
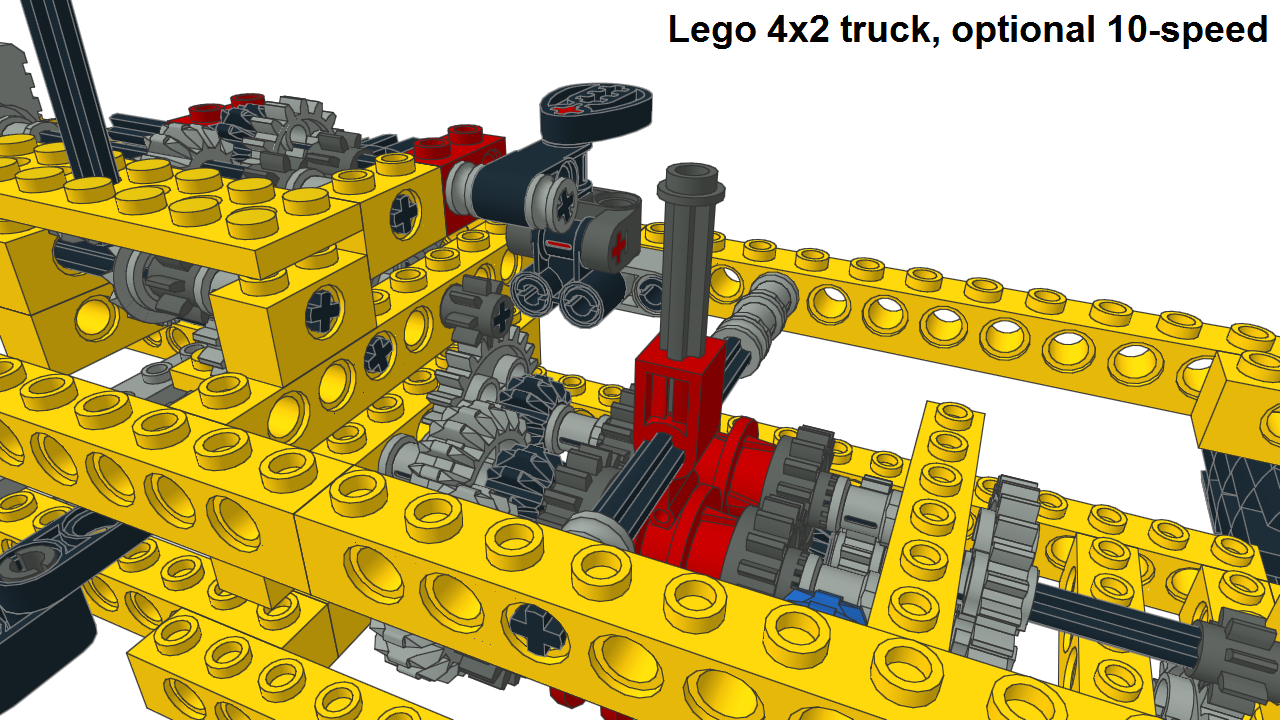
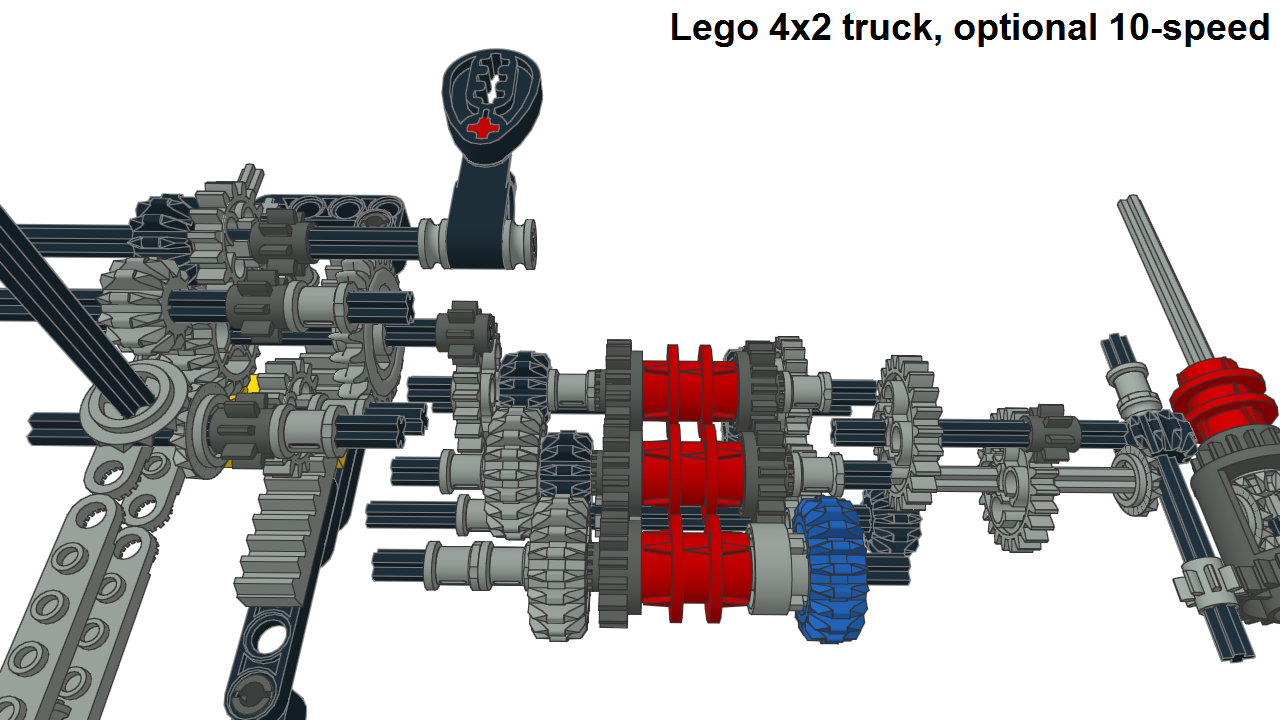
For lego builders is now available slightly modified but full LDraw model about this truck plus 20 step building instructions with step by step parts list, check Brickshelf Gallery link BuildIt. I recommend to keep looking parts list during building steps. And if you feel uncertainty about what you should build during some step it’s worth to check few steps forward to see model in different angles. Also if you have LDraw program packet downloading LDraw file will help, model follows same 20 building steps. If you want to check only reduced truck skeleton with transmission jump to chapter Transmission. Details: Truck’s design is 4x2 tractor truck for semitrailer use with long haul sleeper cabin. This truck is lego technic version with some details but not all. Cabin steps, mirrors, steering wheel, seats and bed are included but for example windshield, roof, cabin doors and walls are missing. Outside of cabin you have details like fifth wheel, huge fuel tank on the right and exhaust system, AdBlue tank and air tanks for brakes on the left. Bed hides gear wheels of range-change unit while they are located higher than main gearbox and splitter. All shift levers are collected together behind cabin. There is no real suspension in this truck, only pendular rear axle. Like real trucks driven rear axle has double wheels, one detail I wanted to follow. While there is a lot of weight on front wheels I tried to build approximation of Ackermann steering for smoother turning. More information about Ackermann steering is in earlier shown section A. Lego 4WD Vehicle. Transmission:
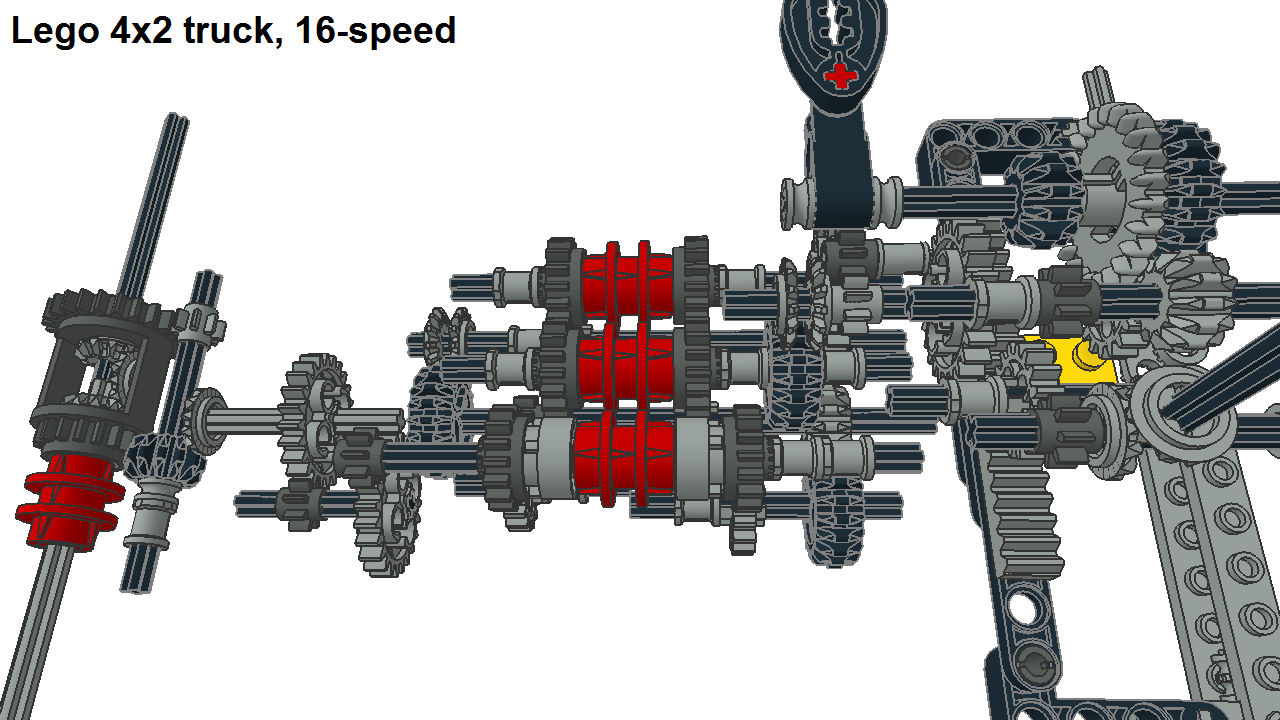
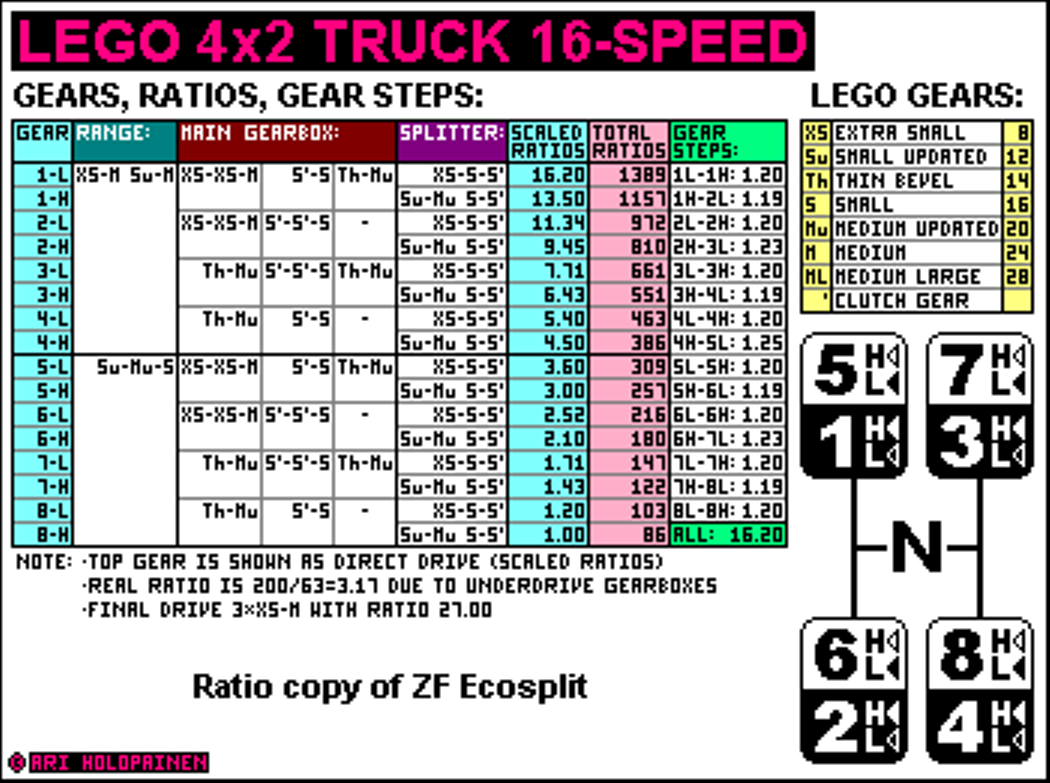
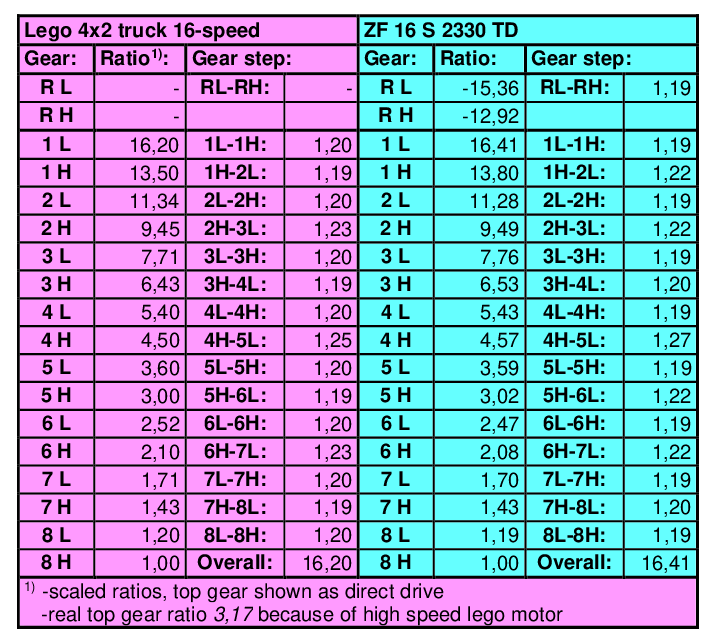
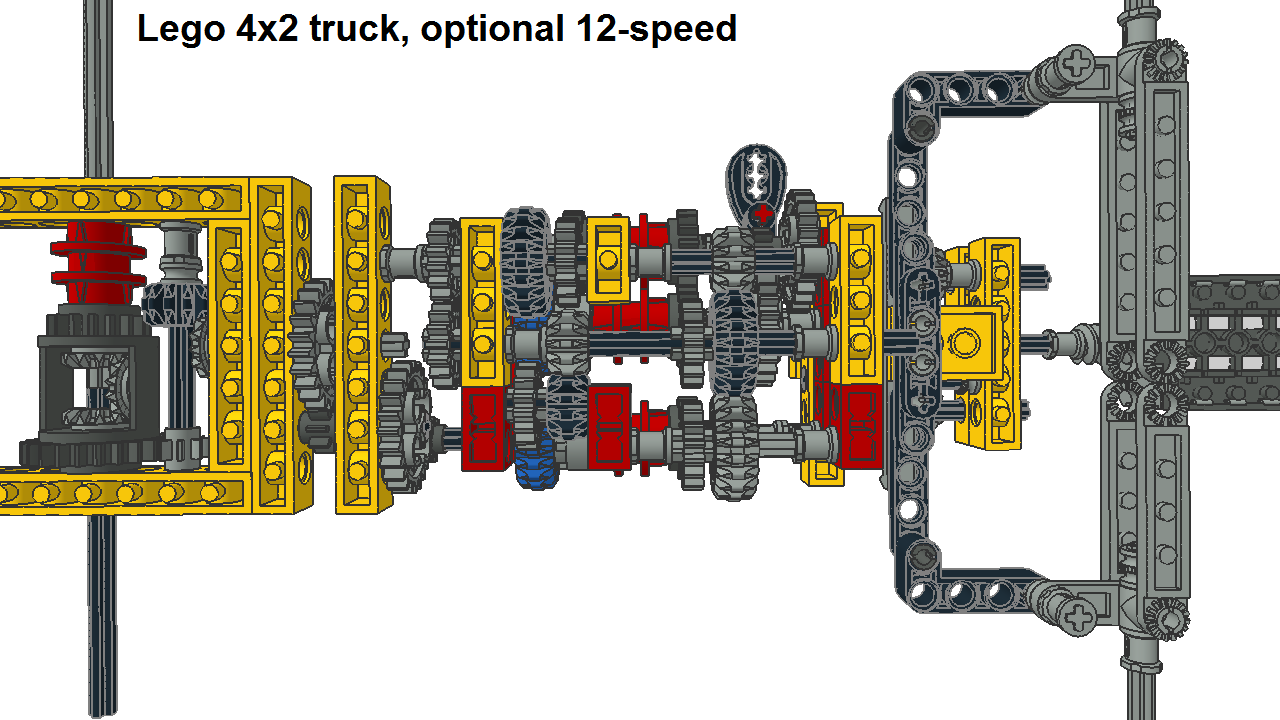
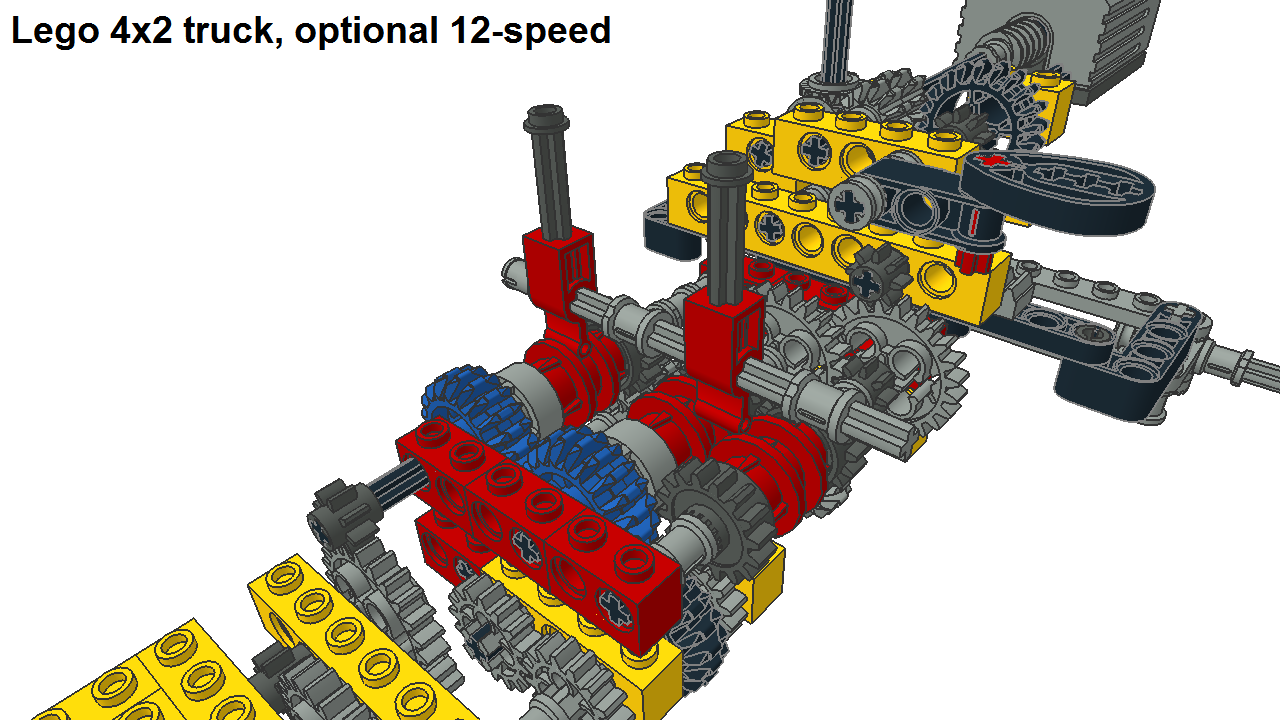
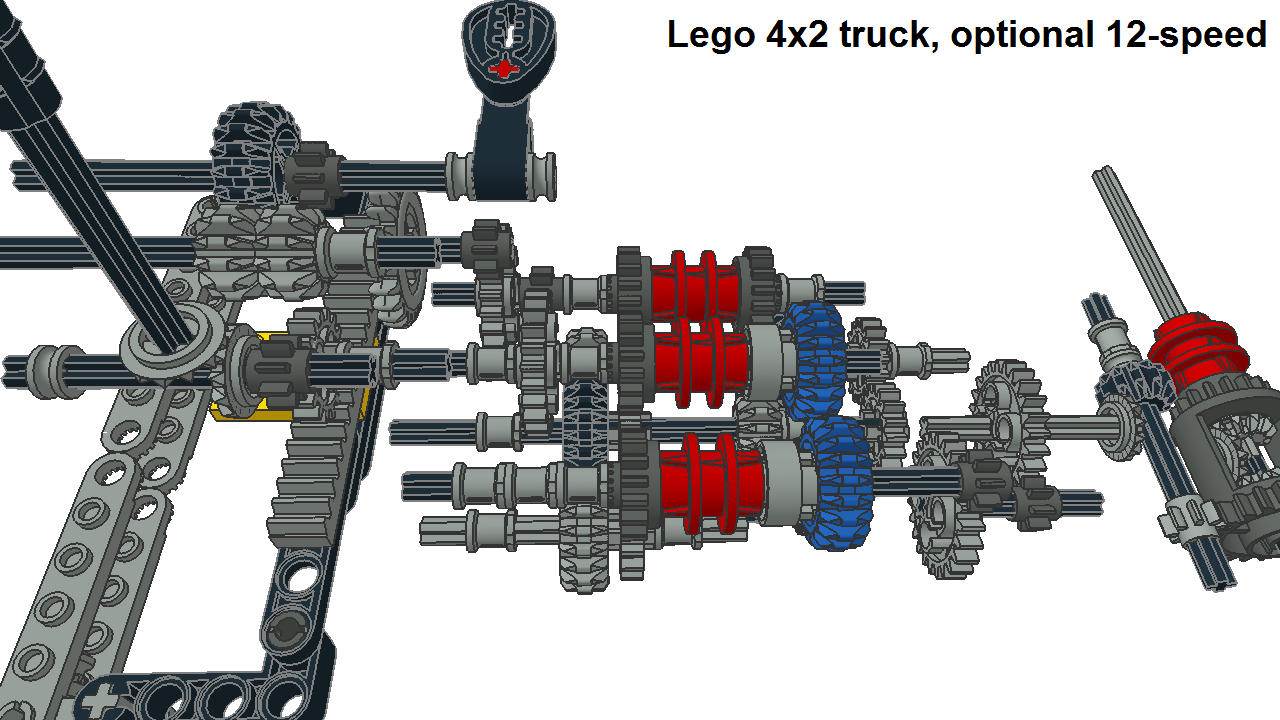
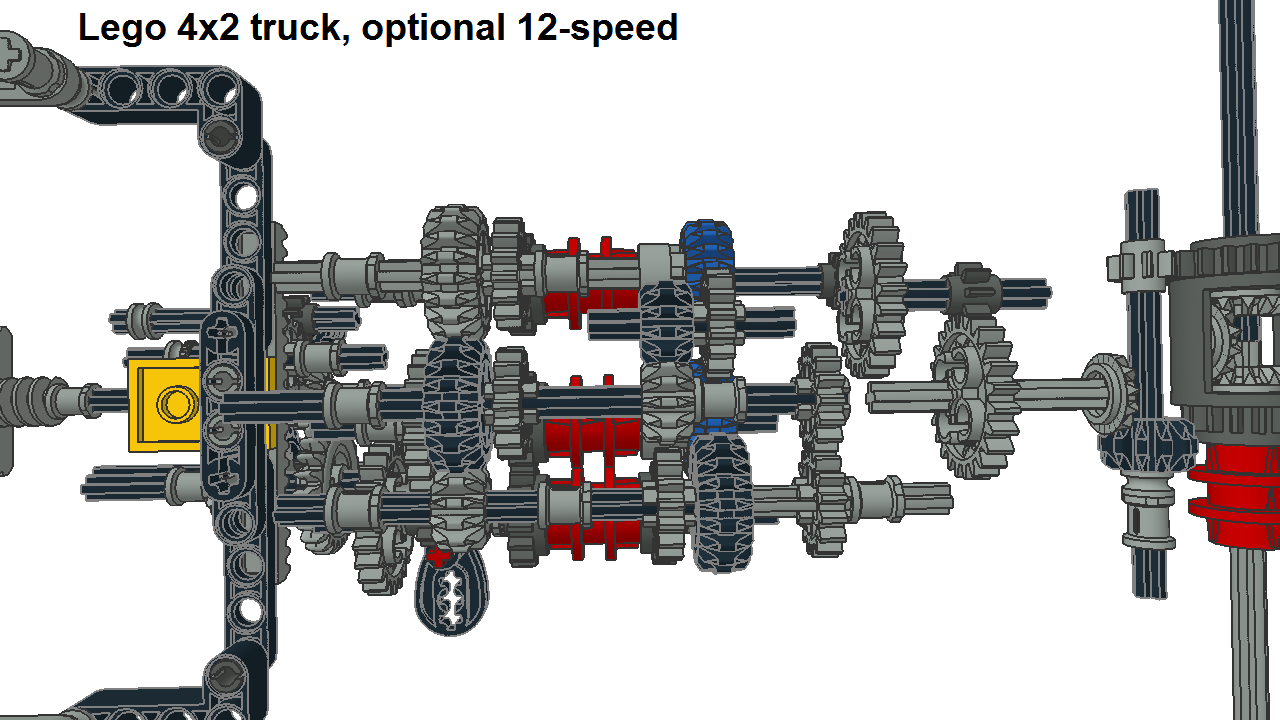
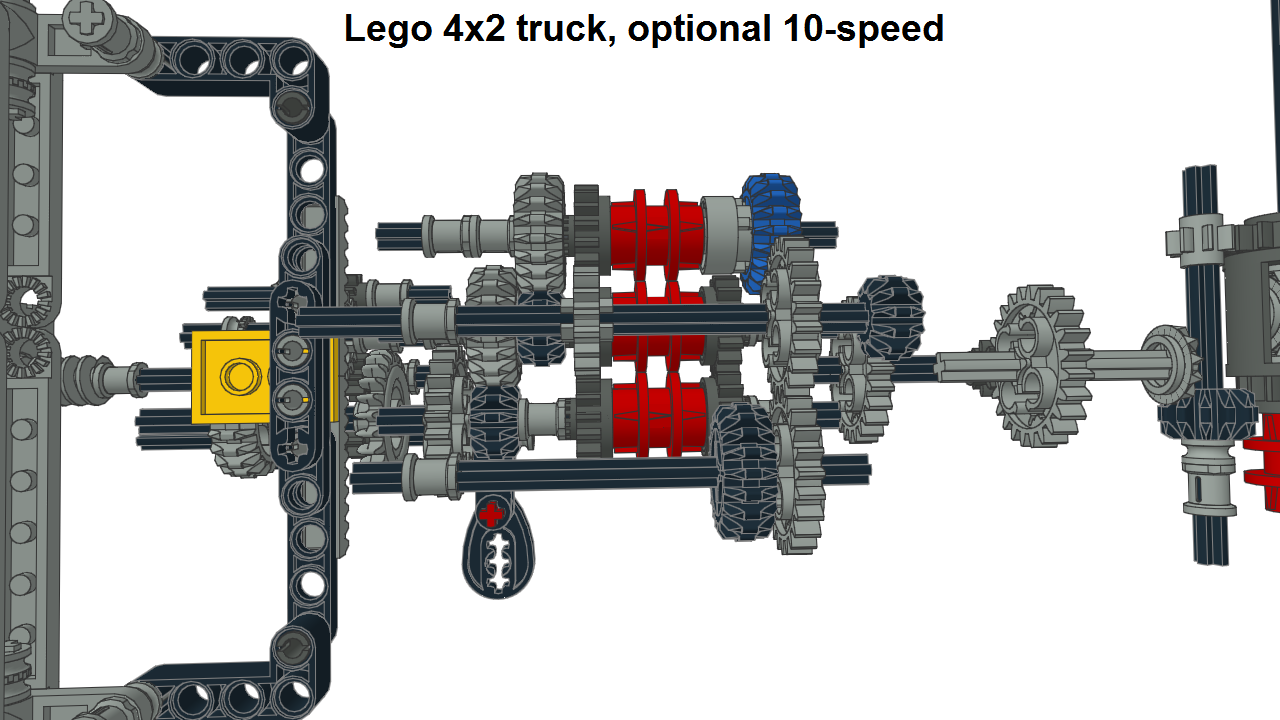
Lego truck’s 16-speed transmission (2x4x2 design) has range-change unit located partly inside cabin while 4-speed main gearbox and splitter are located parallel behind cabin inside frame. This parallel design is why frame is too wide in the middle before it gets more narrow between rear wheels. Gears are 1L-1H-2L-2H-3L-3H-4L-4H-range_change-5L-5H-6L-6H-7L-7H-8L-8H, in which L and H are splitter’s low and high. To see how to shift through gears you can check YouTube slideshow Upshifting procedure. While I use high speed lego motor transmission is underdrive design but gear steps, overall gear ratio and scaled ratios are almost identical with direct drive version of ZF Ecosplit. Only difference is that lego design is without reverse gears while lego motor works in both directions. But this one is probably the most realistic lego version of 16-speed ZF Ecosplit you can get, check picture Ratio comparison. Unfortunately this ratio copy needs four old 14 teeth thin bevel gears because new 28 teeth gear will give ratios that are closer to Volvo’s old SR62 transmission. Transmission is in brick frame with only few beams but there are no special gear pairs so you can directly use studless frame if you want to. Like real truck also lego version has mechanical lock in rear axle differential. Transmission can be difficult to see in real pictures but I have made reduced LDraw model which shows main bricks, transmission and steering. This model is not completed but it’s easier to build your own truck with help of this model. For example half stud bricks are colored as red and transmission layers need two plates between bricks. If these skeleton pictures are not clear enough you can download LDraw file or check building instructions for whole truck in Brickshelf Gallery link BuildIt. Driving: In real DAF with ZF Ecosplit upshifting sequence from stop to full speed would be something like 3L-4L-range_change-5L-6L-7L-7H-8L-8H meaning lots of gear skipping in lower speeds. But lego playing will be completely different due to electric motor and fact that you can’t shift manual lego transmission while driving. So, electric motor allows move off with top gear so on flat terrain and open area you can drive with top gear 8H. For slightly lower speed you can make splitter shift to gear 8L. Main gearbox shifting between 5H, 6H, 7H and 8H gives quite large speed range which covers the most lego driving situations. For temporary low speed driving you can make range-change from 8H to 4H. These six gears are usually enough in lego playing but you can say that you have real truck transmission with realistic ratios in your lego truck. :-) 7 transmission straight: I have designed for this lego truck so called 7 transmission straight: same truck chassis but seven different kind transmissions with number of gears 10, 11, 12, 13, 14, 15 and 16. Straight includes earlier introduced 16-speed transmission and my truck’s current 12-speed transmission. Current lego design is not documented yet. Straight has also remade versions of 10- and 14-speed transmissions so next chapter Optional transmissions is partly outdated and will have an update later. This 7 transmission straight is published as LinkedIn article and you can check it from next link. My Lego Technic 4x2 truck & 7 transmission straight (plus extra truck transmission info) Optional transmissions (partly outdated):
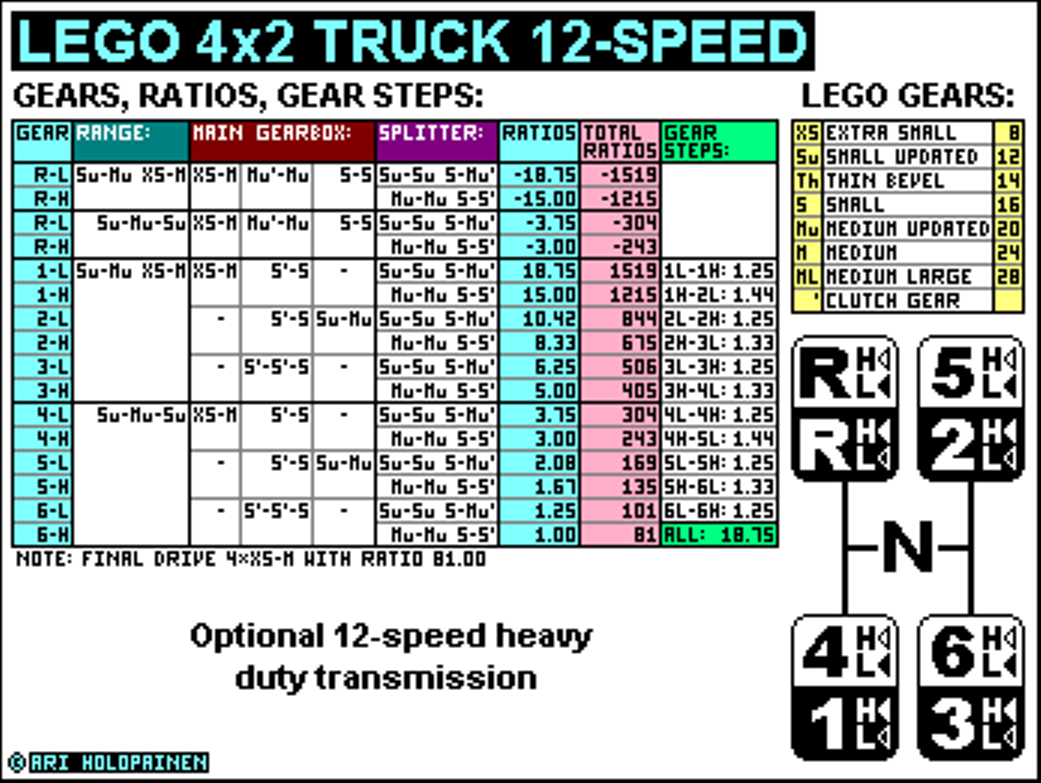
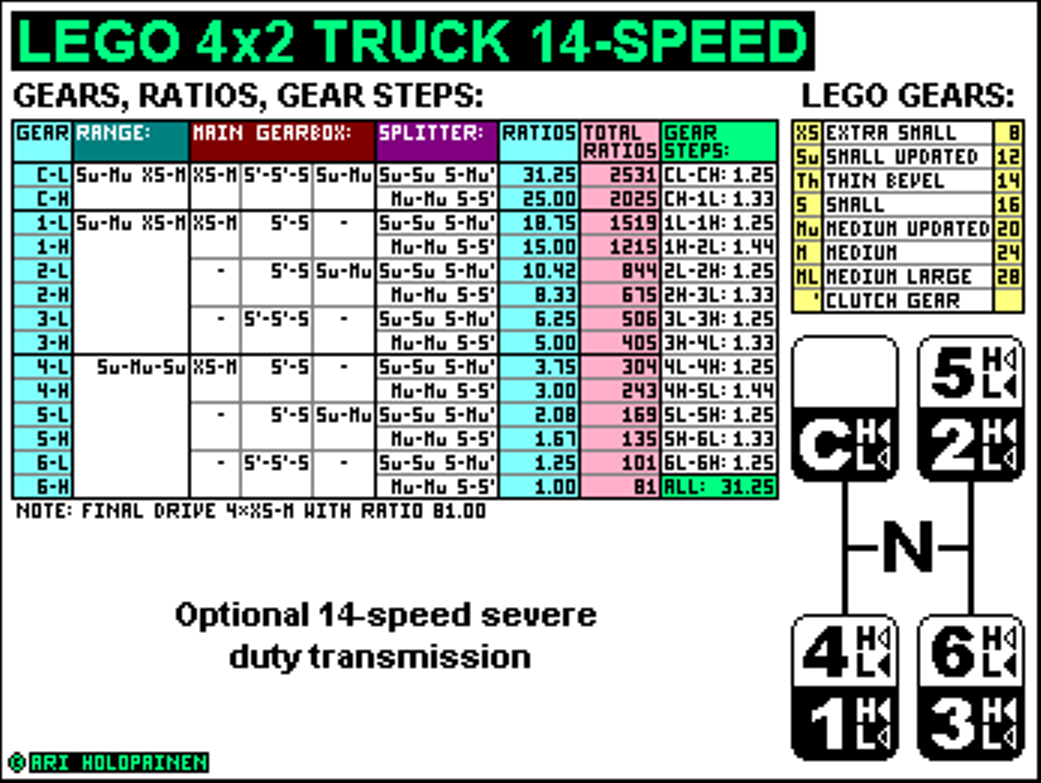
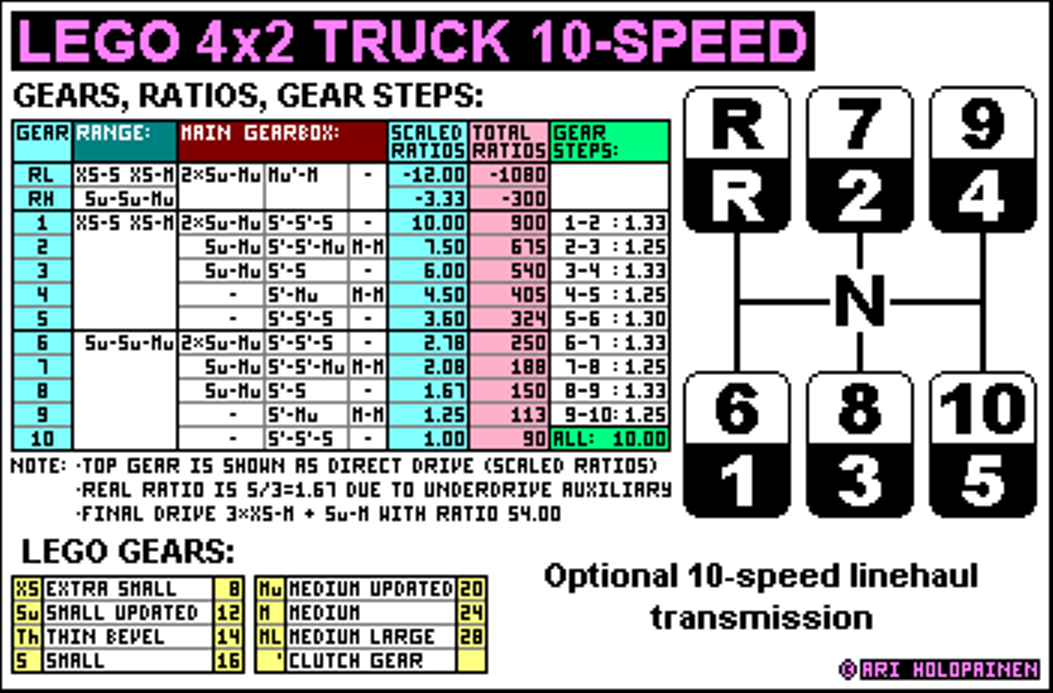
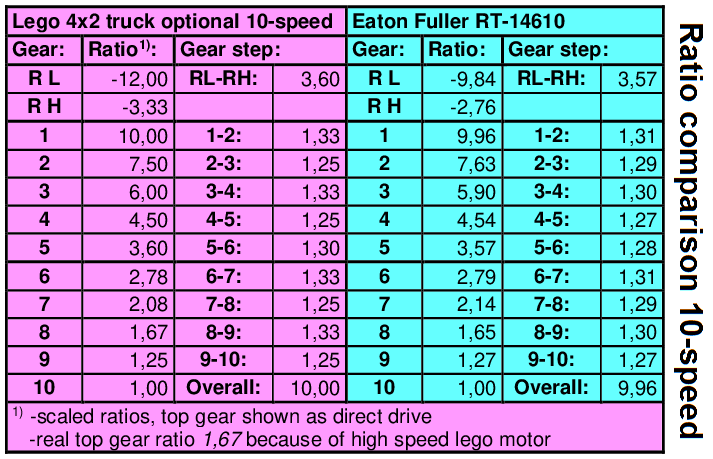
Note: This chapter is partly outdated due to previous chapter 7 transmission straight but other new optional transmissions will be located here. My lego truck uses high speed lego motor (4500 r/min) so transmission ratios and final drive ratio are matched with it. So top gear’s ratio is now 3,17 and final drive ratio 27,00 which give total ratio about 85,7 for top gear. With this lego motor and tyre size suitable total ratios for top gear are around 50-100. But for lego builders there are also other lego transmission possibilities. In this version final drive ratio can reduced to 3,00 which will give total ratio about 9,5 for top gear. If you want 16-speed transmission and this modification is still too slow you can make request for direct drive or overdrive transmission. As 1st option it’s possible to replace transmission with basic 12-speed (2x3x2) heavy duty transmission with 4 reverse gears. It’s direct drive transmission with 4-stage final drive so total ratio of top gear can be chosen between 3-81, which allows both low and high speed lego motors. Ratio set is not taken from any current 12-speed truck transmissions but it’s still realistic. This transmission can be used in 12-speed Mercedes, Scania and Volvo, also in 12-speed manual ZF Ecosplit, automated ZF AS Tronic or automated ZF TraXon based trucks like DAF, Iveco, MAN and Renault, and also in Eaton Endurant HD based American trucks. As 2nd option 12-speed transmission is easy to convert into severe duty 14-speed (2x3x2+2) transmission by replacing reverse gear with crawler gear. These extra slow crawler gears give very high overall gear ratio allowing very low speed driving for special purposes. Also this ratio set is not taken from real transmission but you can use it instead of Volvo’s I-Shift with crawler gears and Eaton Fuller 11-speed severe duty transmissions. As 3rd option this truck can be equipped with simple 10-speed linehaul transmission that has 5-speed main gearbox with reverse gear plus range-change unit. But then becomes a small reality problem: lego truck is quite new European design but transmission is inspired by older 10-speed Eaton Fuller that was used in American linehaul trucks somewhere in 80’s or 90’s. So lego truck must be modified to look old American cabover truck like Freightliner, Kenworth or Peterbuilt. Reason for this inspirer is quite small gear steps and overall gear ratio but it is the easiest ratio set of 10-speeder to build with lego. In older truck engines speed range of high torque was more narrow than in modern engines so gear steps had to be smaller. Modern engines allow larger gear steps so larger overall gear ratio in modern 10-speed Fuller and other transmissions gives versatility to optimize economy in high speed without losing too much high move-off and climbing capability. In this lego 10-speed transmission top gear ratio is 1,67 due to underdrive range-change unit. With final drive ratio 54,00 it gives total ratio 90,0 for top gear. But ratio of 4-stage final drive can be chosen between 3-81 so this transmission suits both low and high speed lego motors. One problematic issue can be shifting to low range due to 8 and 16 teeth spur gear pair. But when you shift main gearbox into neutral and run motor shortly during range shift this low inertia crash box shift should help to get into low range. All in all this 10-speed transmission option gives the simplest transmission to operate but small overall gear ratio doesn’t allow heavy duty purposes for your lego truck. And you need to pay more attention for used final drive ratio. These 12-speed, 14-speed and 10-speed don’t need old 14 teeth thin bevel gears or new 28 teeth gear. But they use new 20 teeth clutch gear so if you don’t have this gear wheel make request for alternative design. My email address is on main page. :-) C. Ugly Cabriolet With Lights:
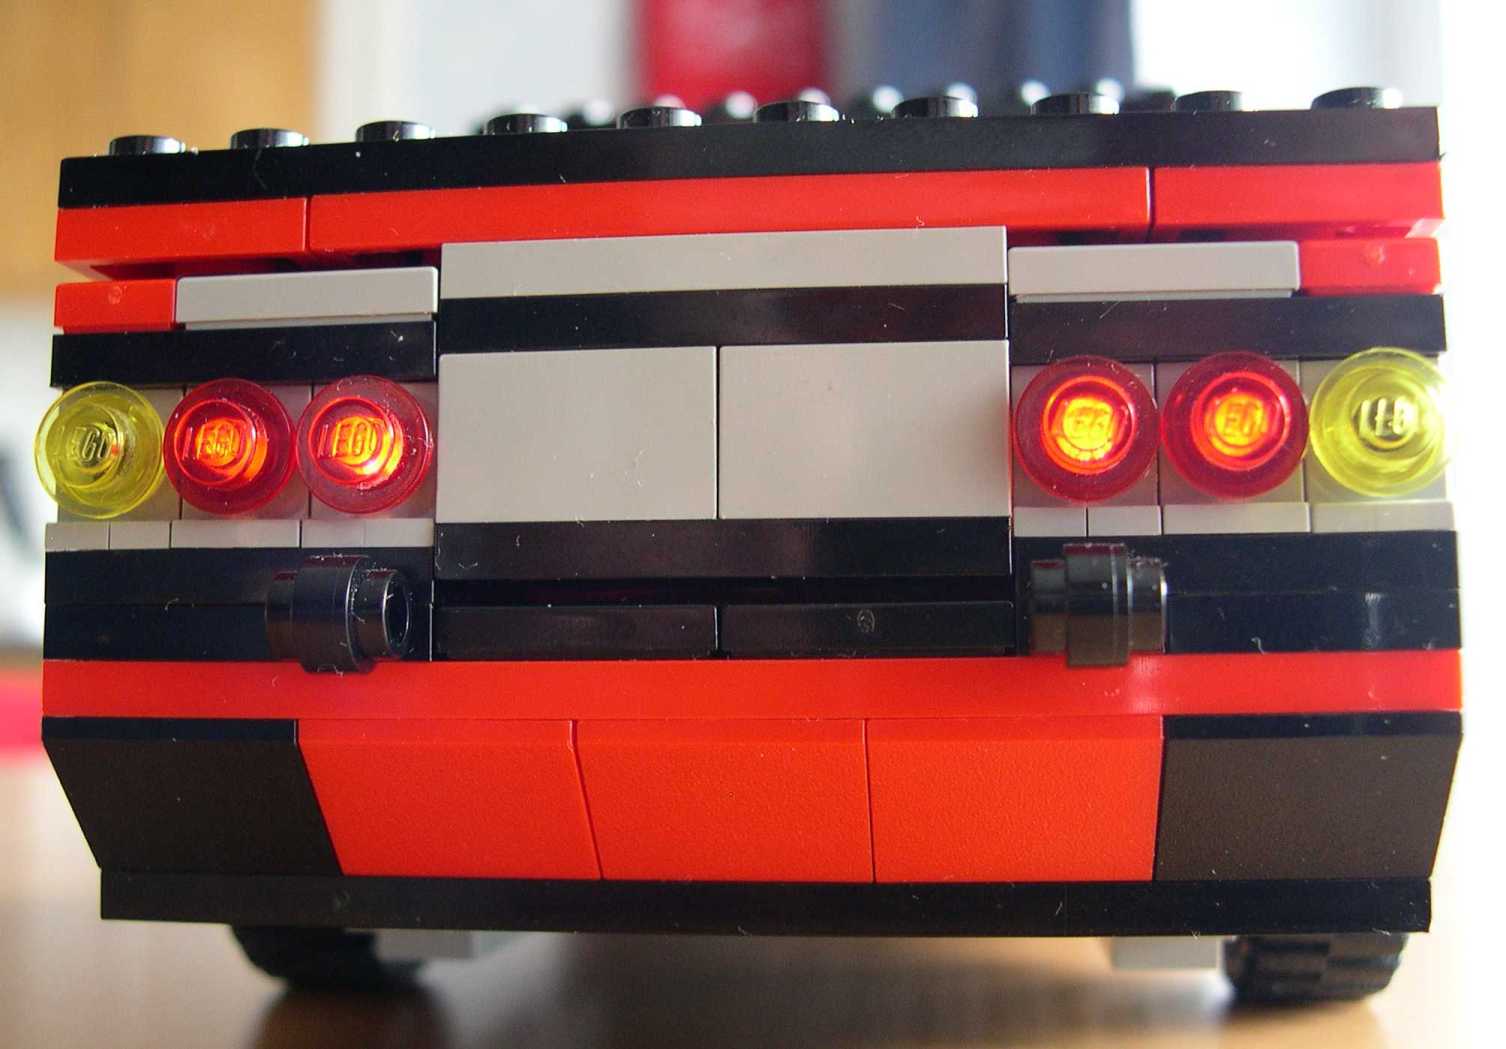
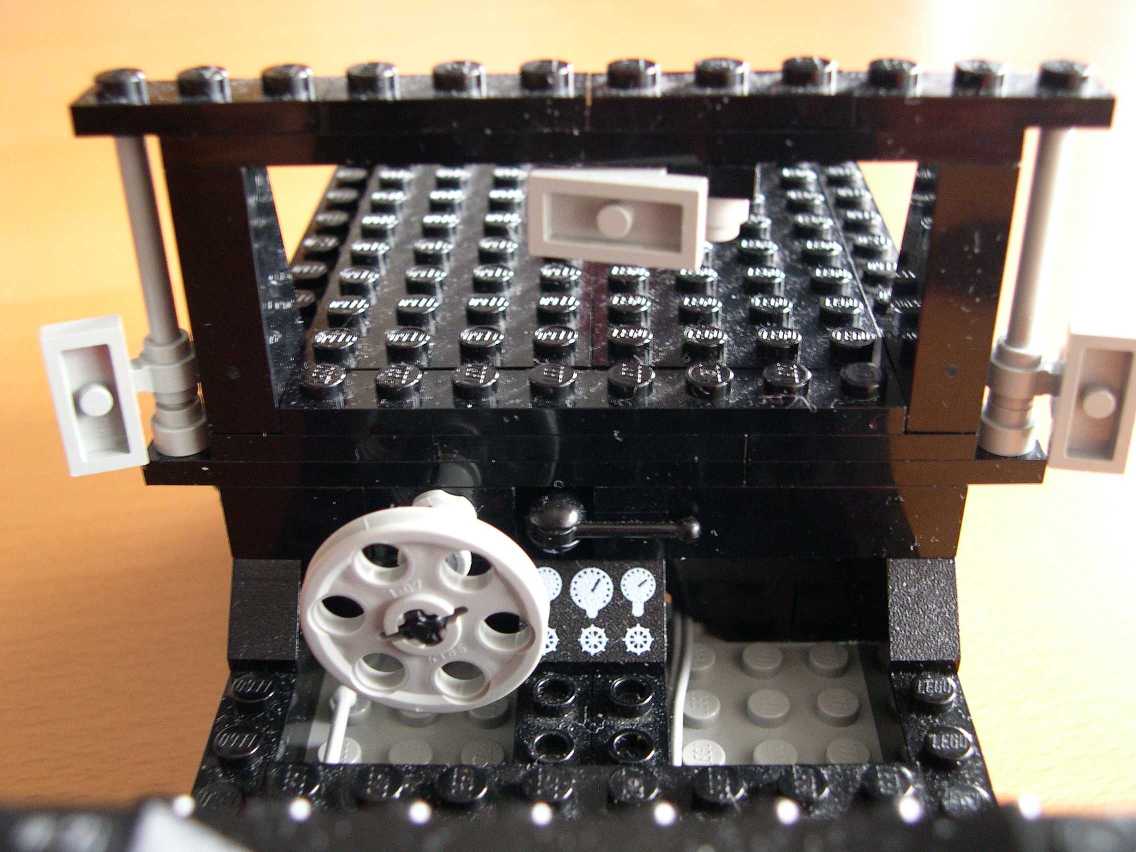
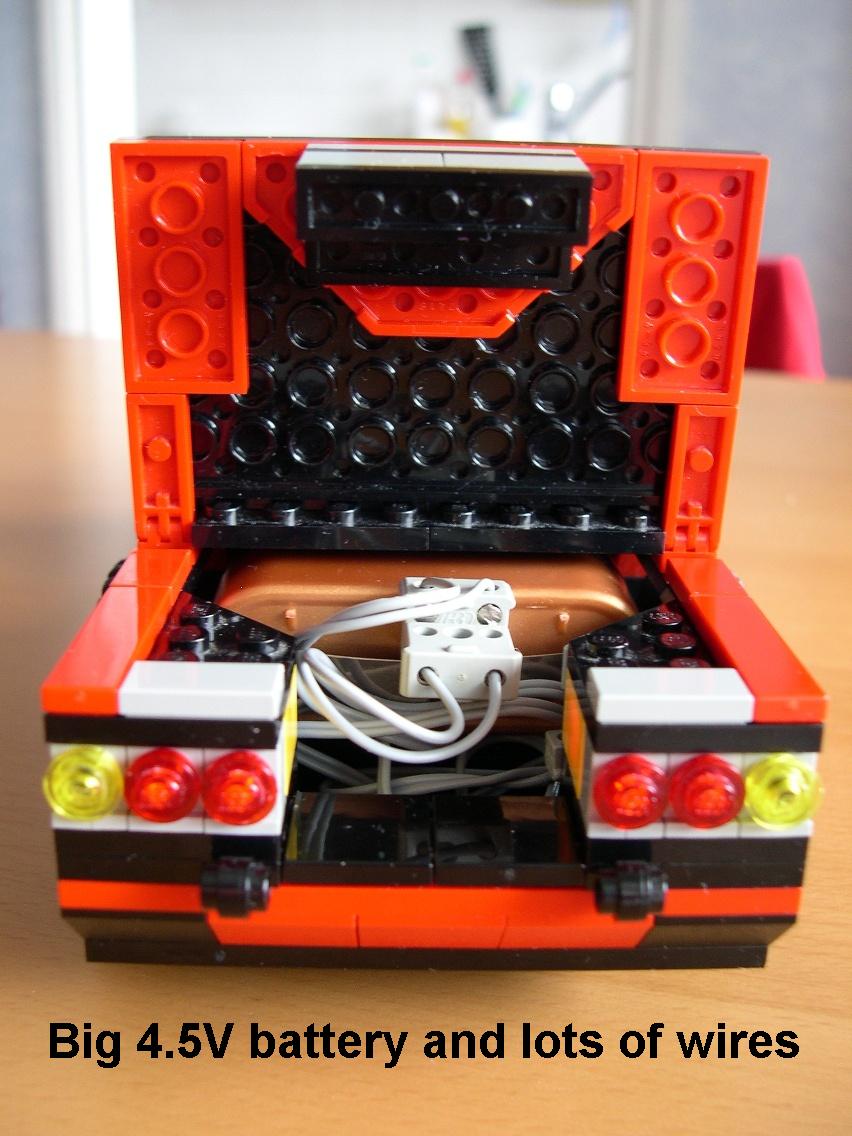
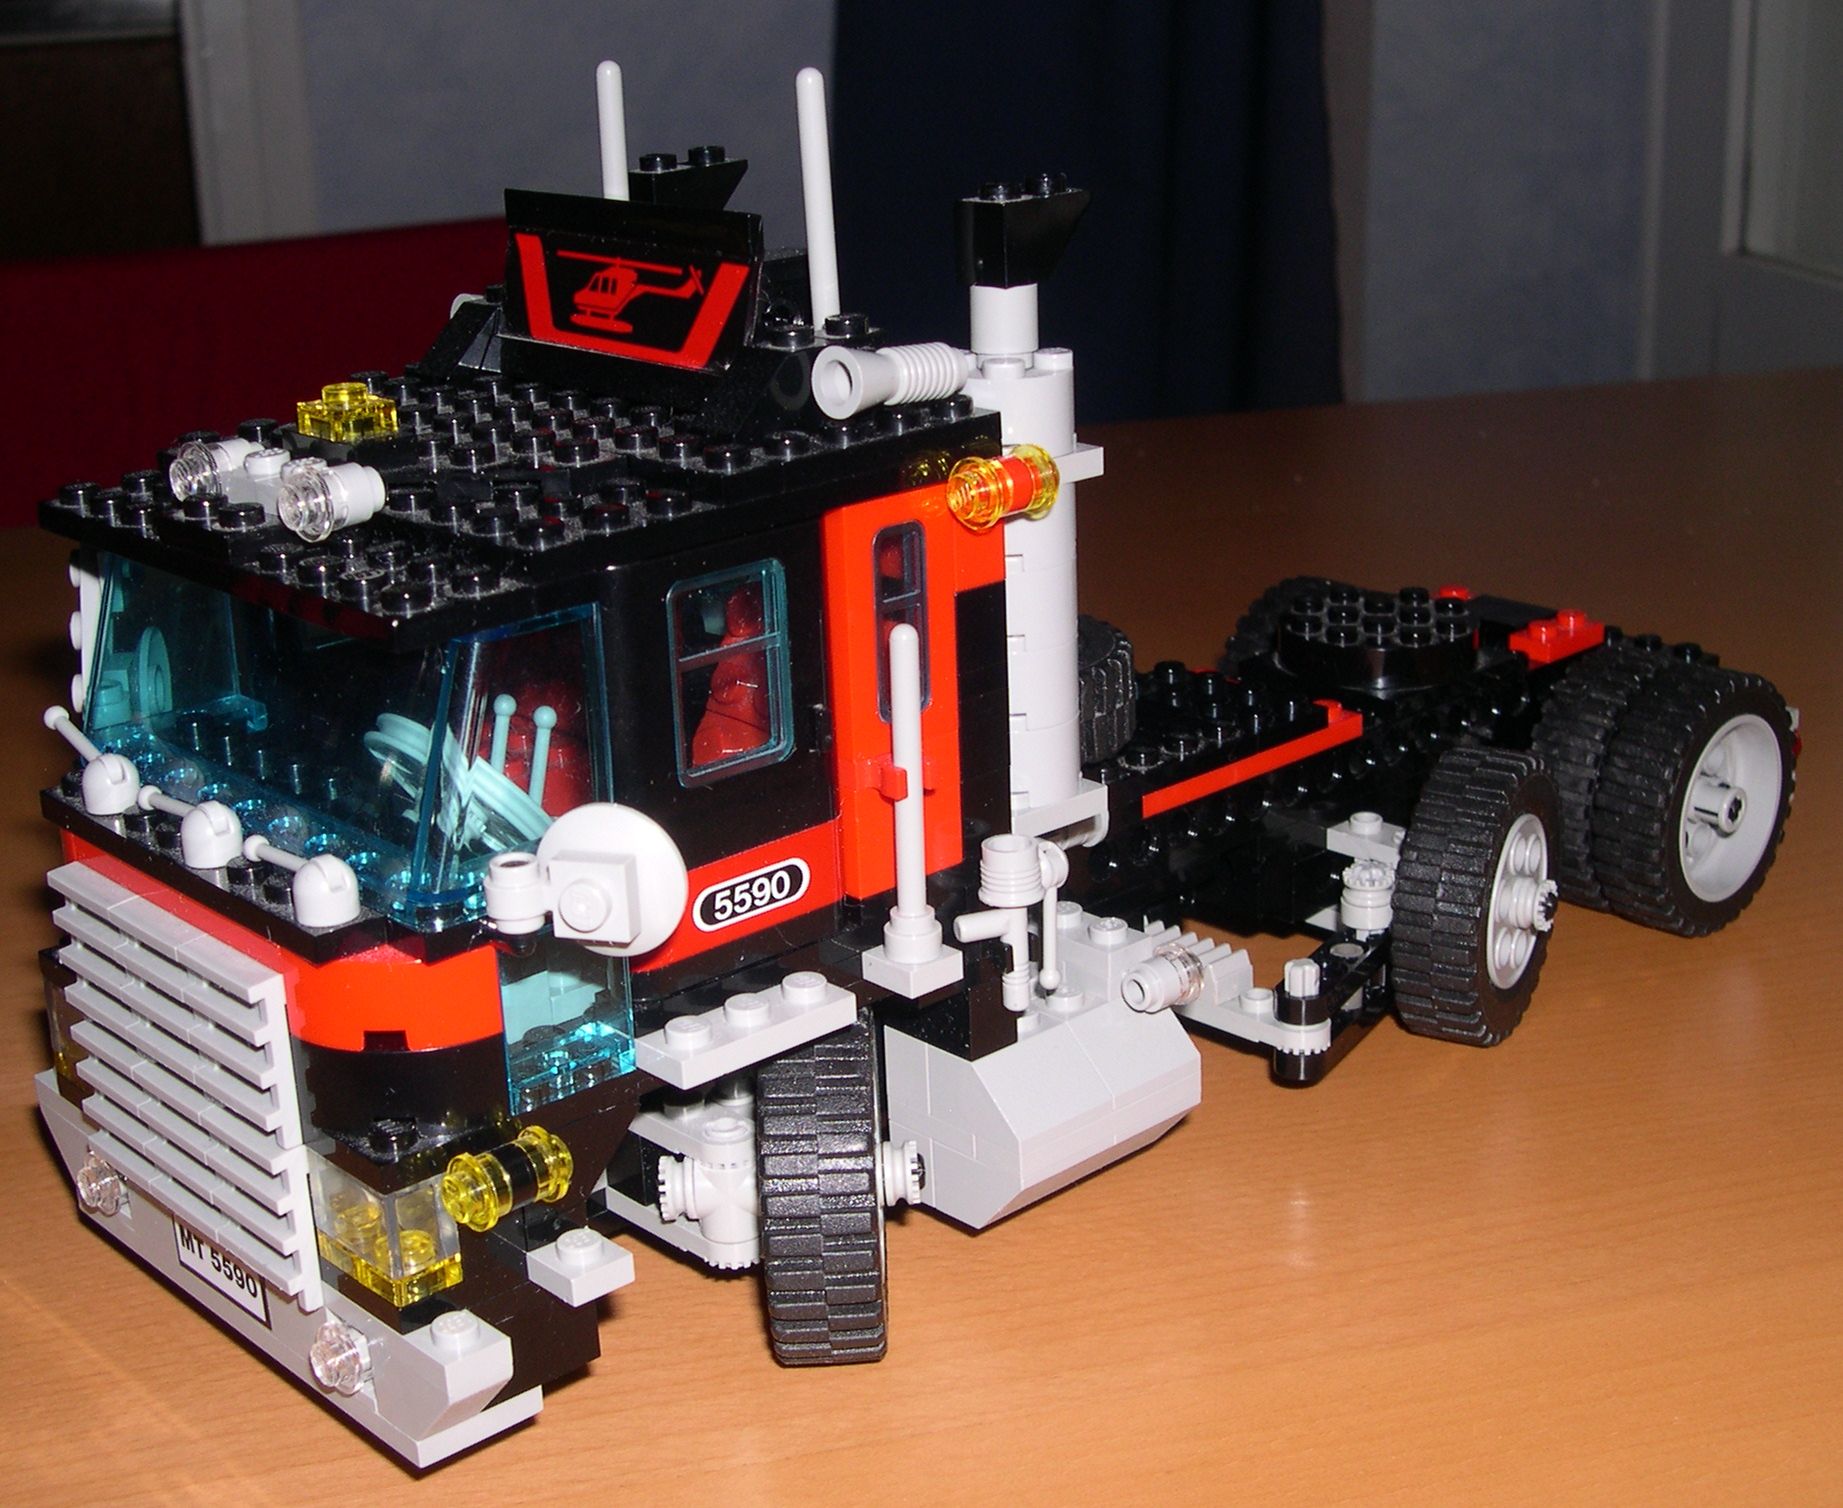
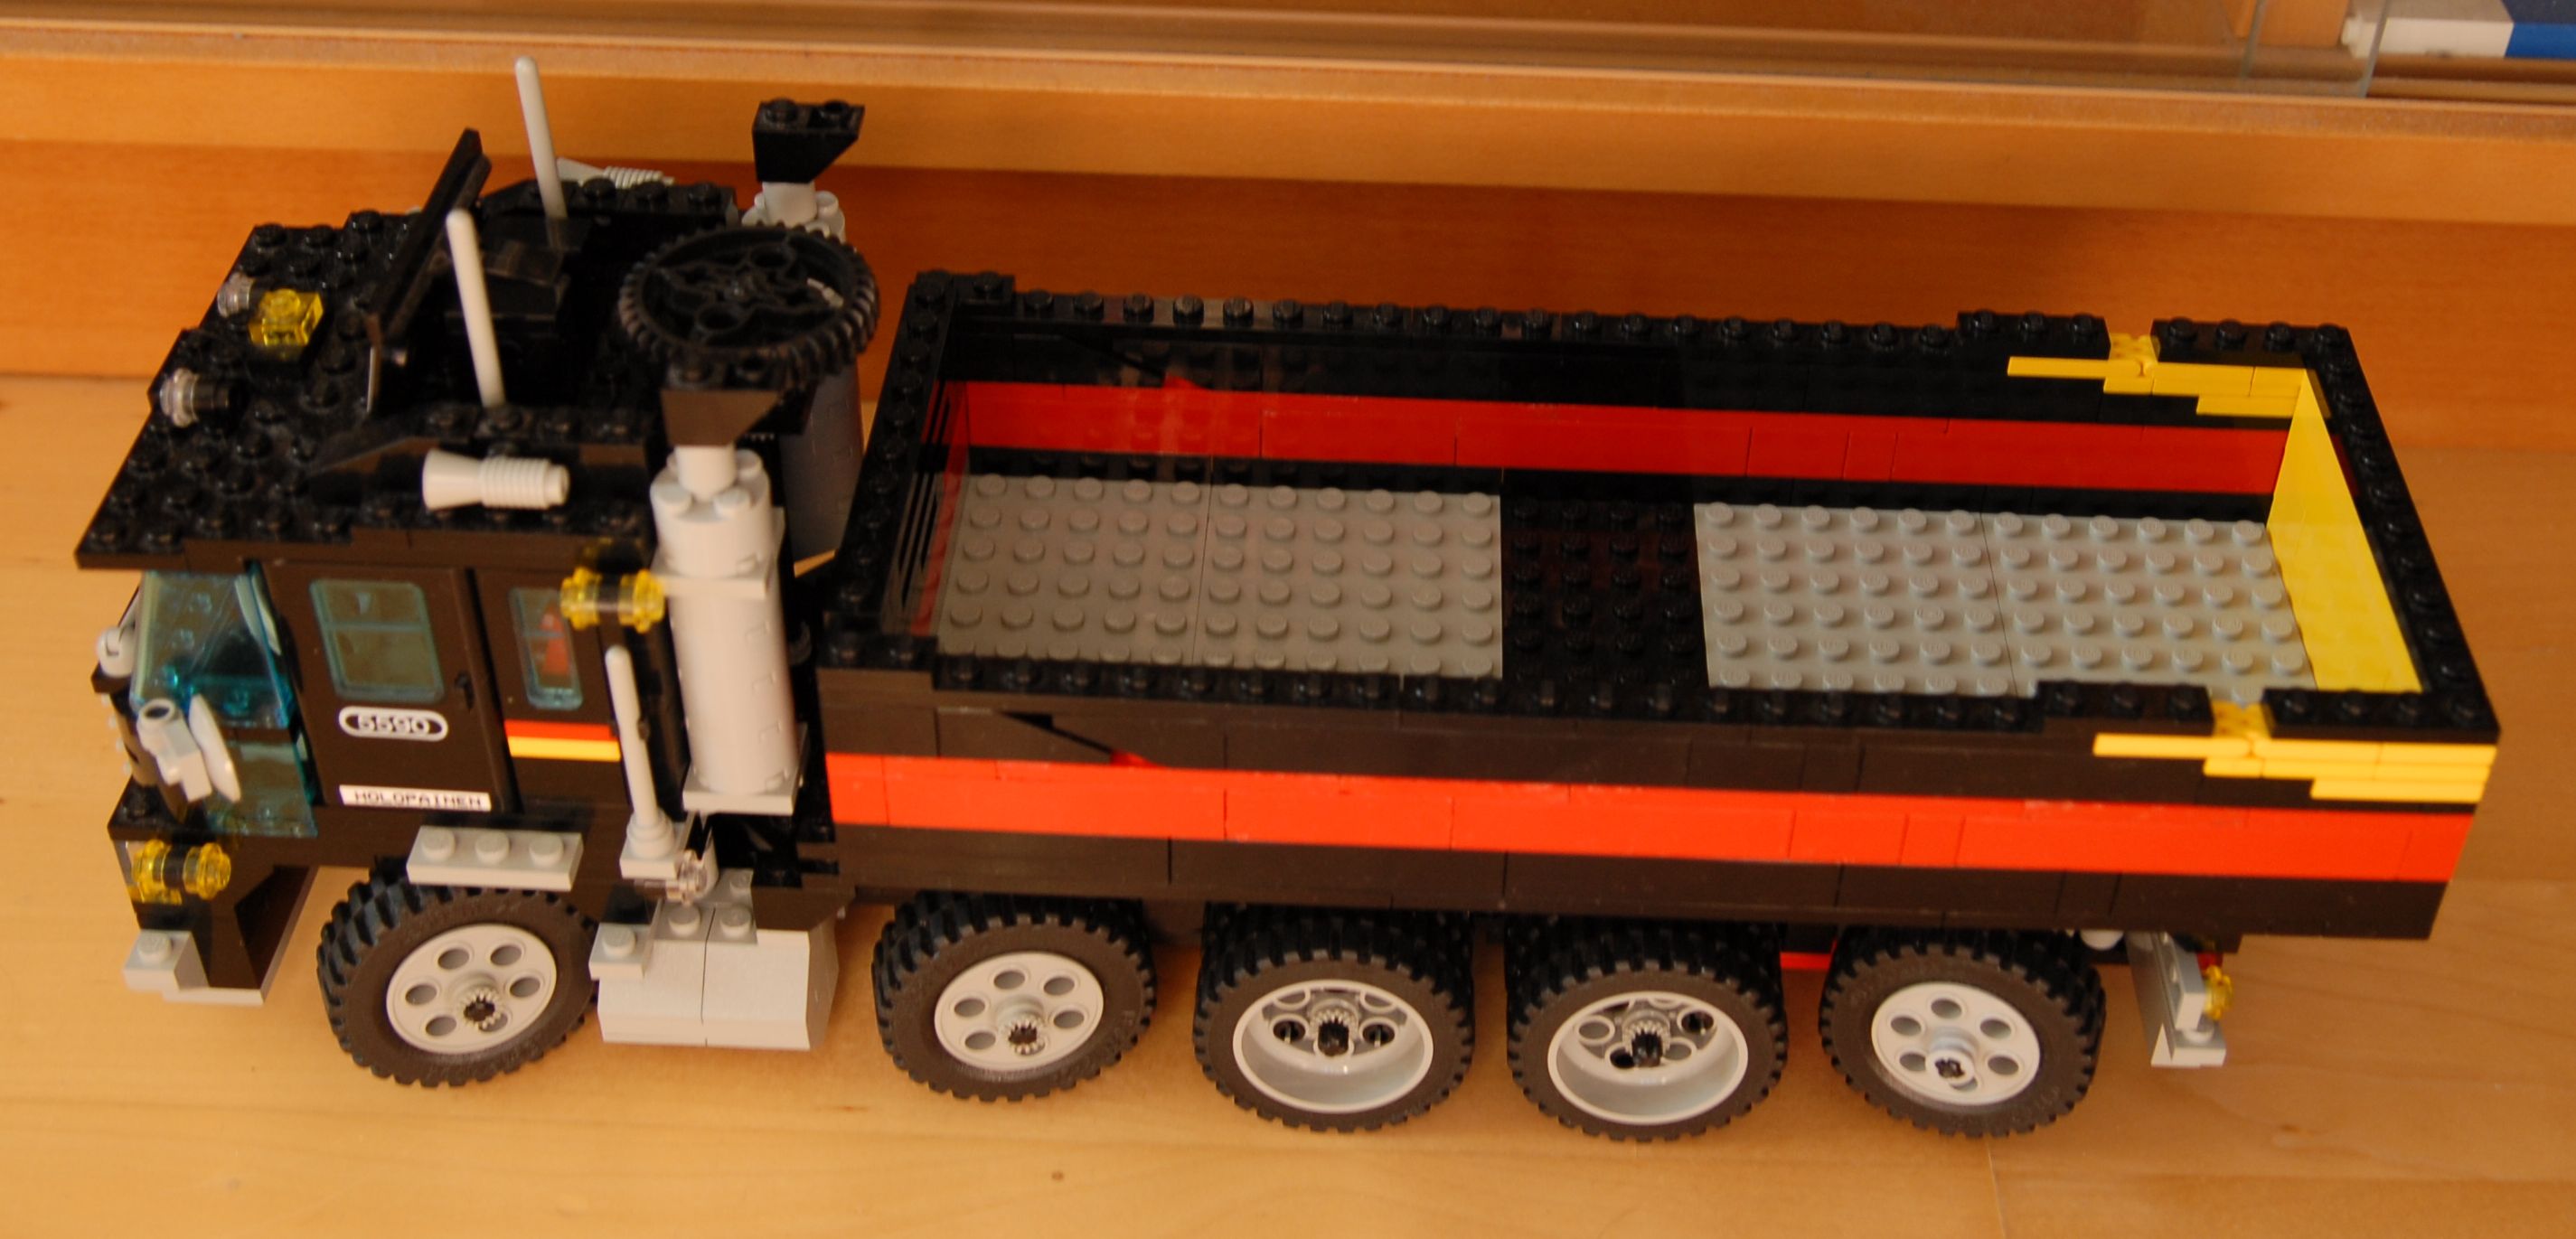
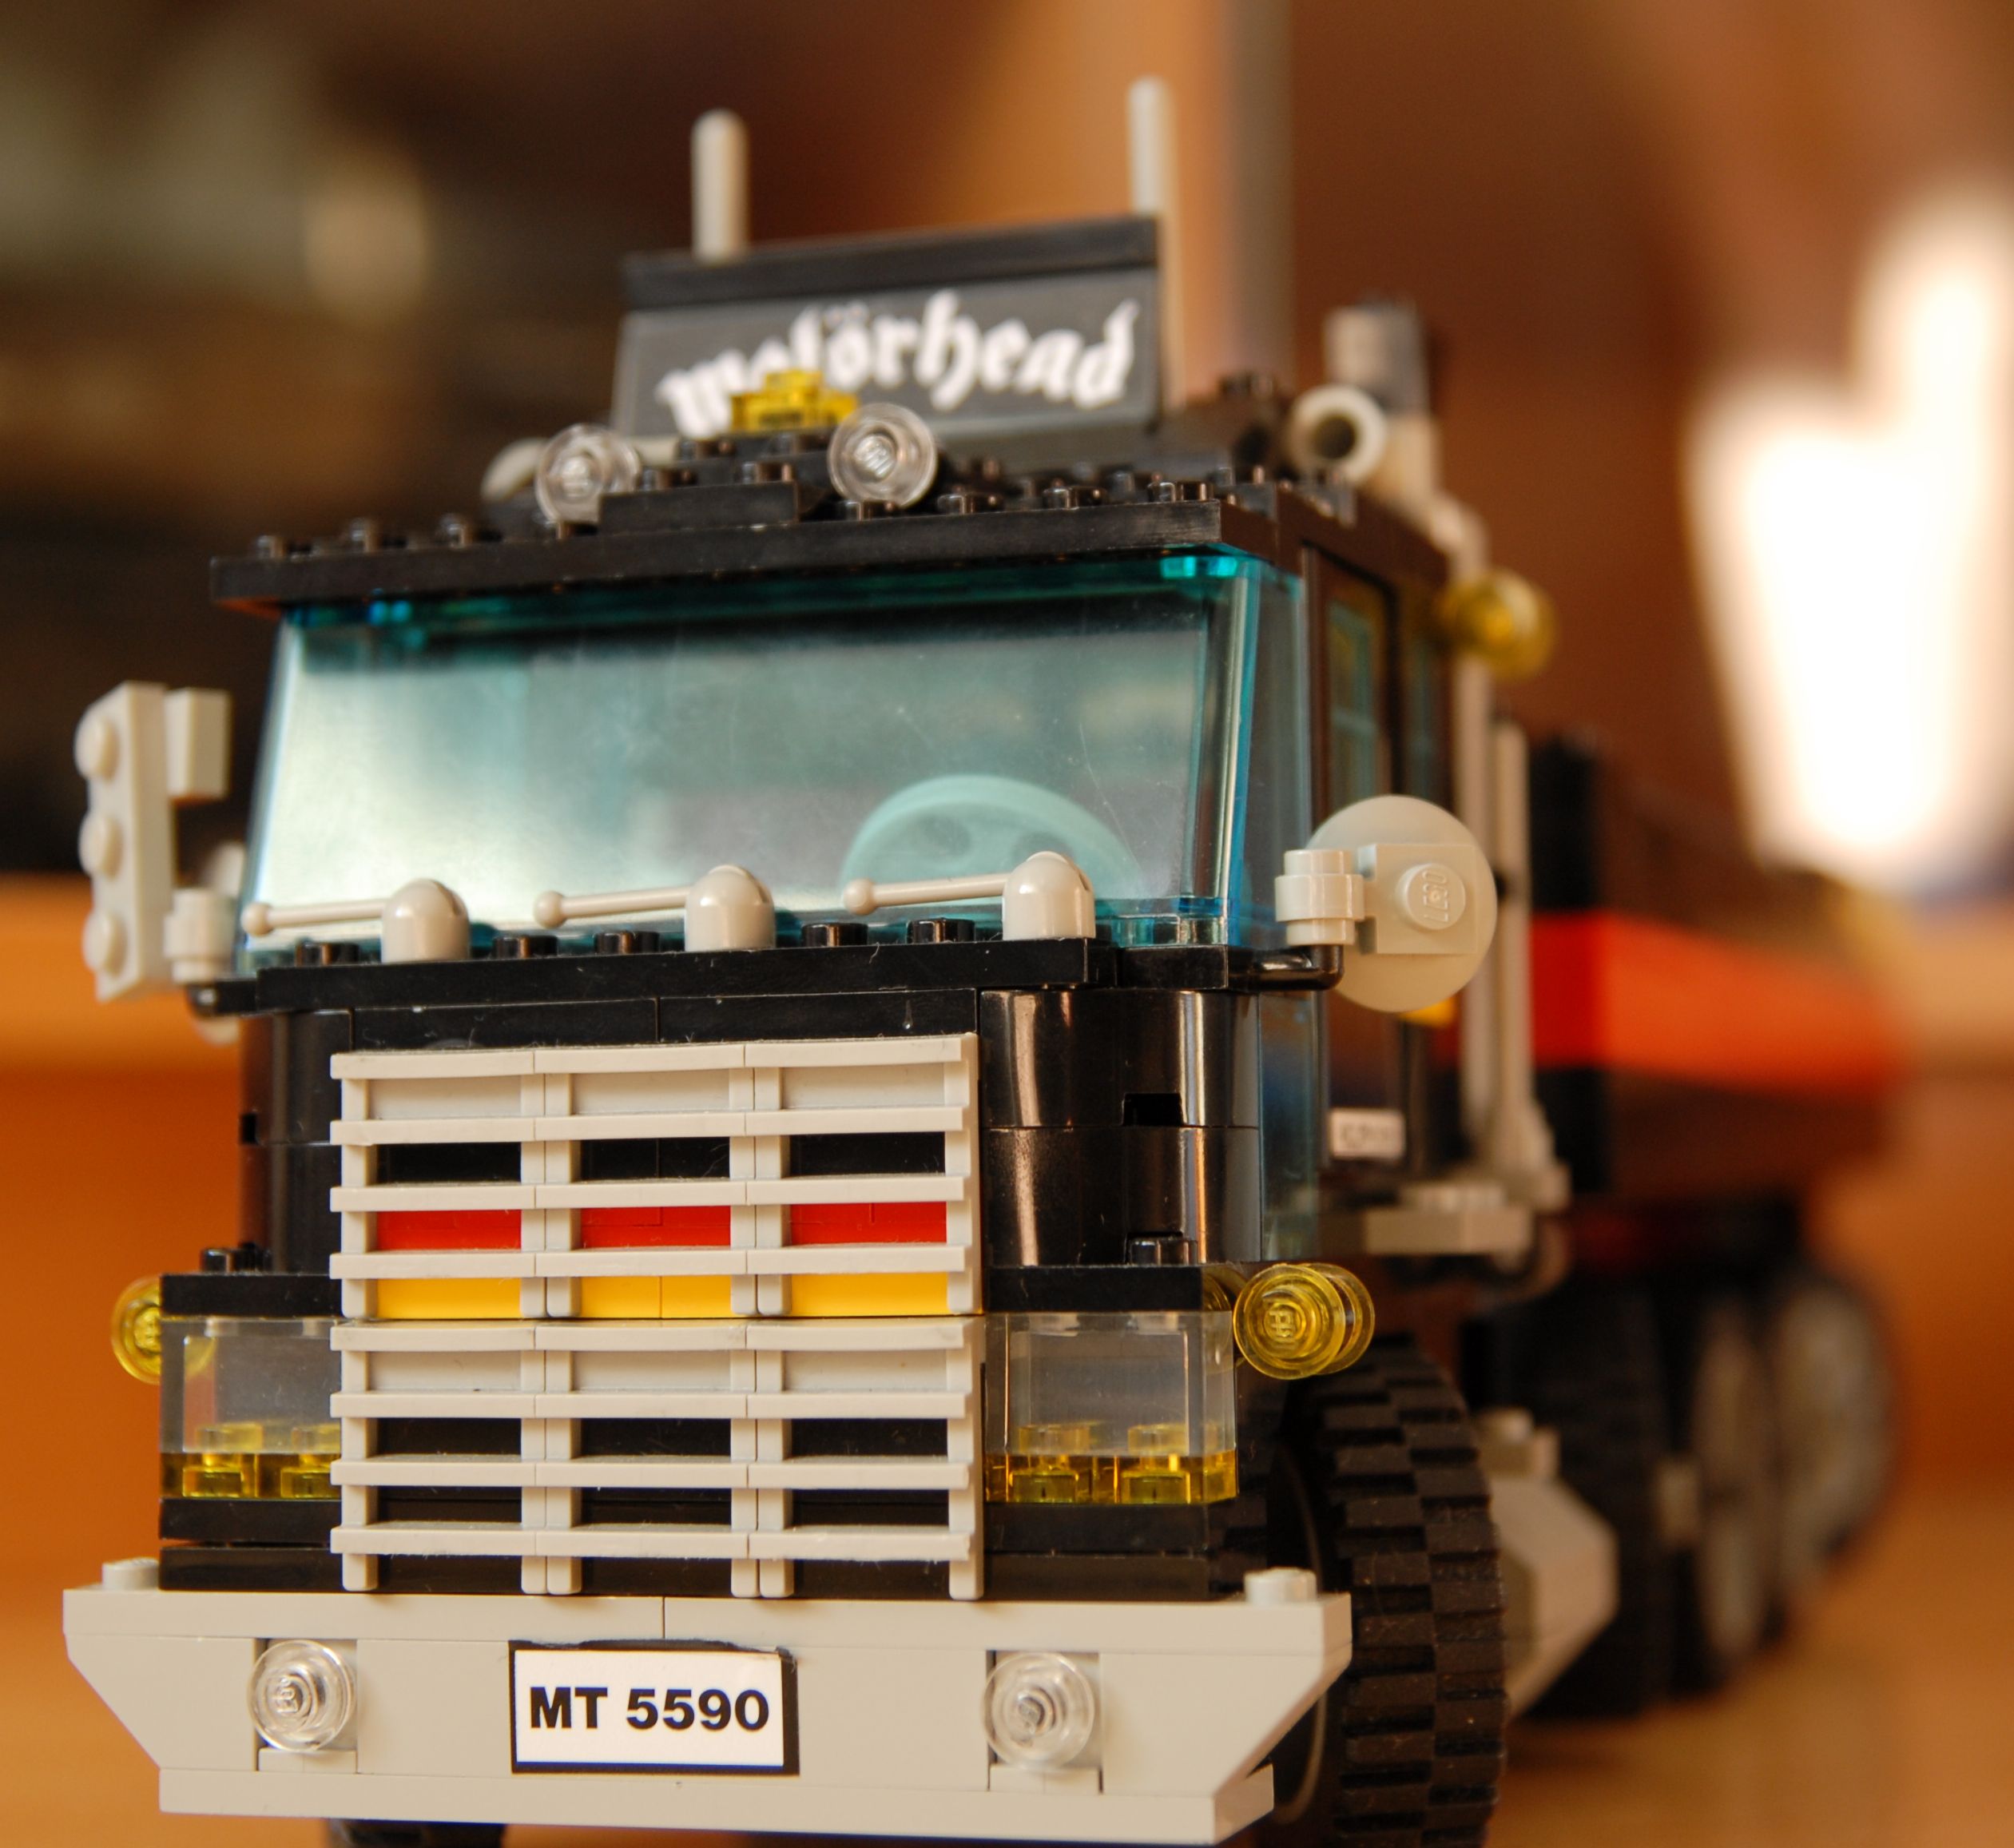
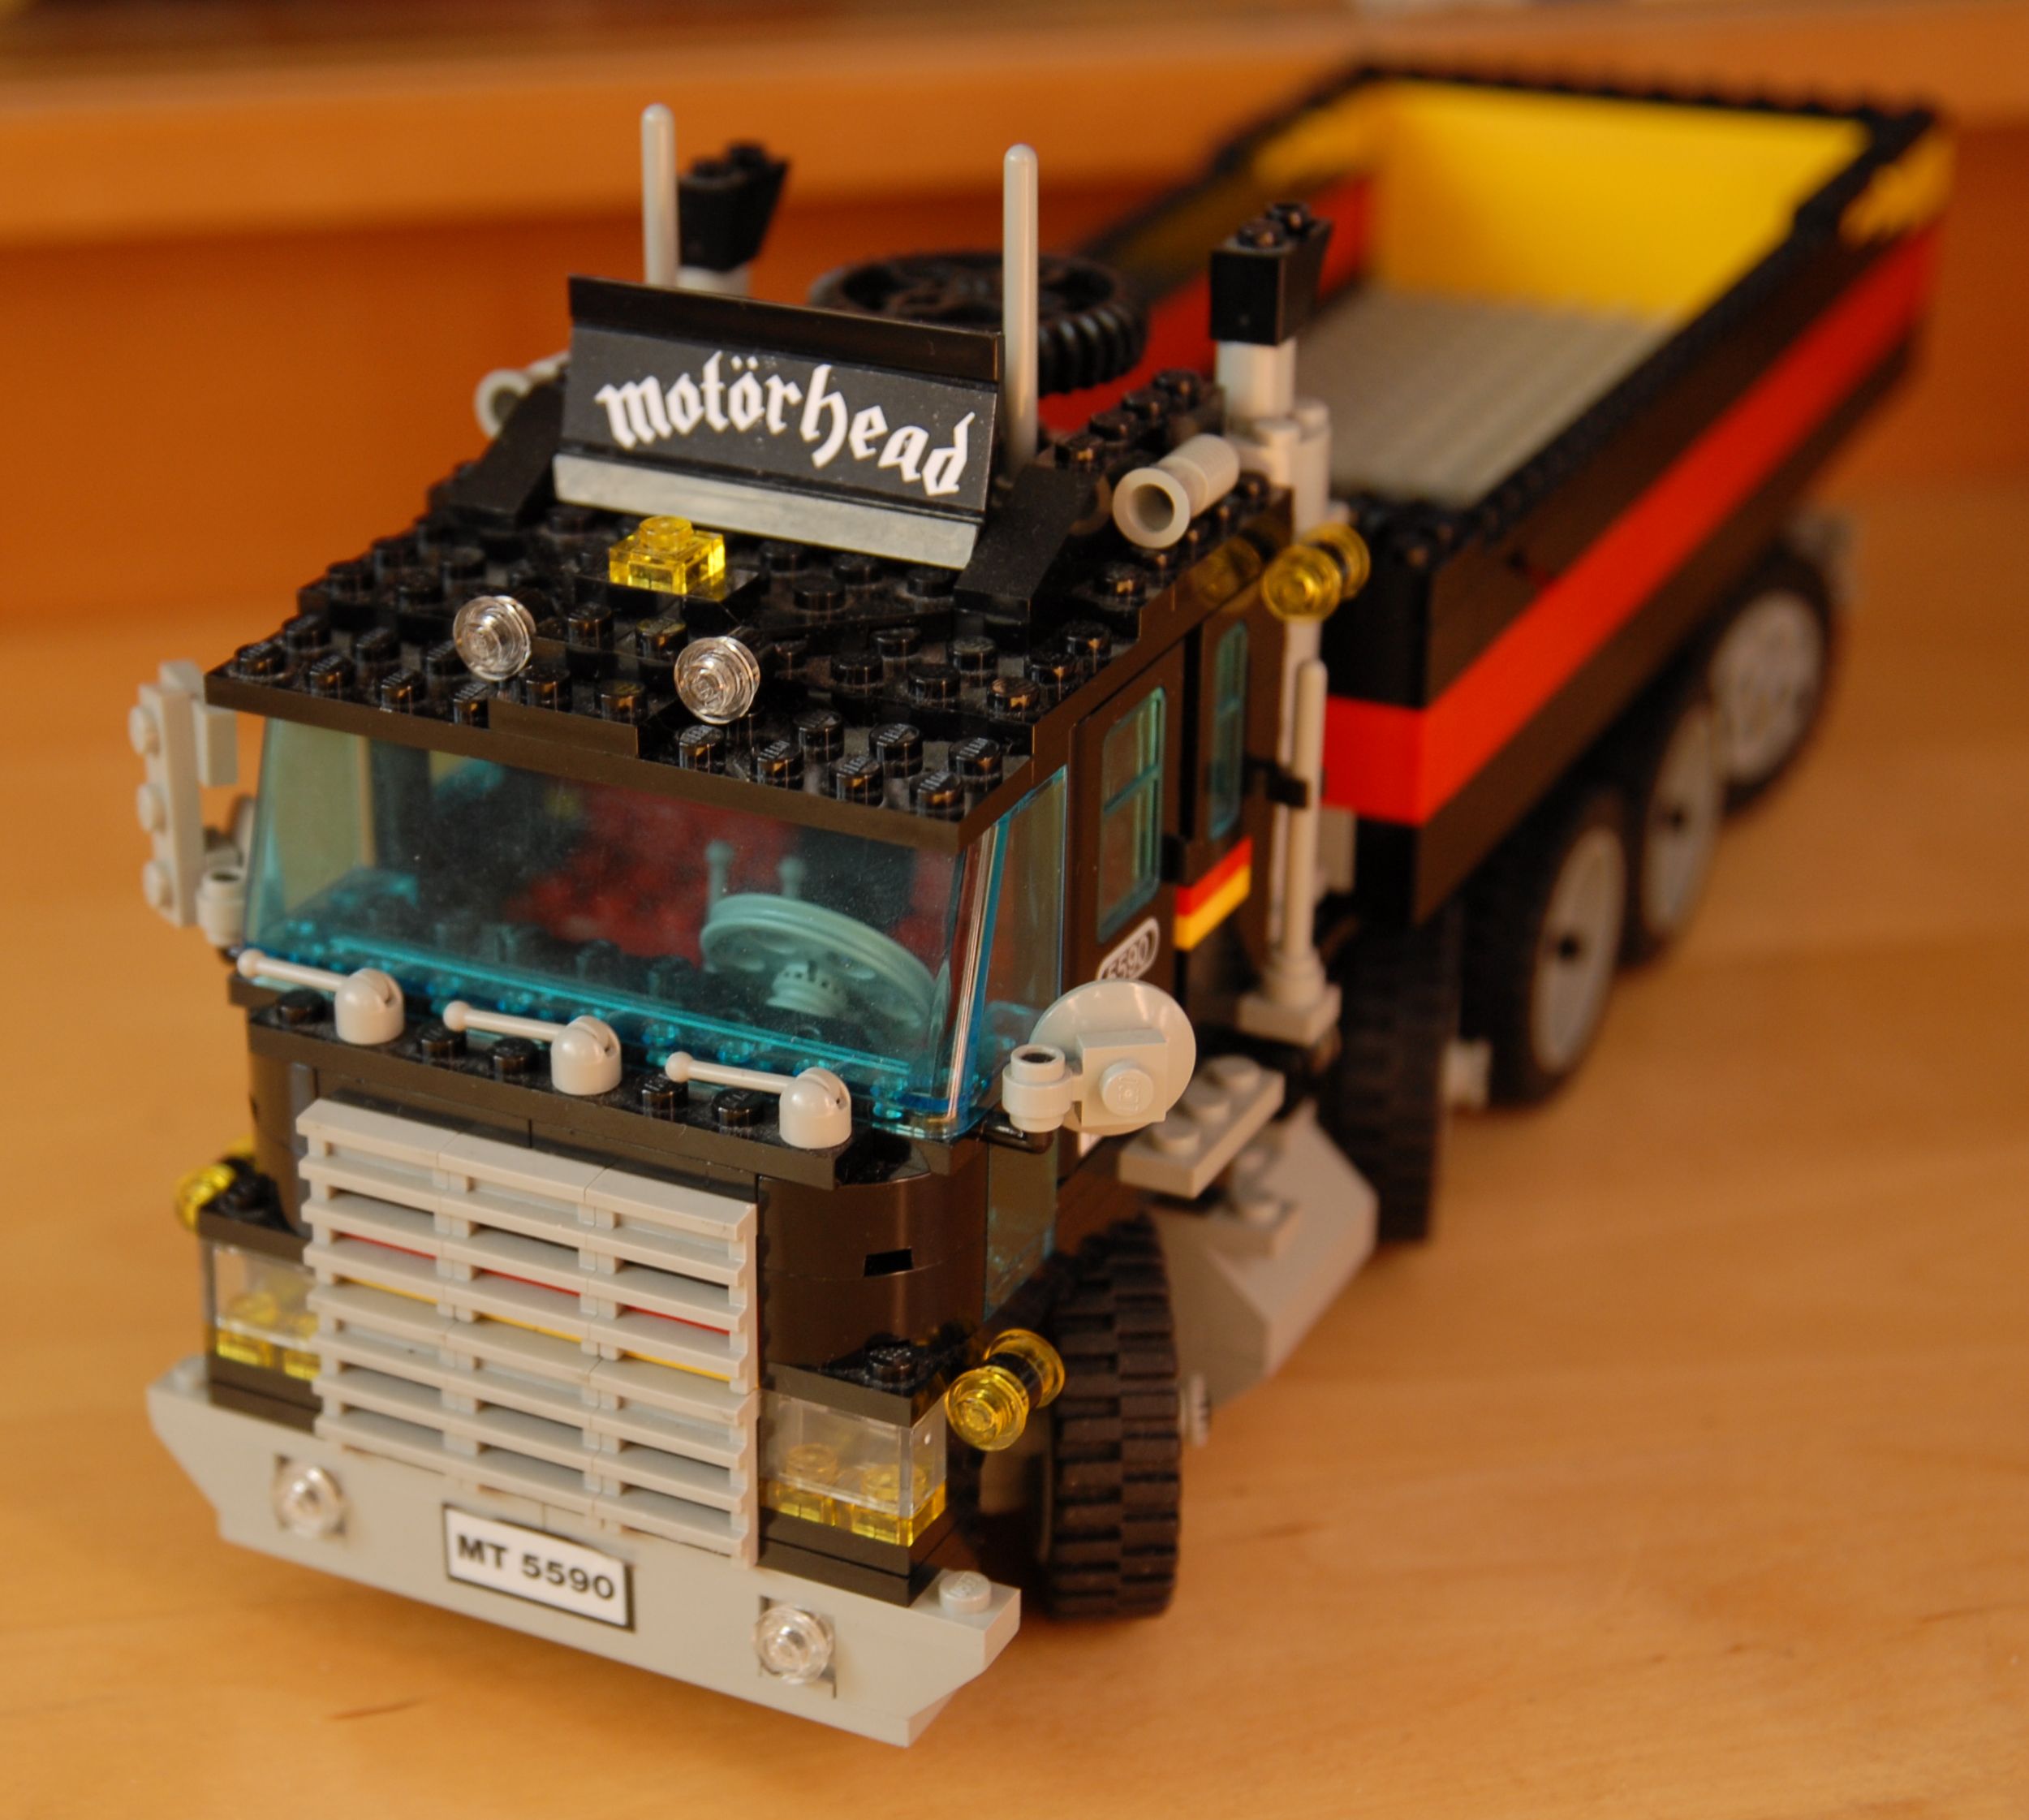
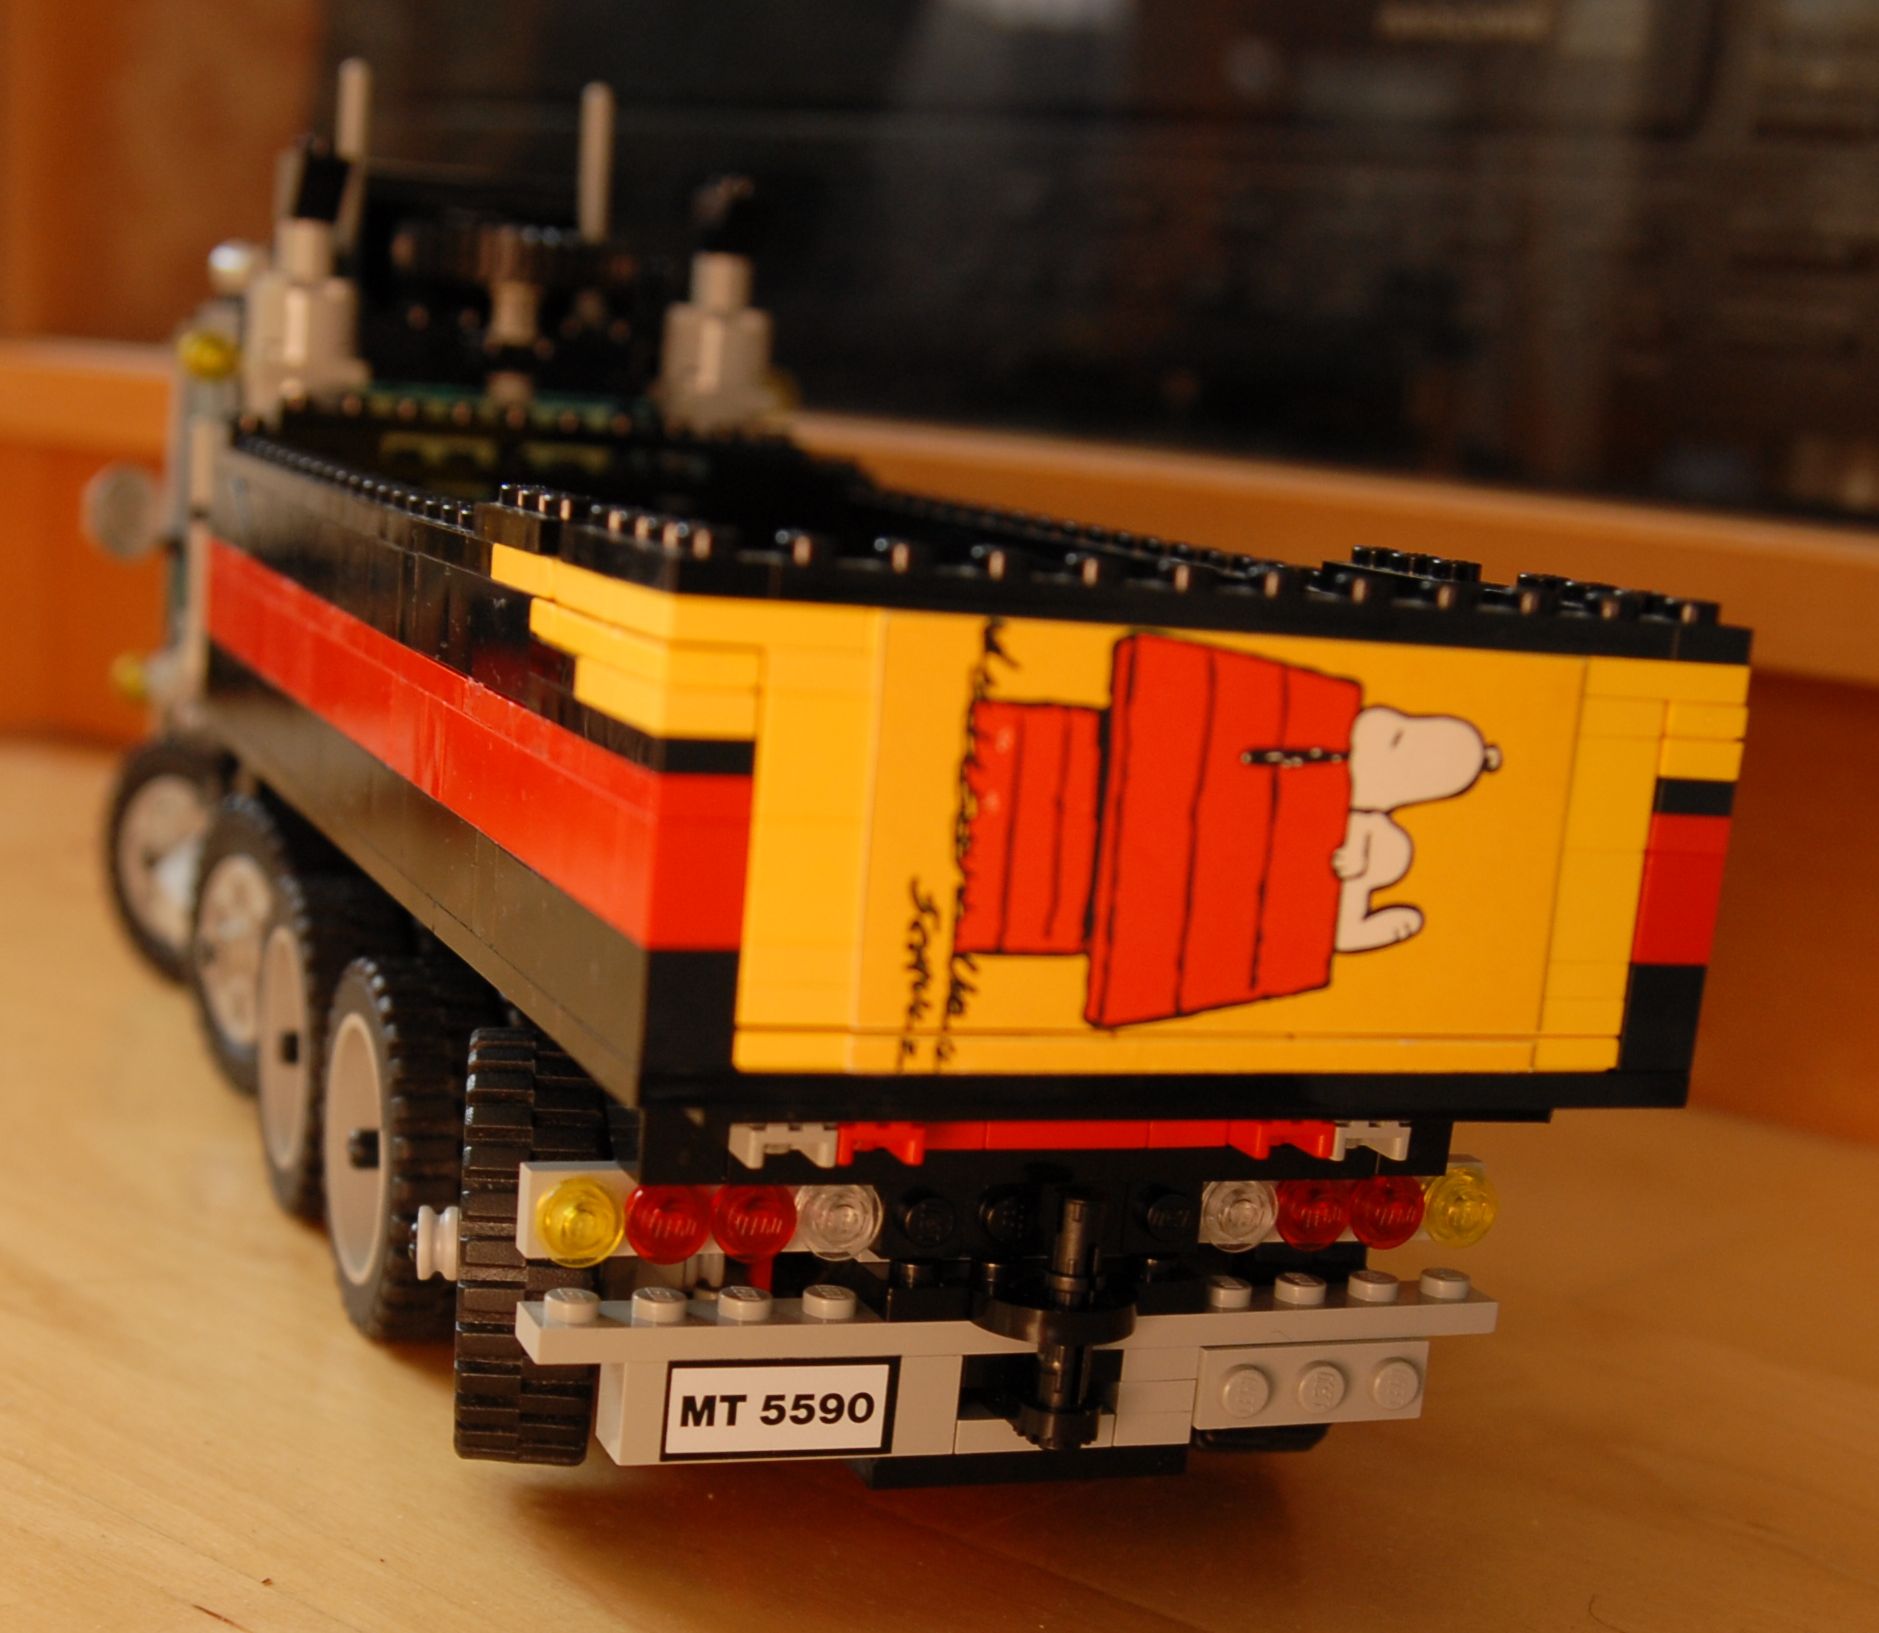
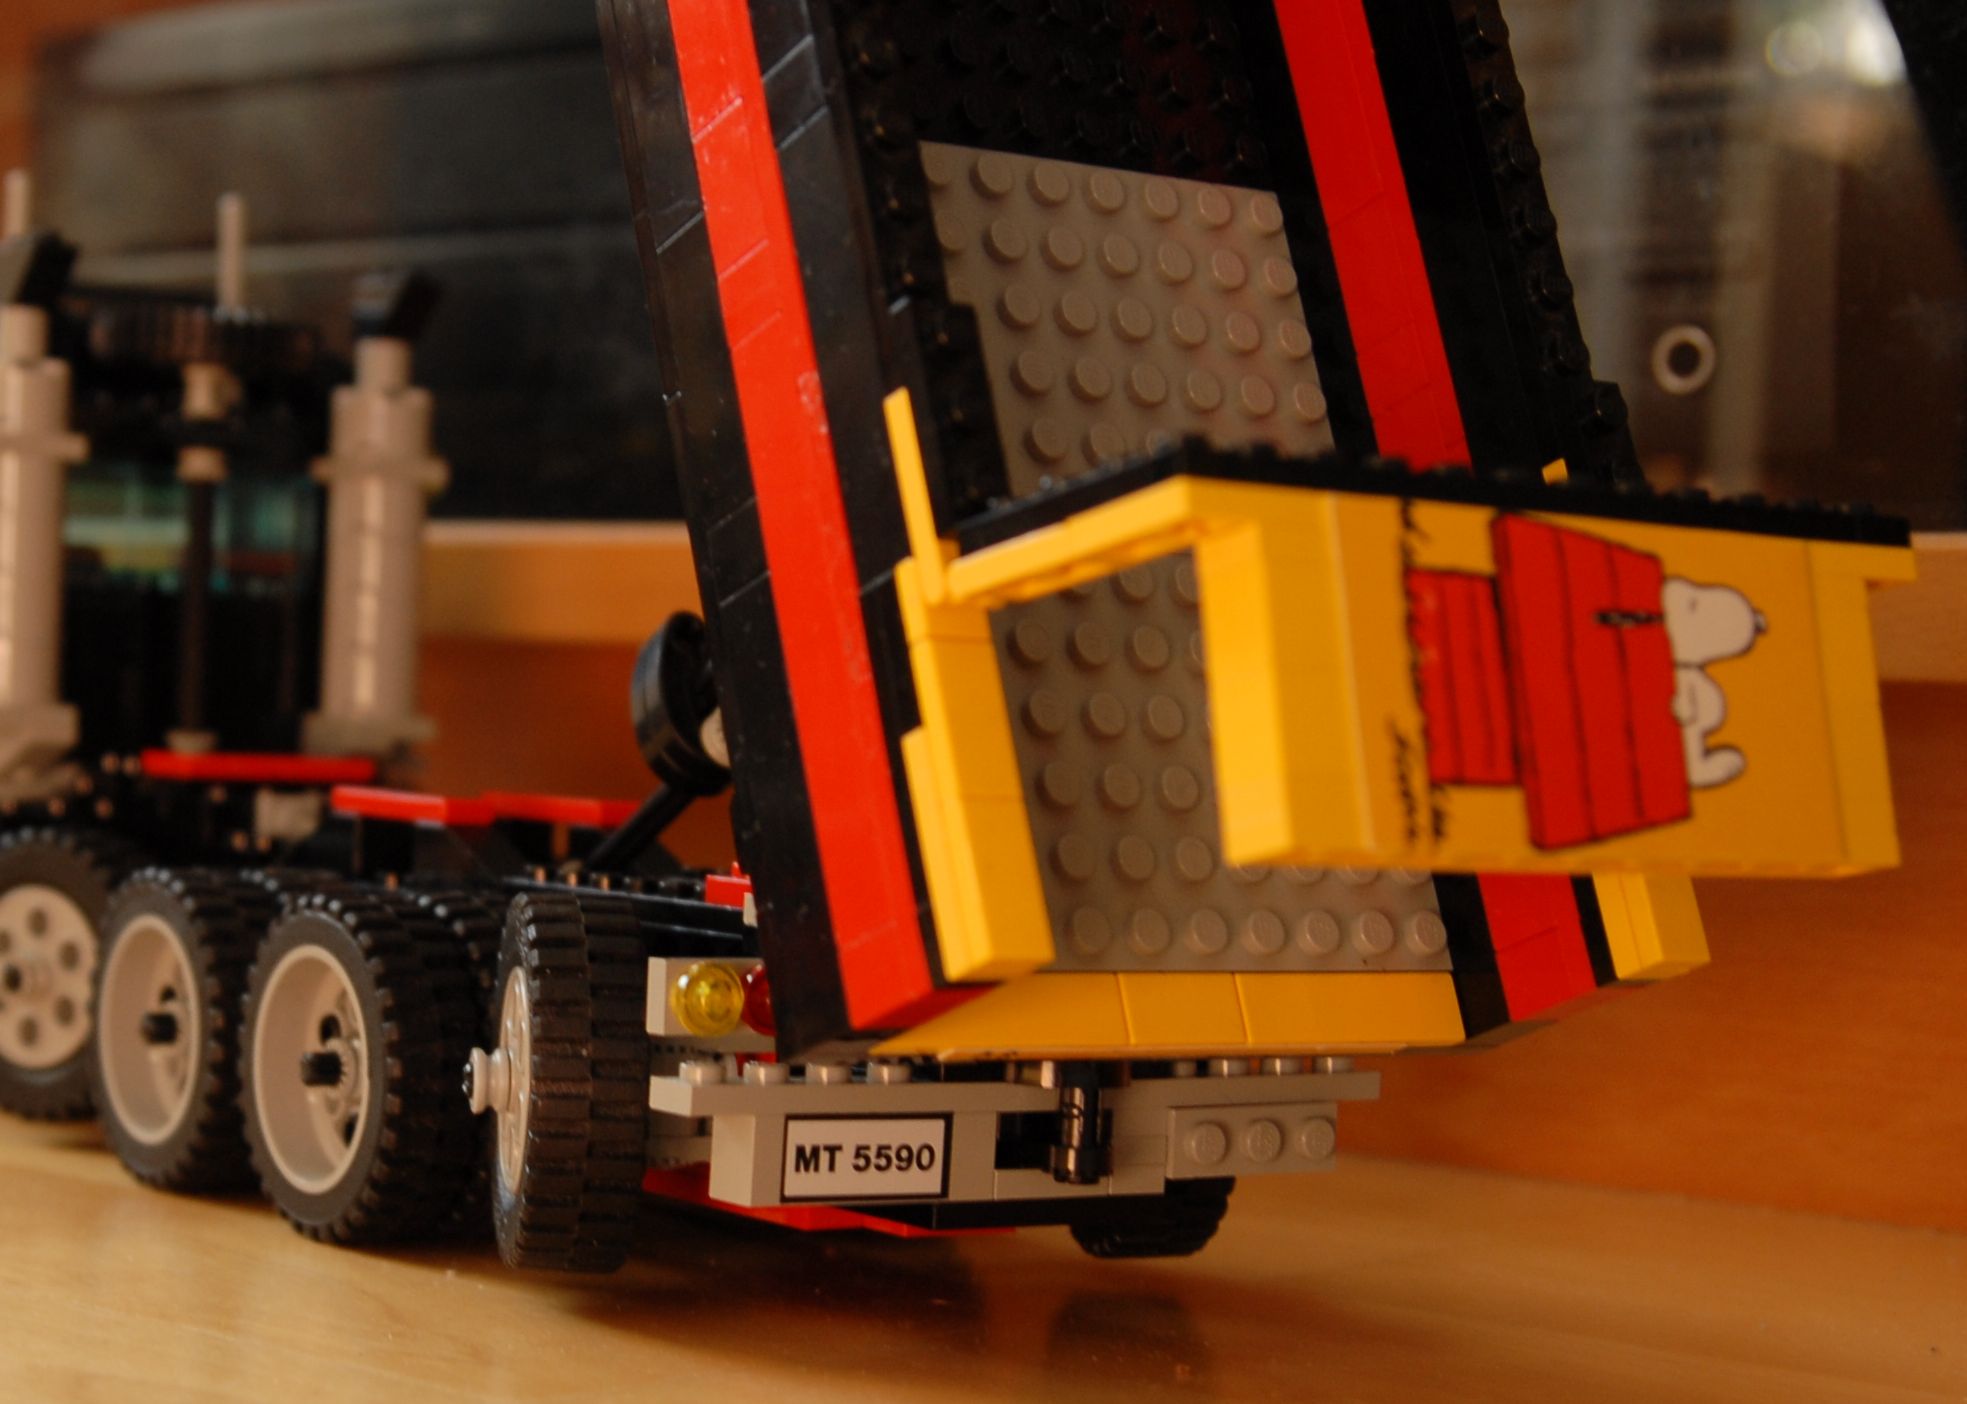
This ugly cabriolet uses old Lego 4,5 V technology. Other parts than lights and wires are from lego set Model Team 5590.
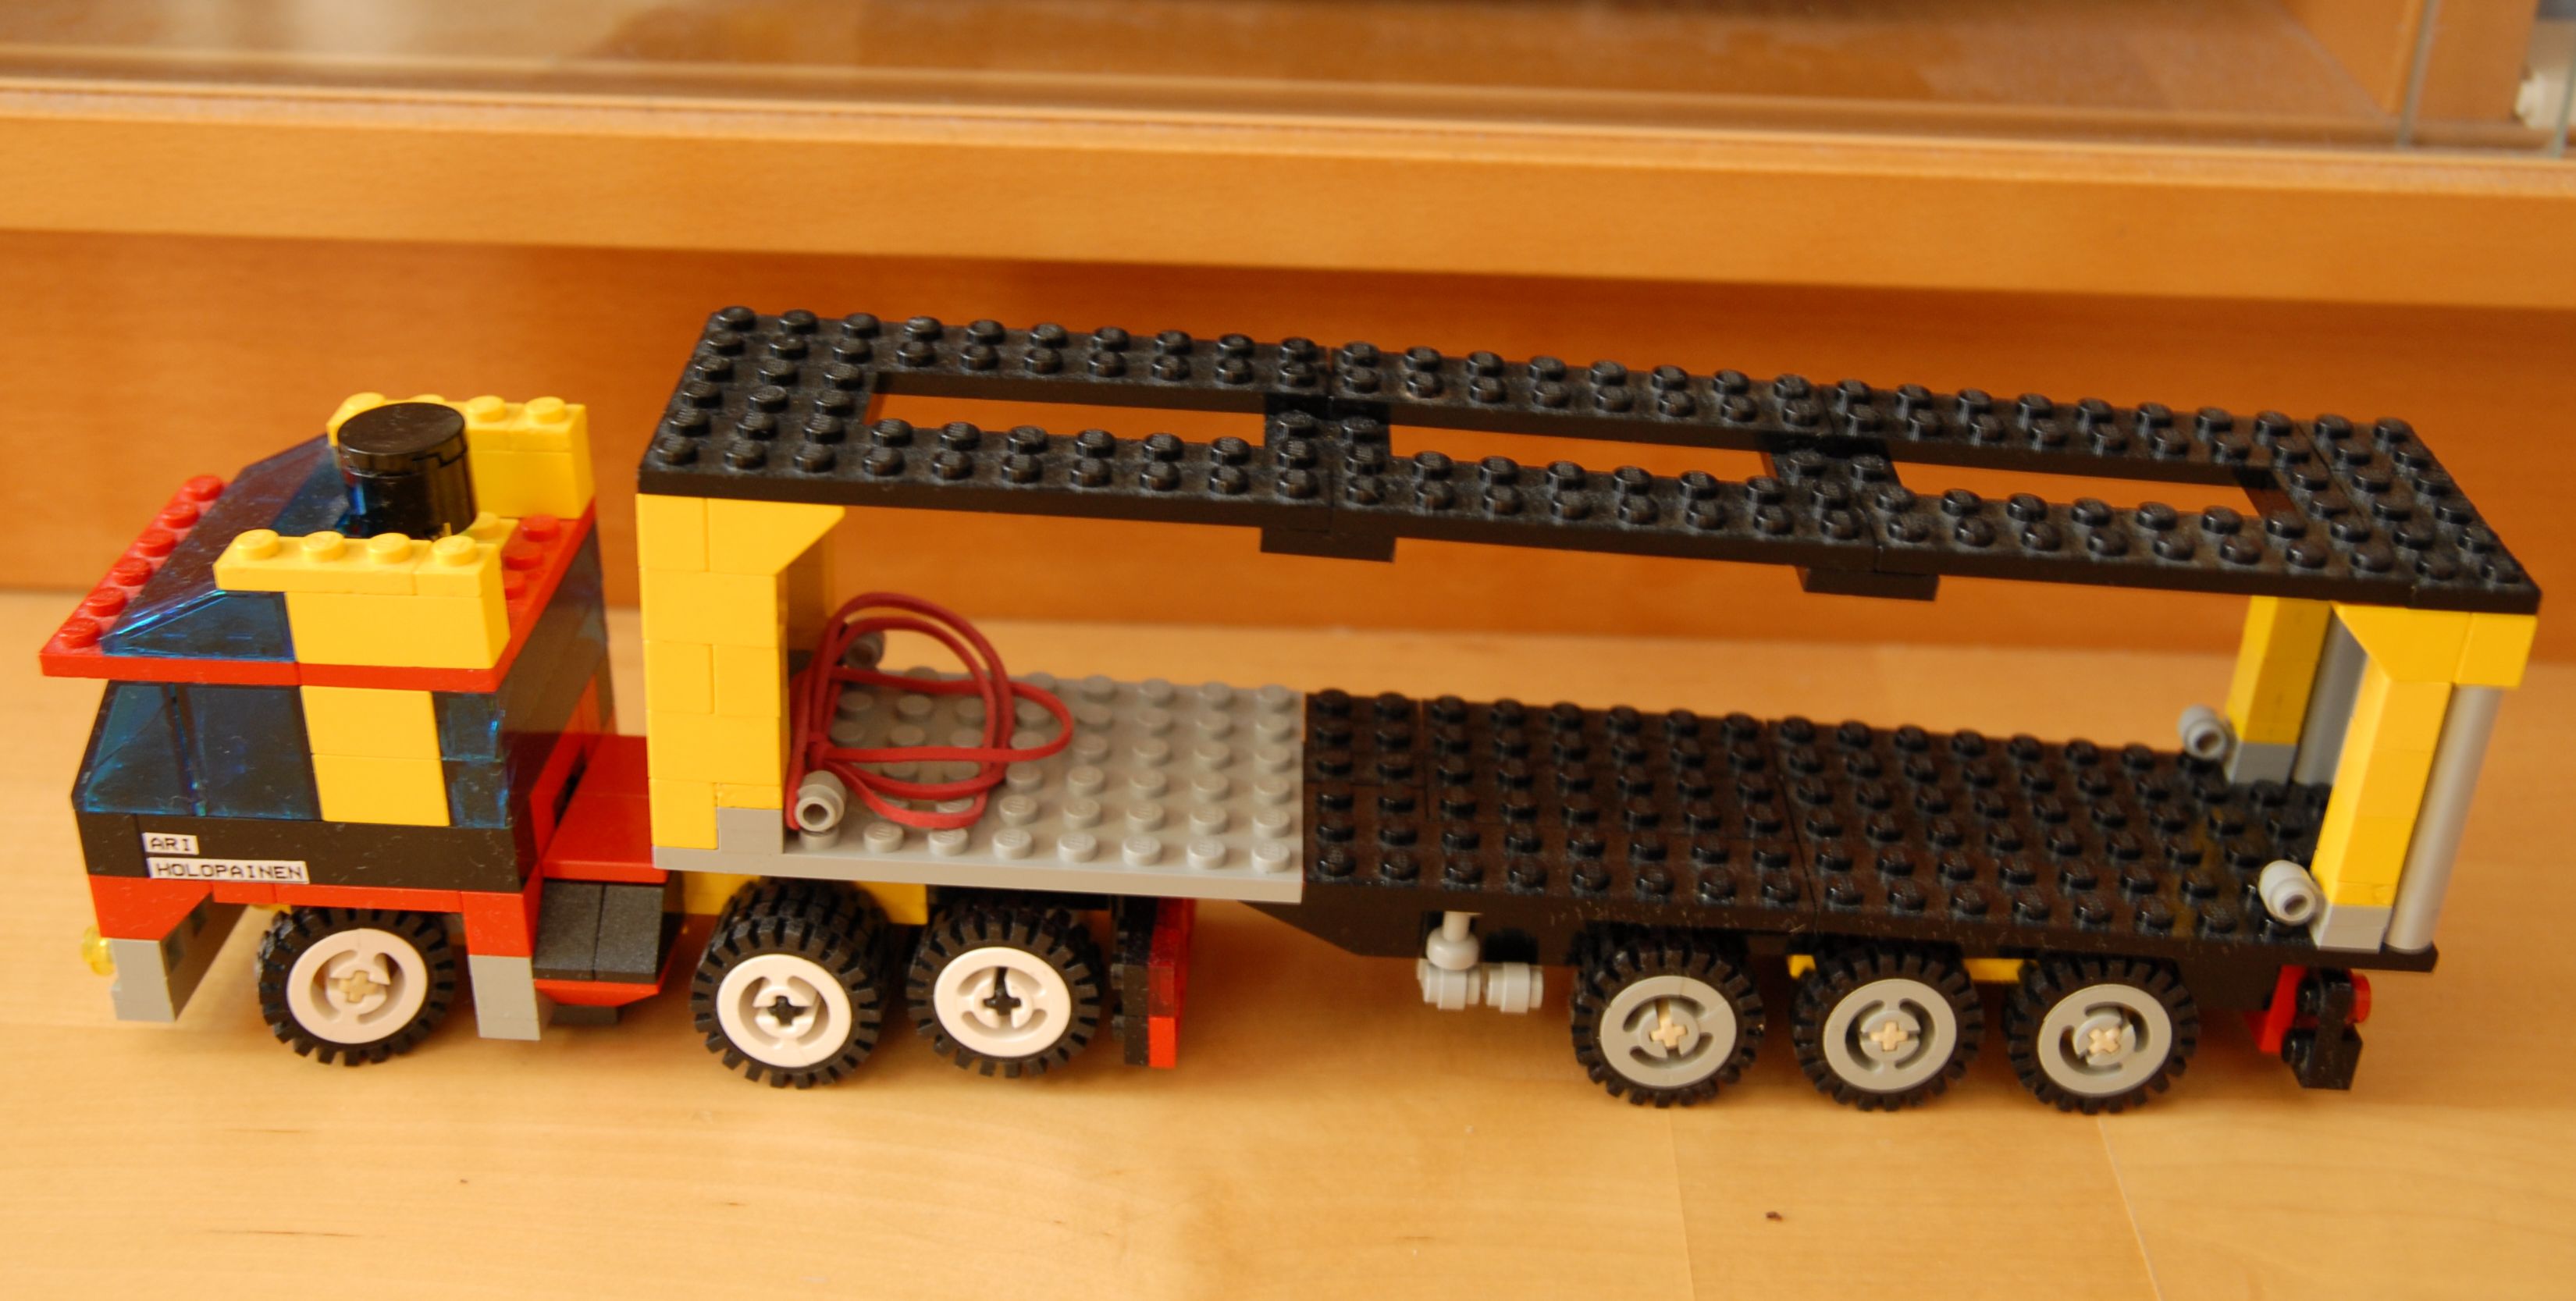
D. Small Scale: Here are my small scale trucks, version 1 is 6 studs wide and version 2 and version 3 are 8 studs wide. Special feature in these trucks is steering which is not so easy to get in this scale. D.1. Version 1, 6x2 tractor truck & 3-axle semi trailer:
This one is small tractor truck with semi trailer and steered front axle. To make steering possible I have modified 2 broken technic axle pins. To get space for front wheels to turn part between two technic plate 1x4s is put longitudinal so width is only 1 stud. Then pin part of the broken technic axle pin is put under this longitudinal part and bottom technic plate 1x4 is put upside down. This way you get very small scale steering but unfortunately I didn’t take pics about it.
One interesting thing is that trailer slants because truck’s fifth wheel is too high for the trailer. But why trailer’s all wheels touch the ground if trailer’s front side is higher than rear? Solution is that trailer’s wheels are an independent part which supports trailer only in four corner points. Front wheels’s corner points have one extra plate compared to rear wheels’s corner points. D.2. Version 2, 10x4 truck with crane:
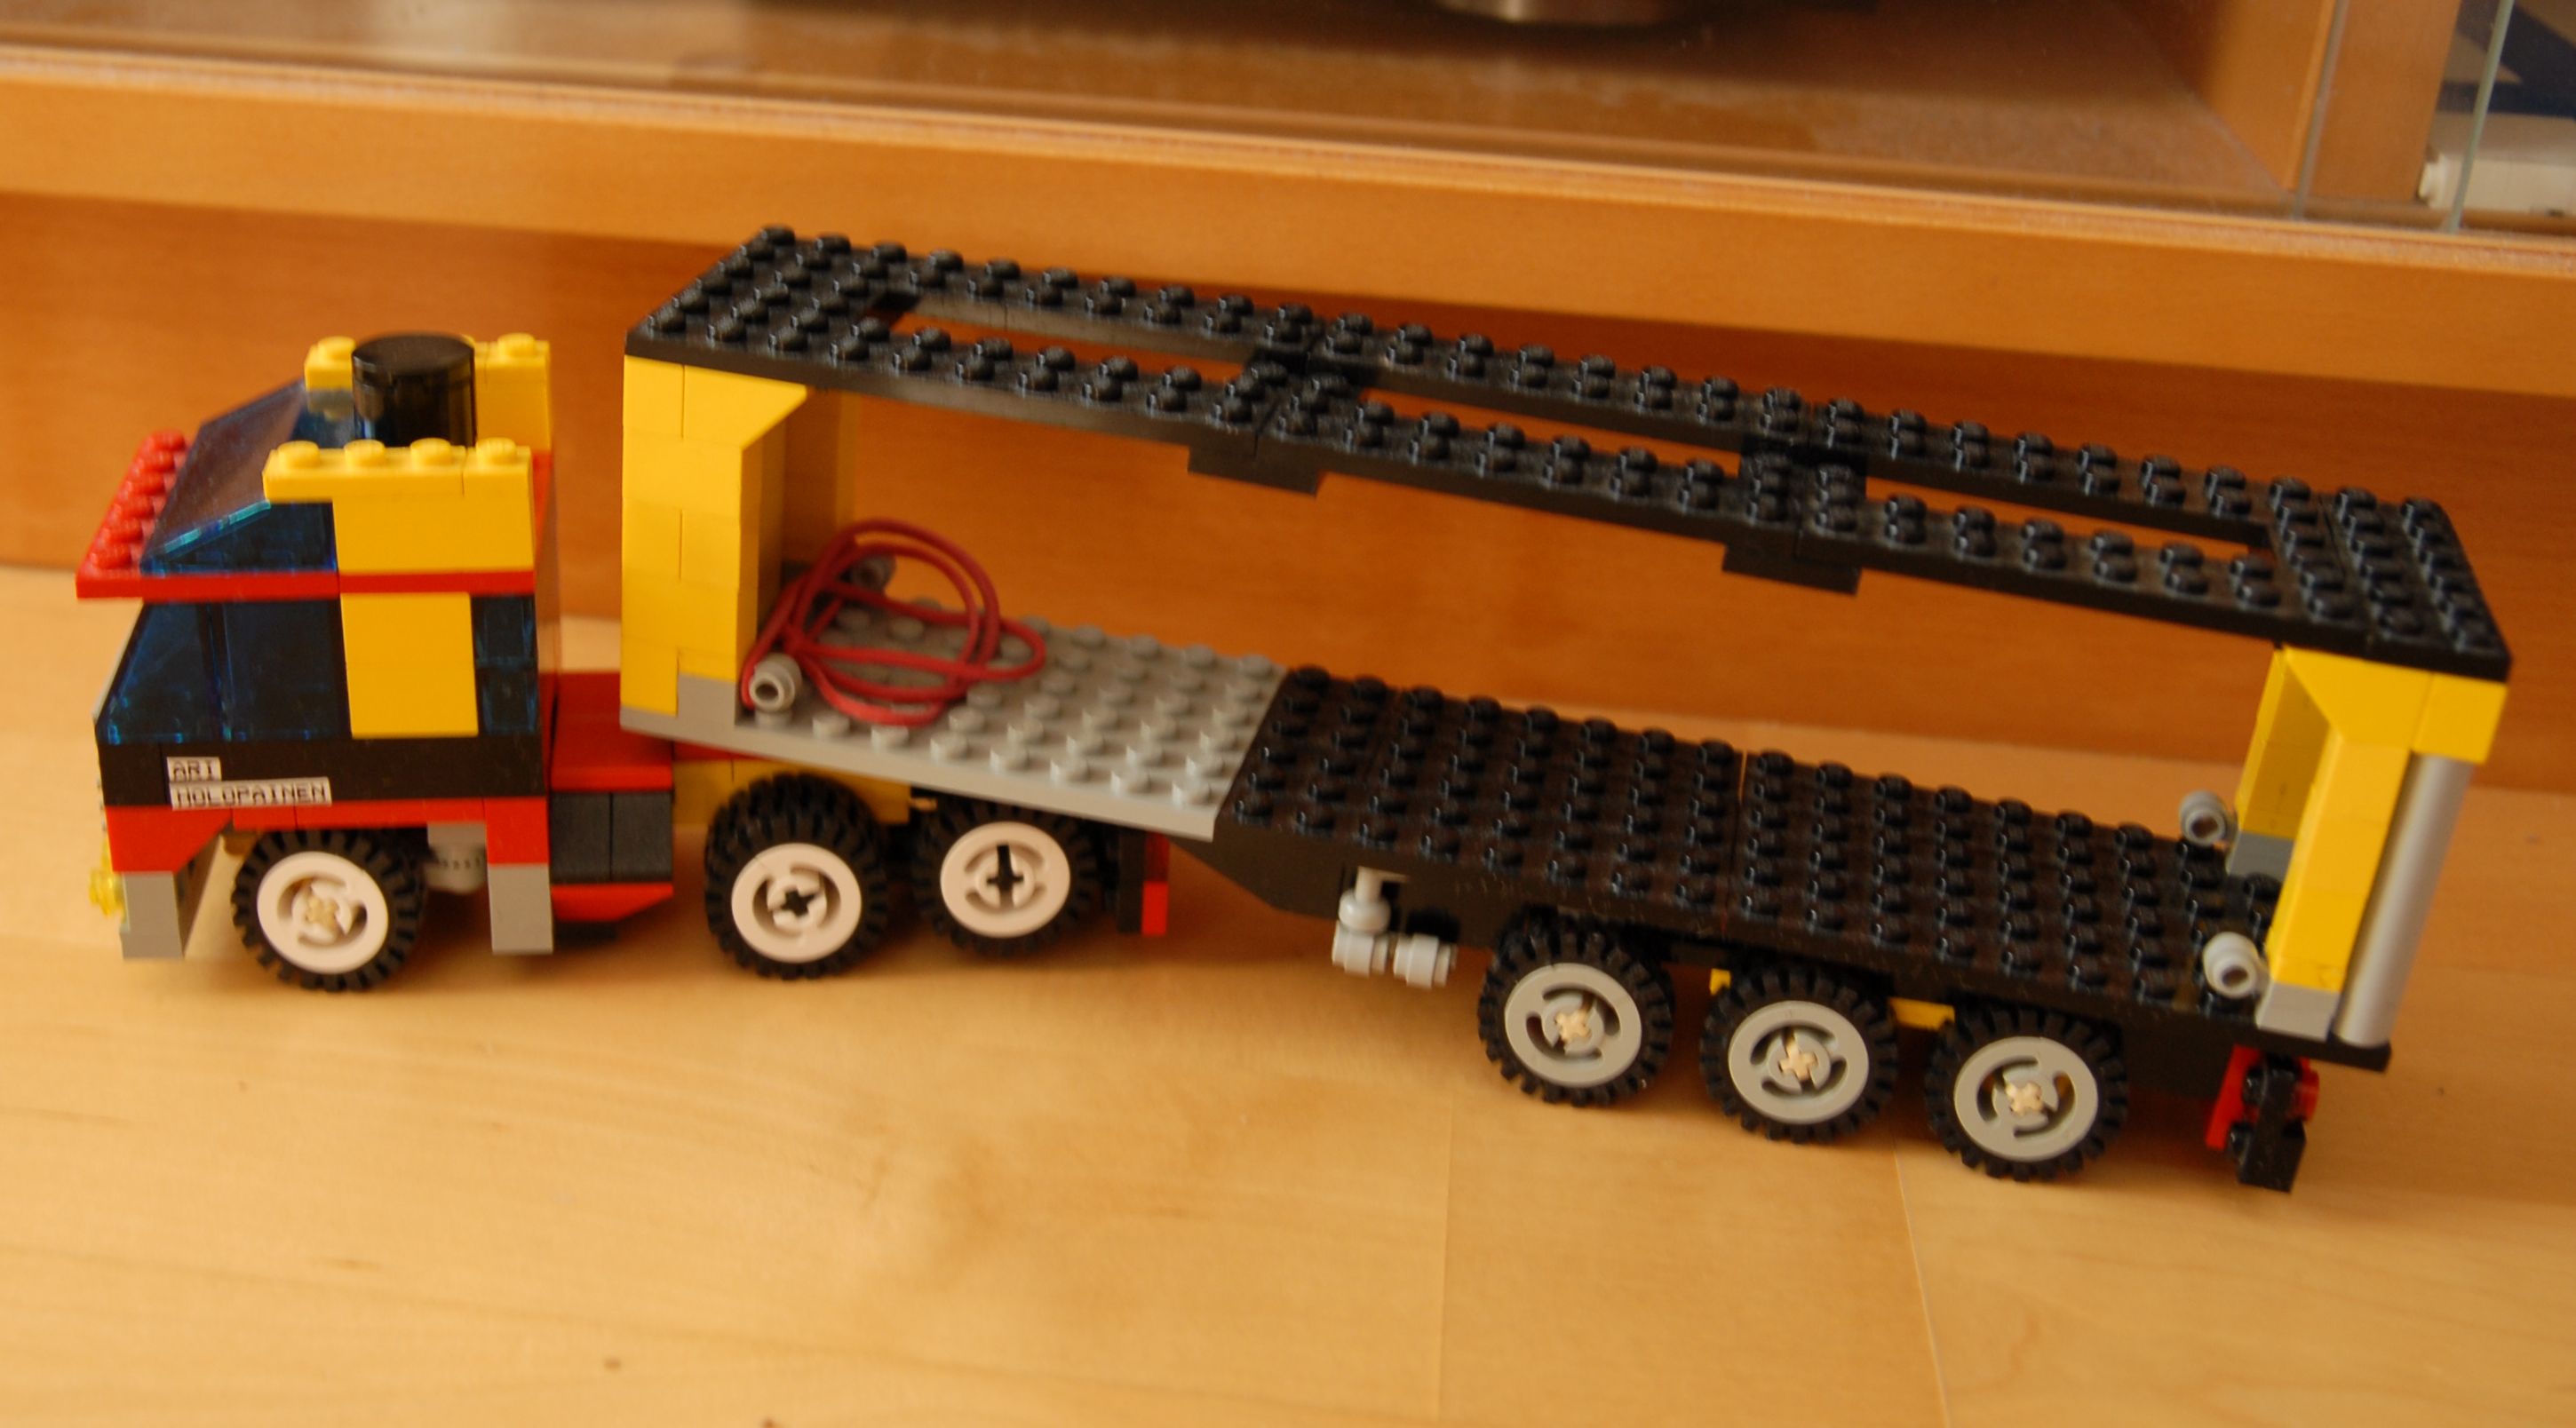
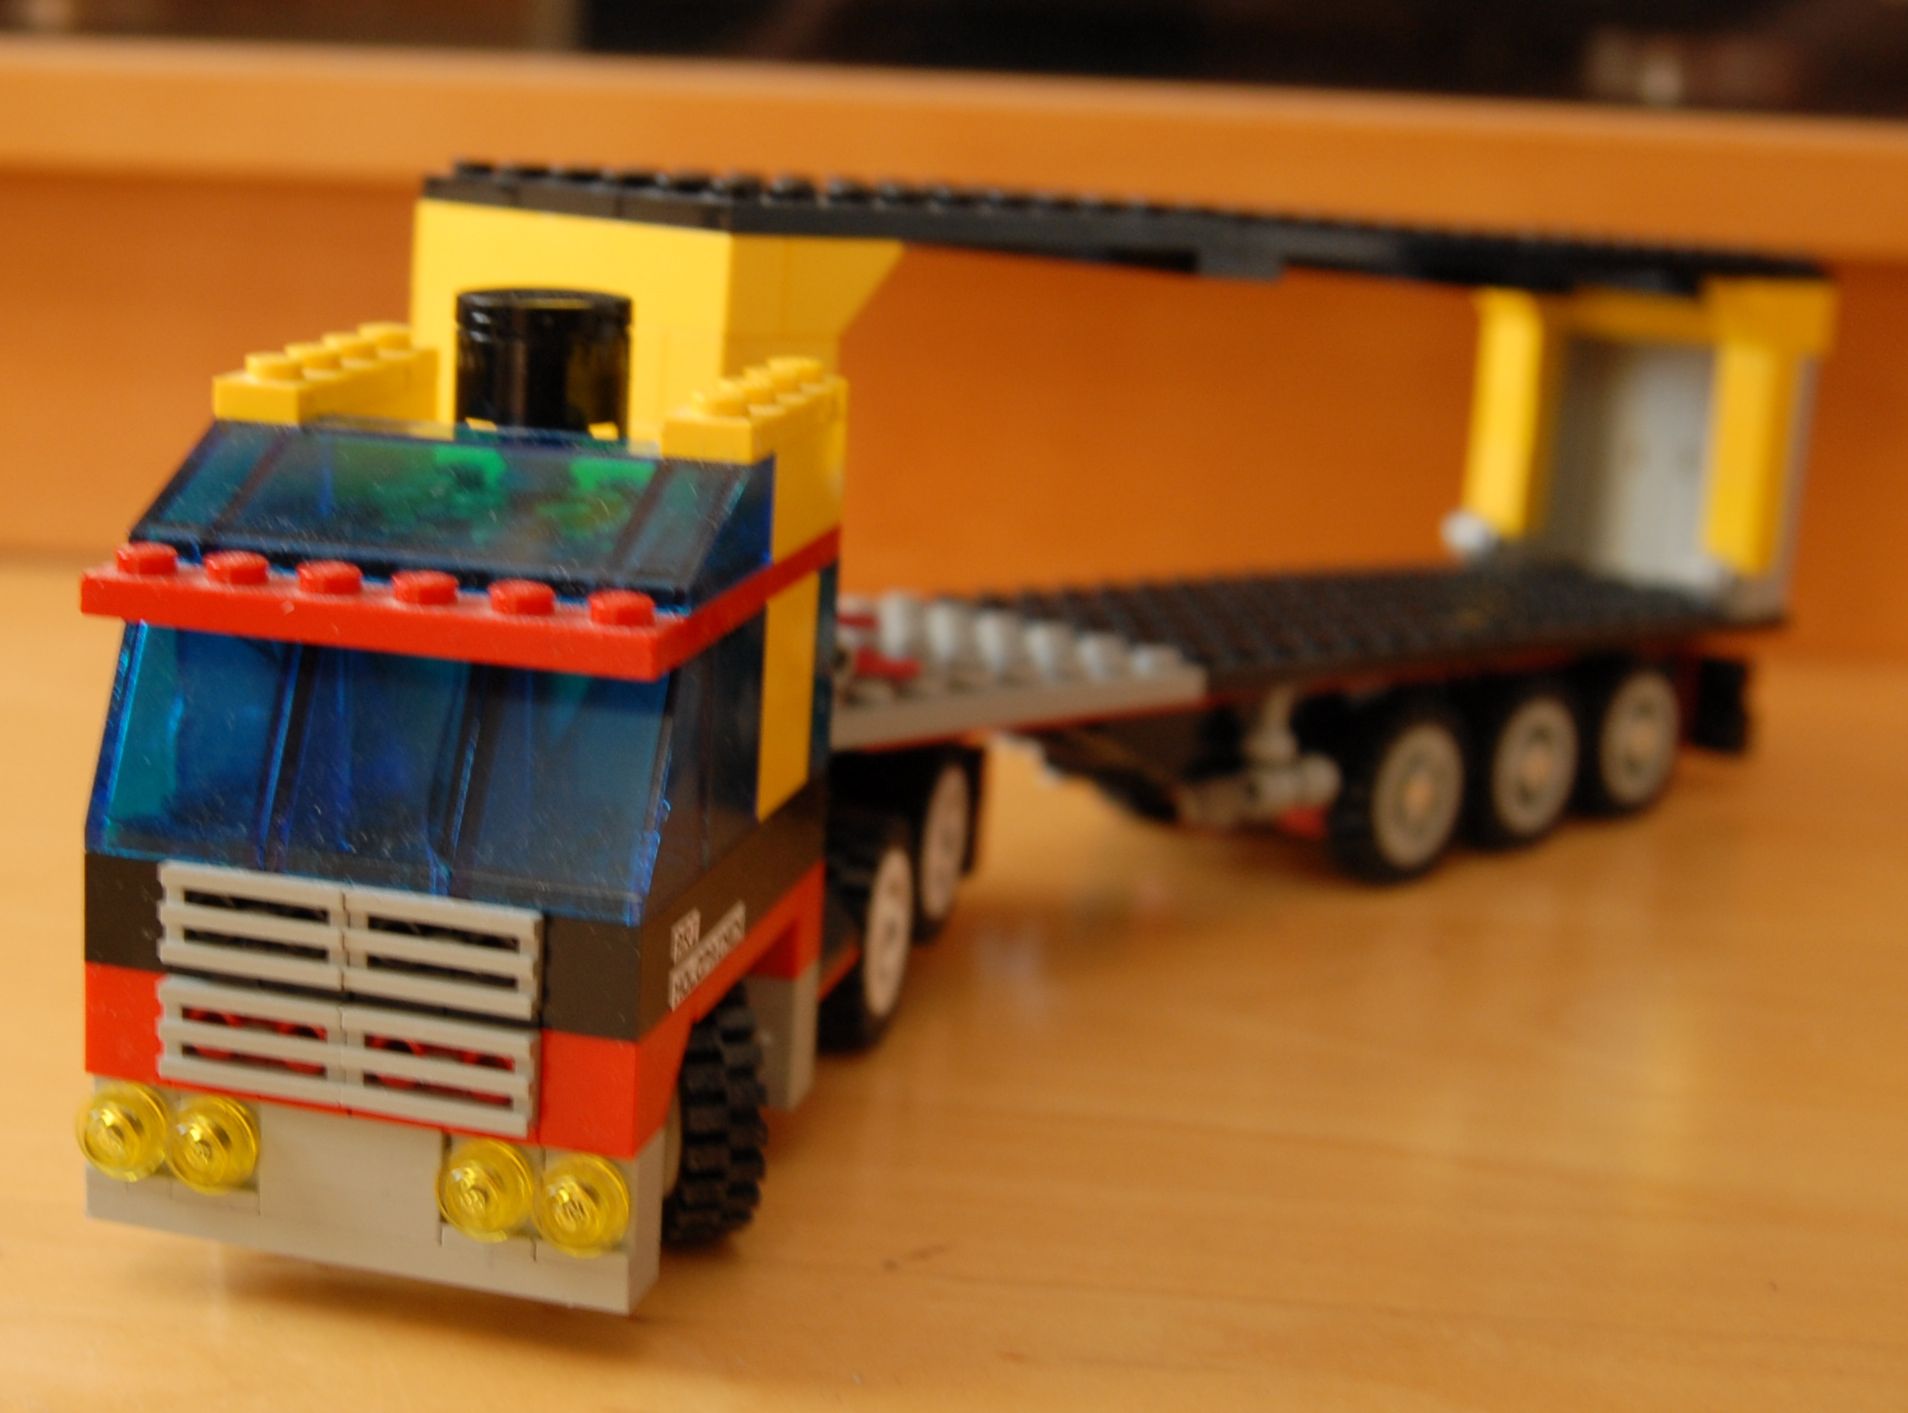
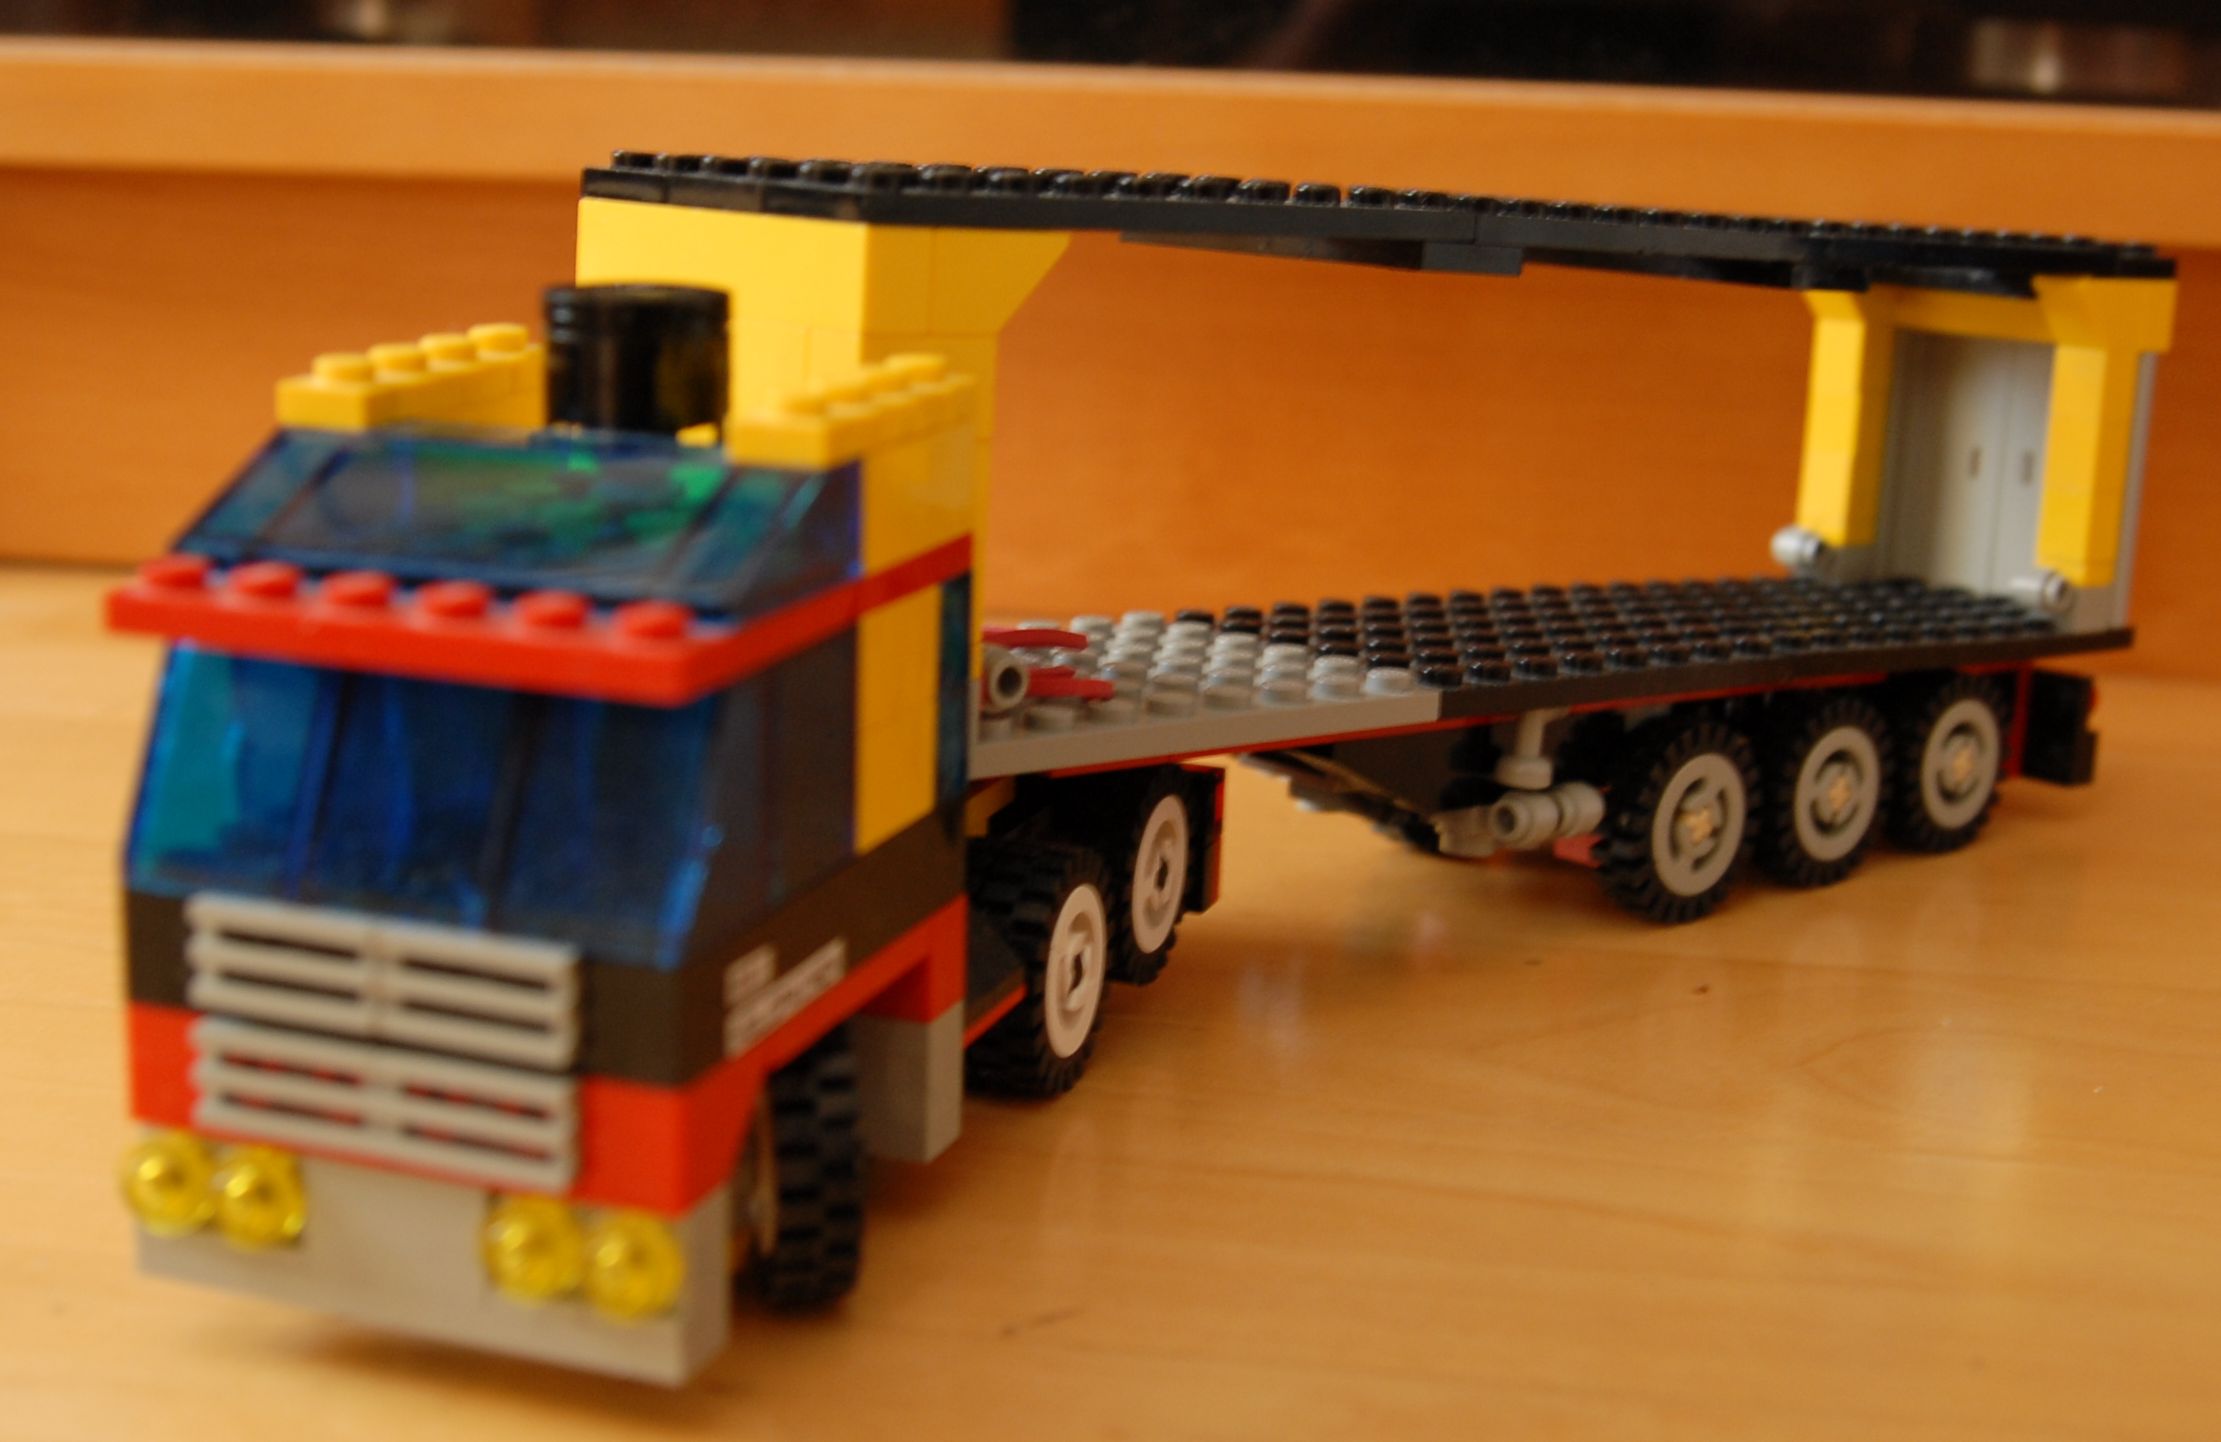
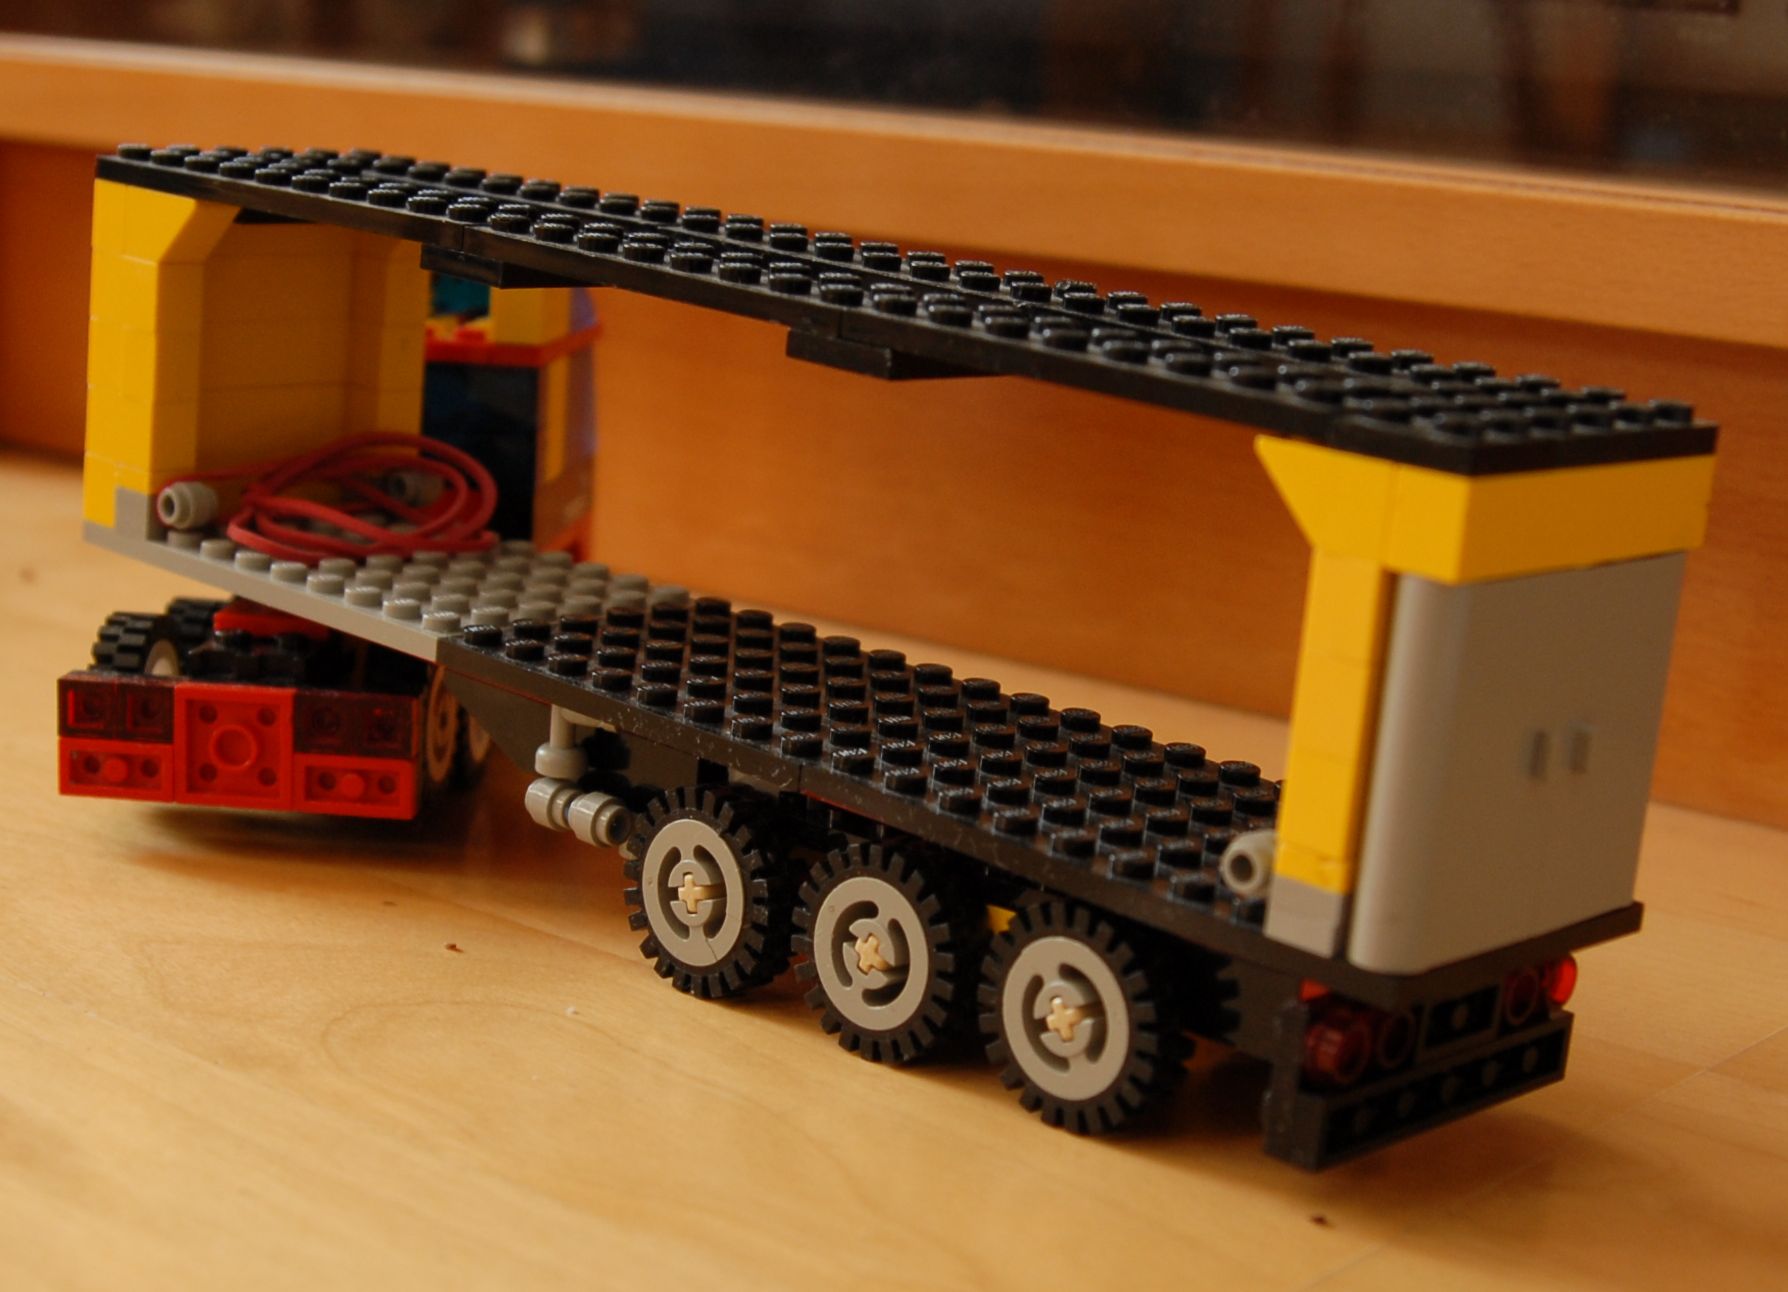
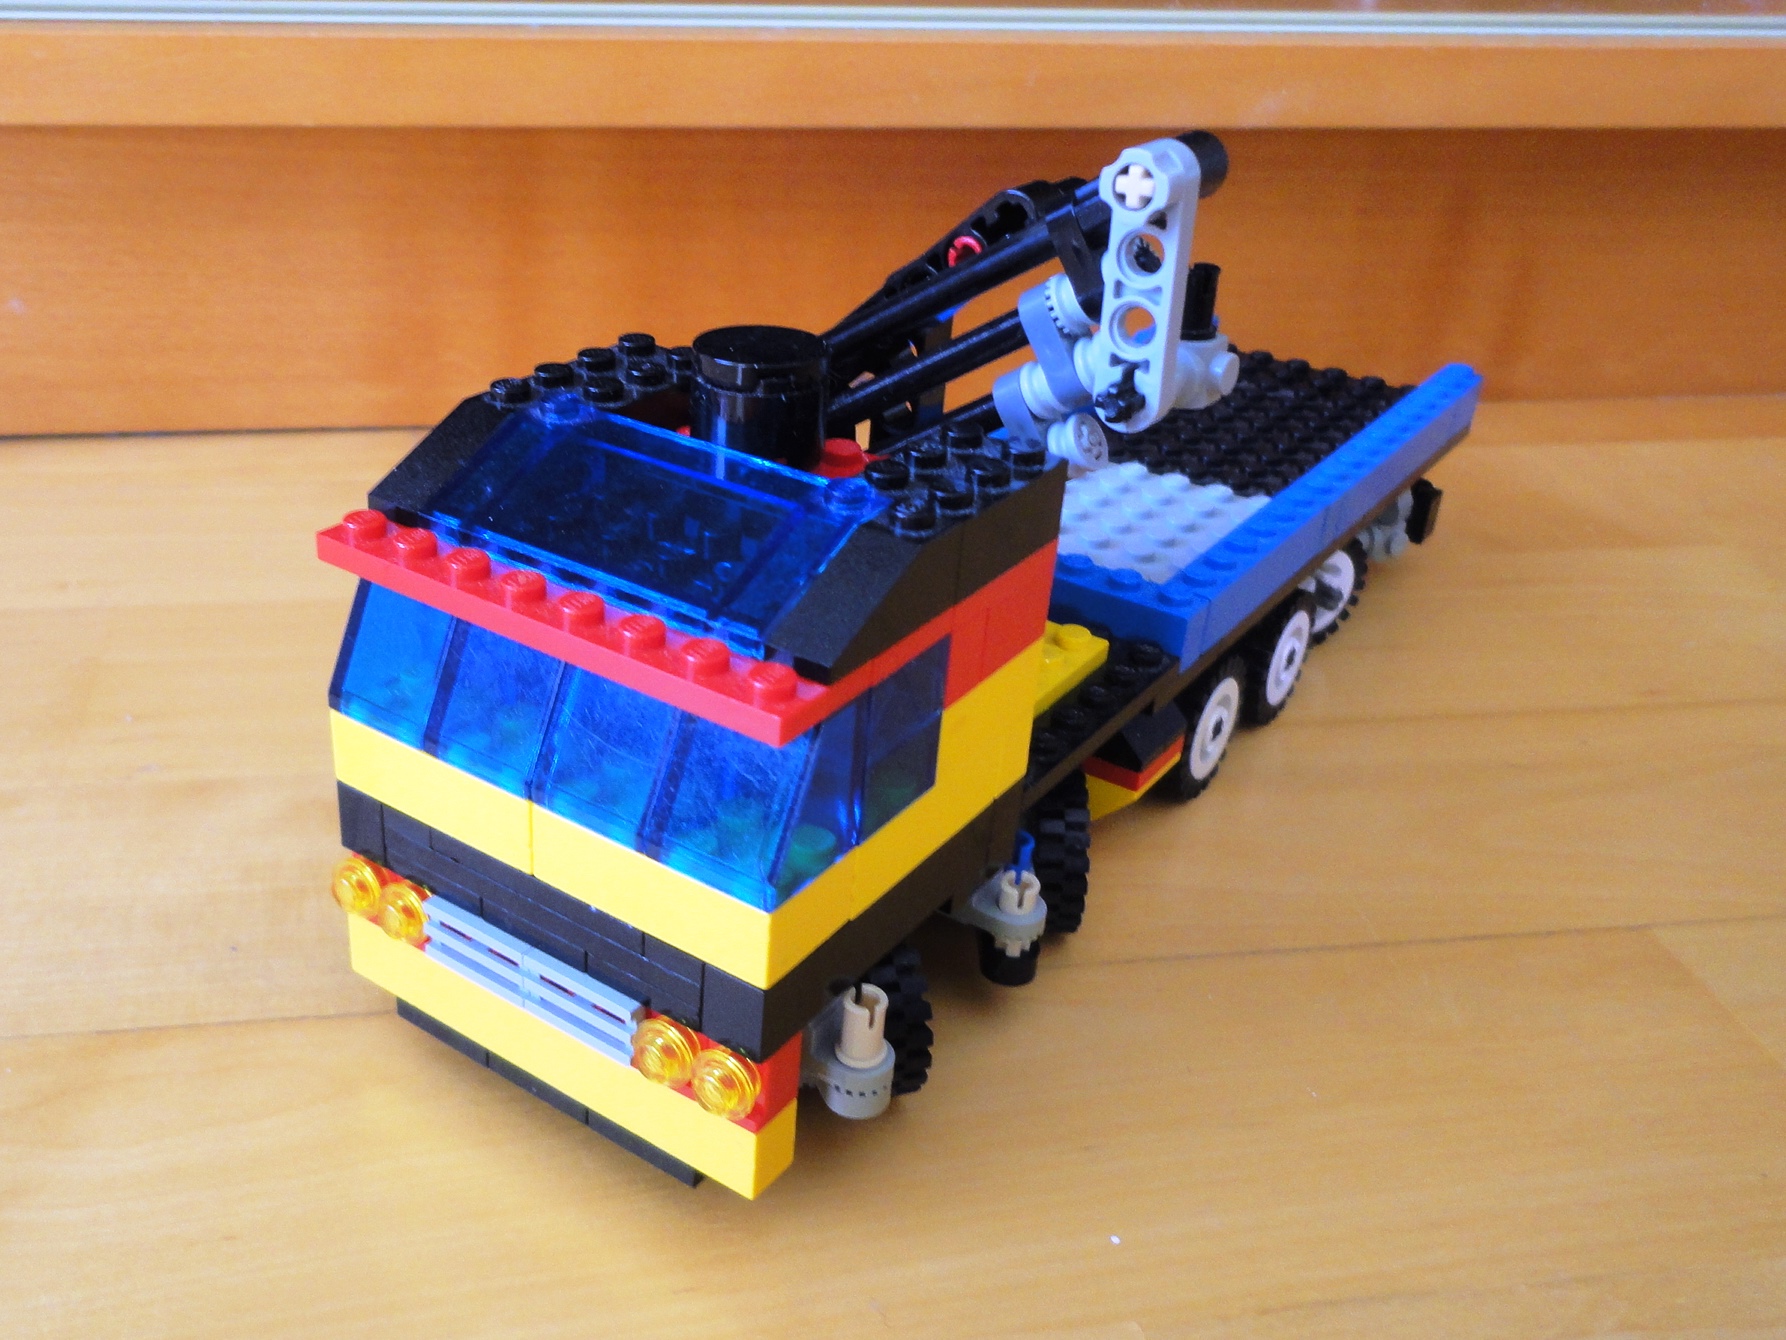
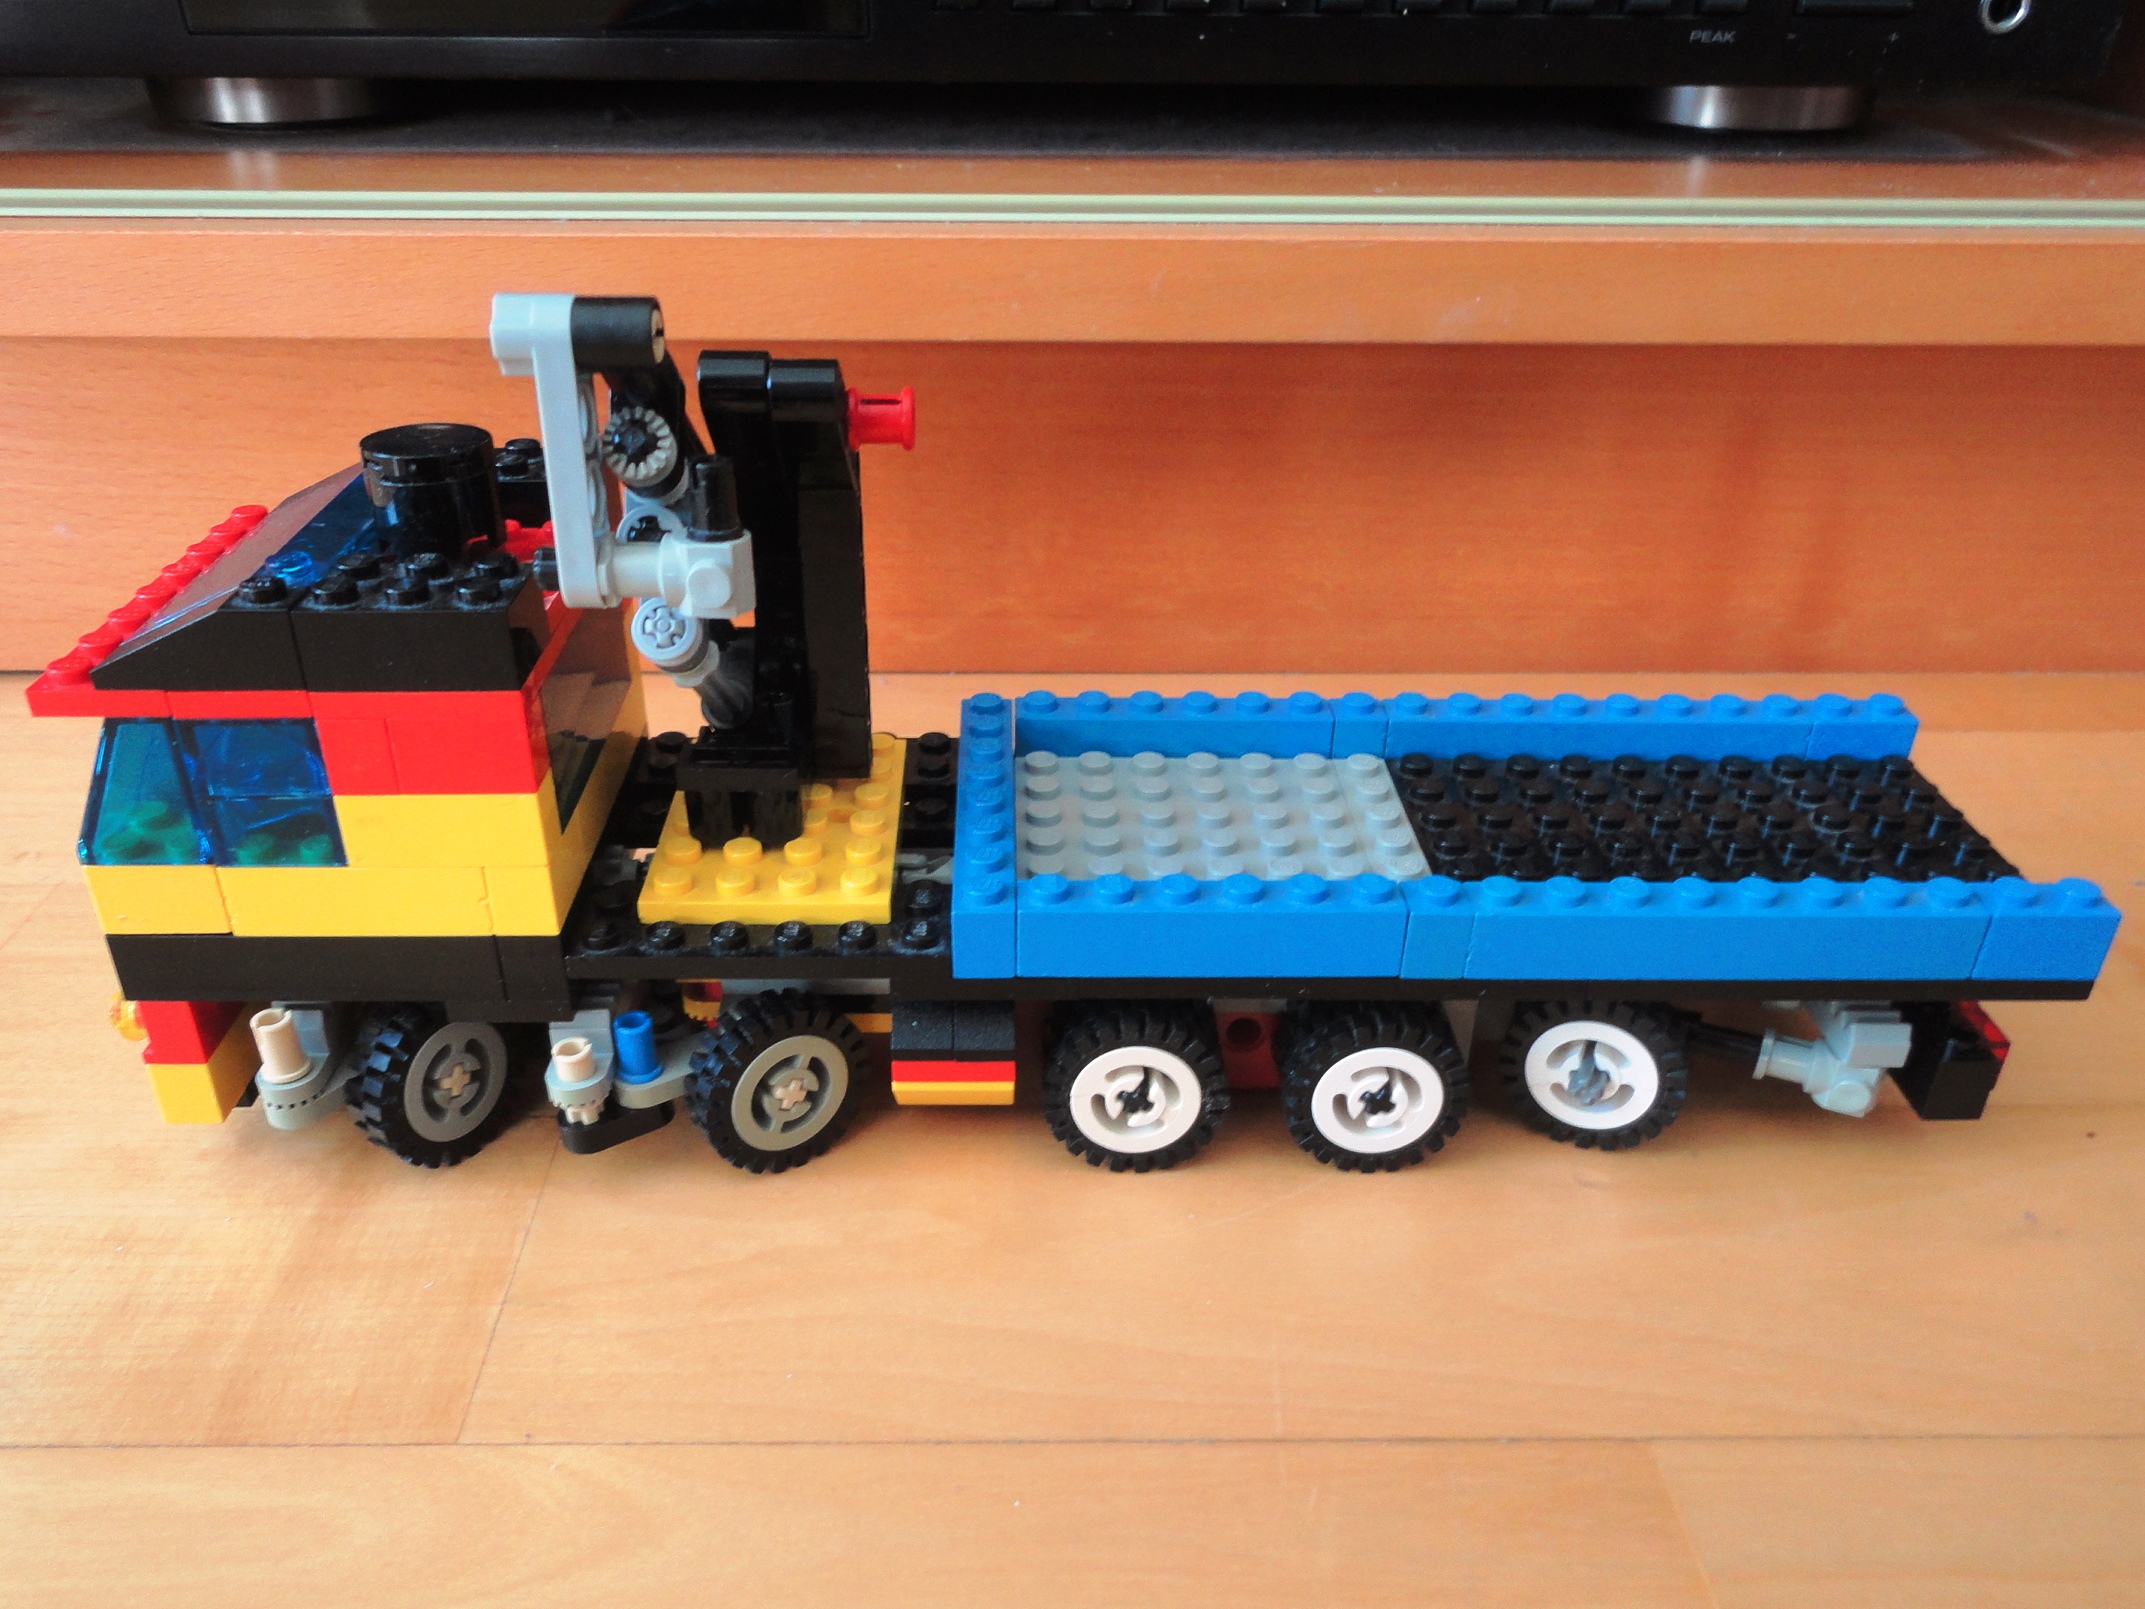
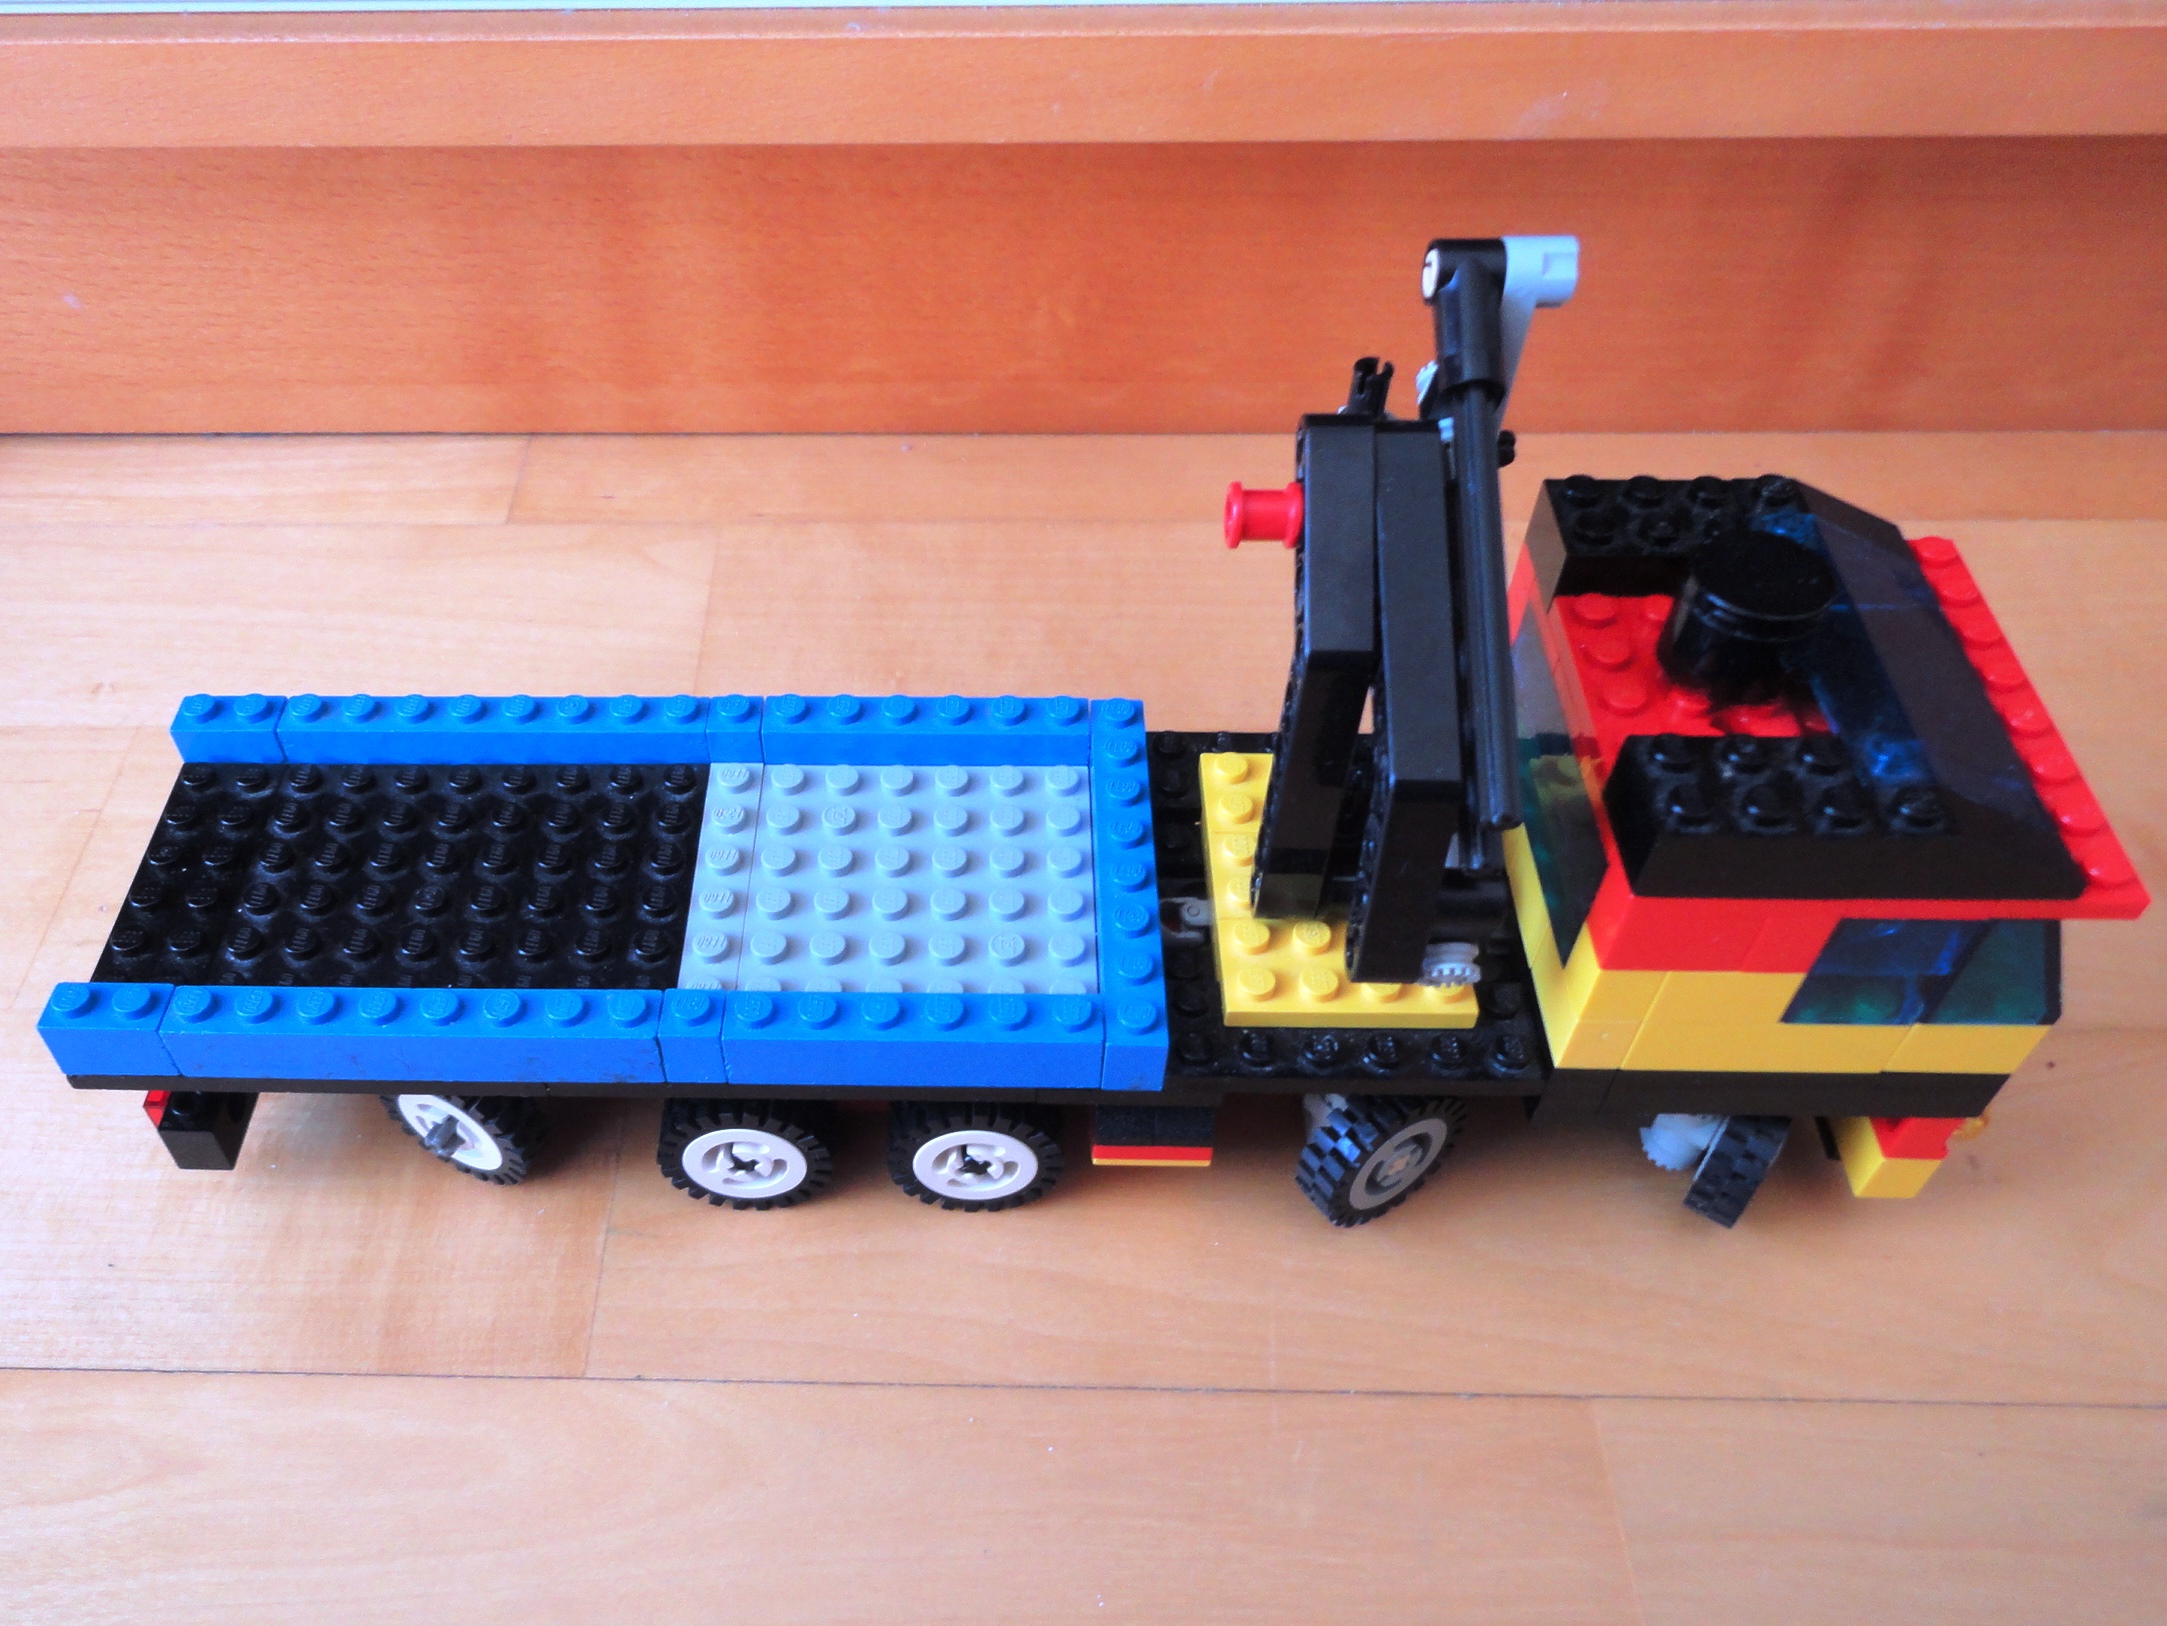
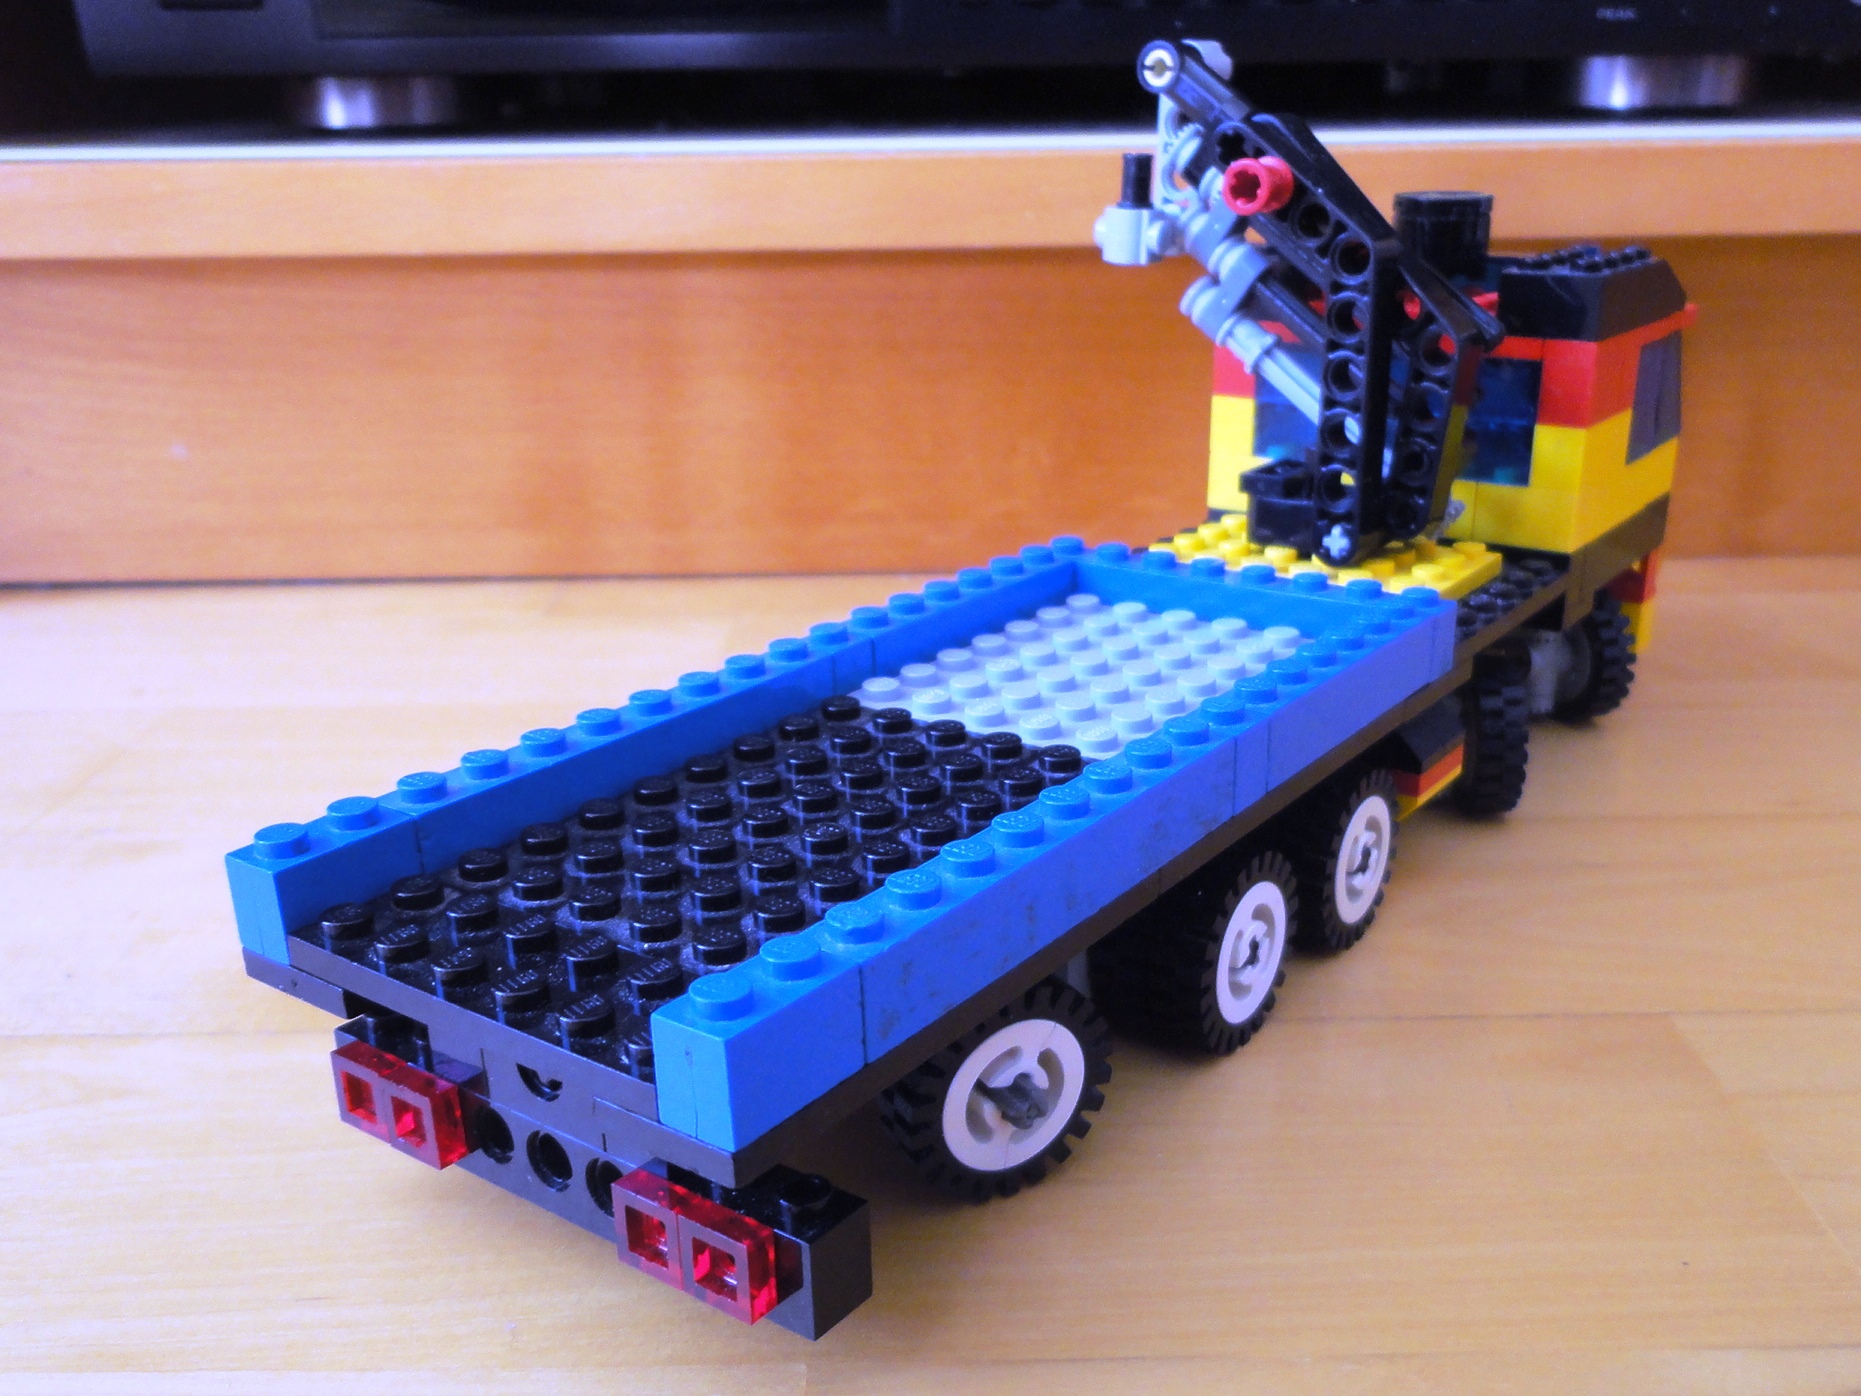
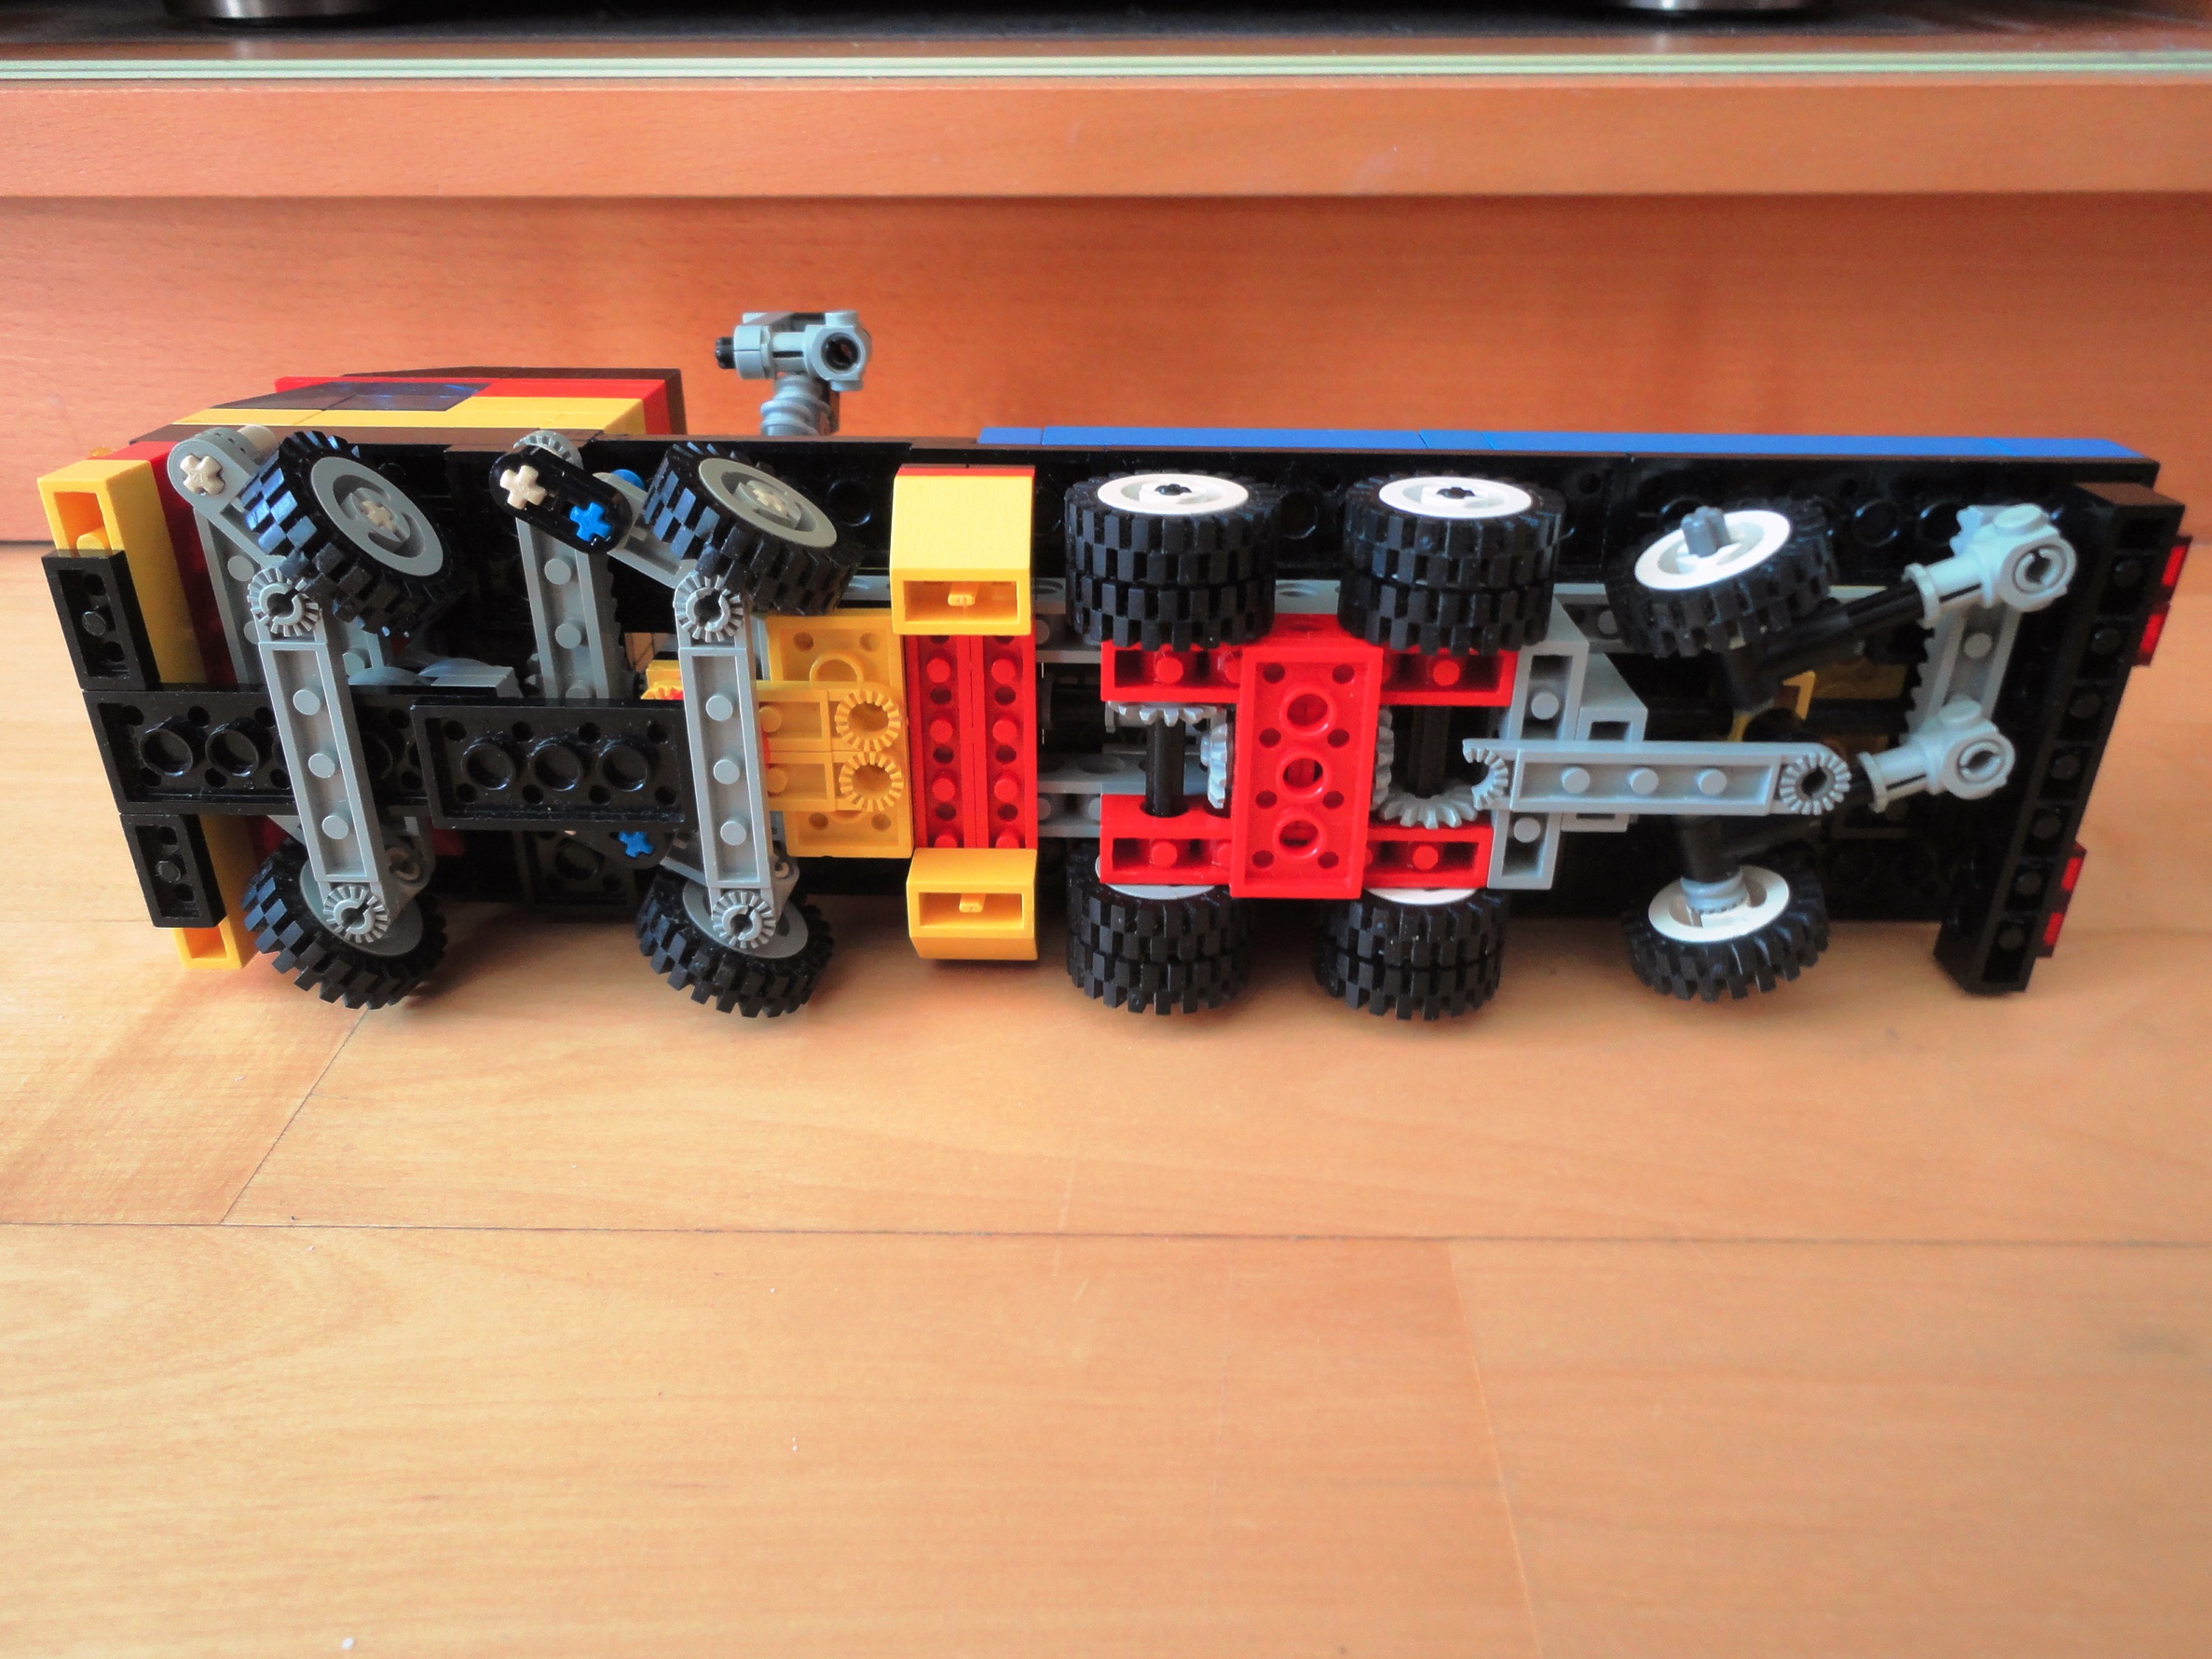
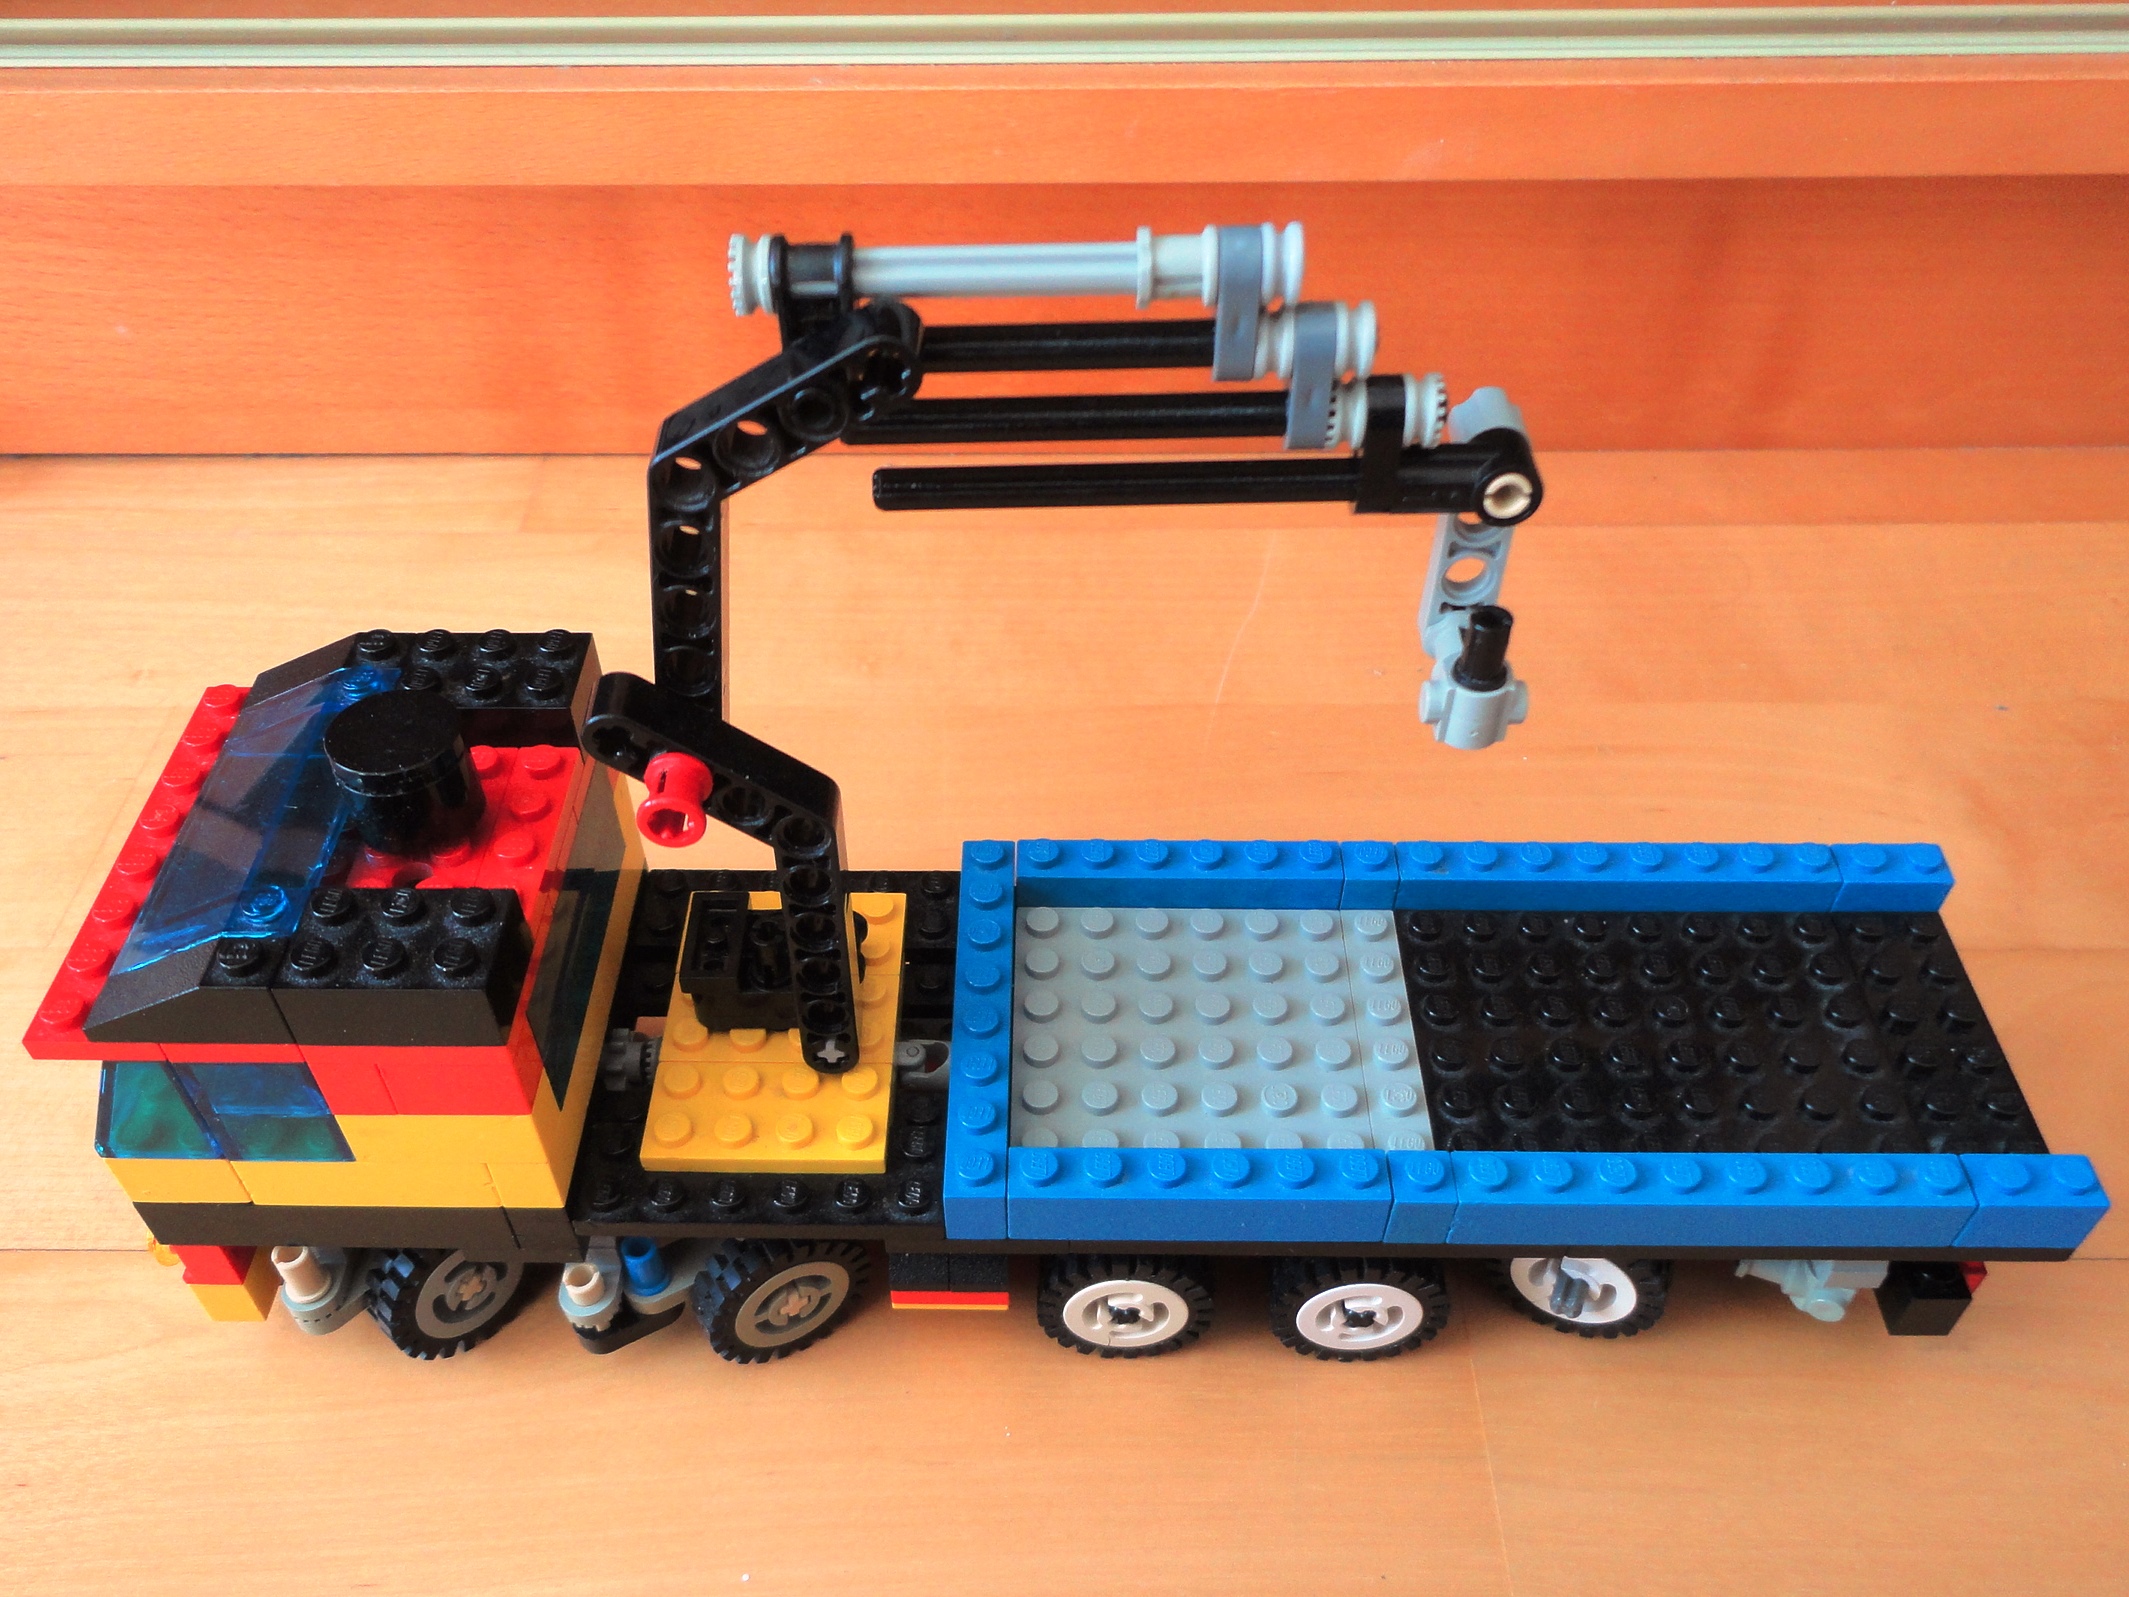
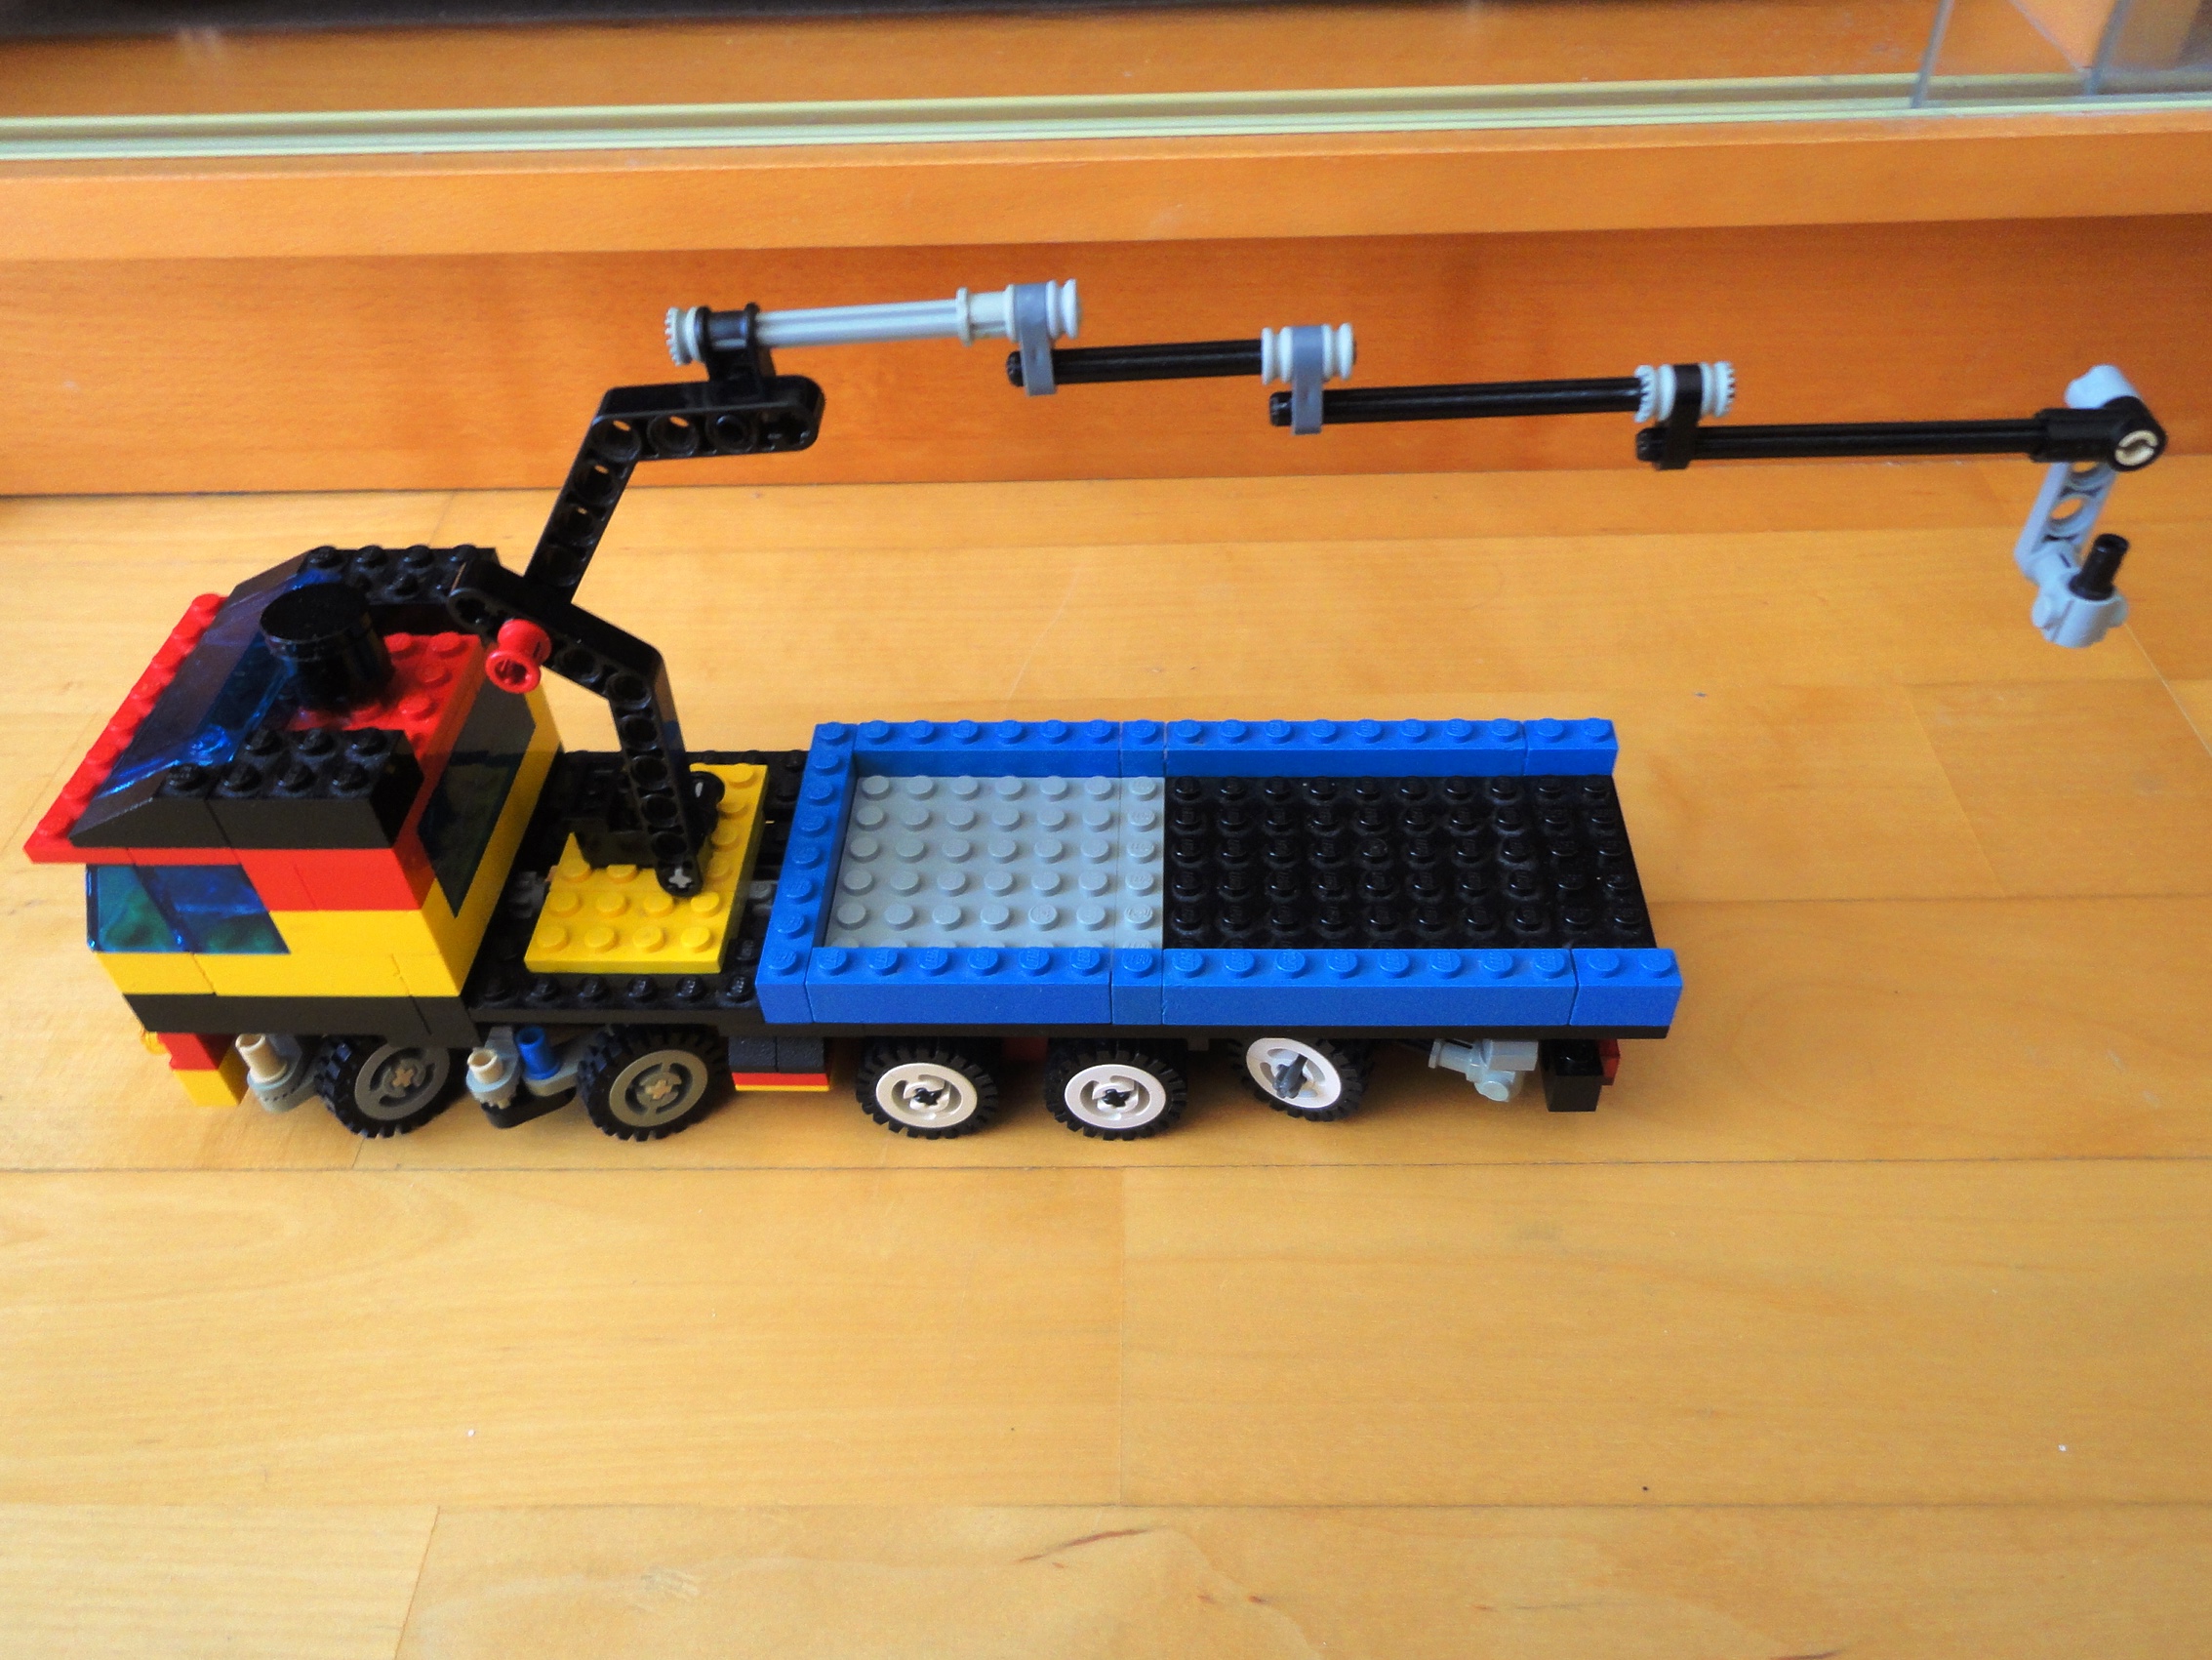
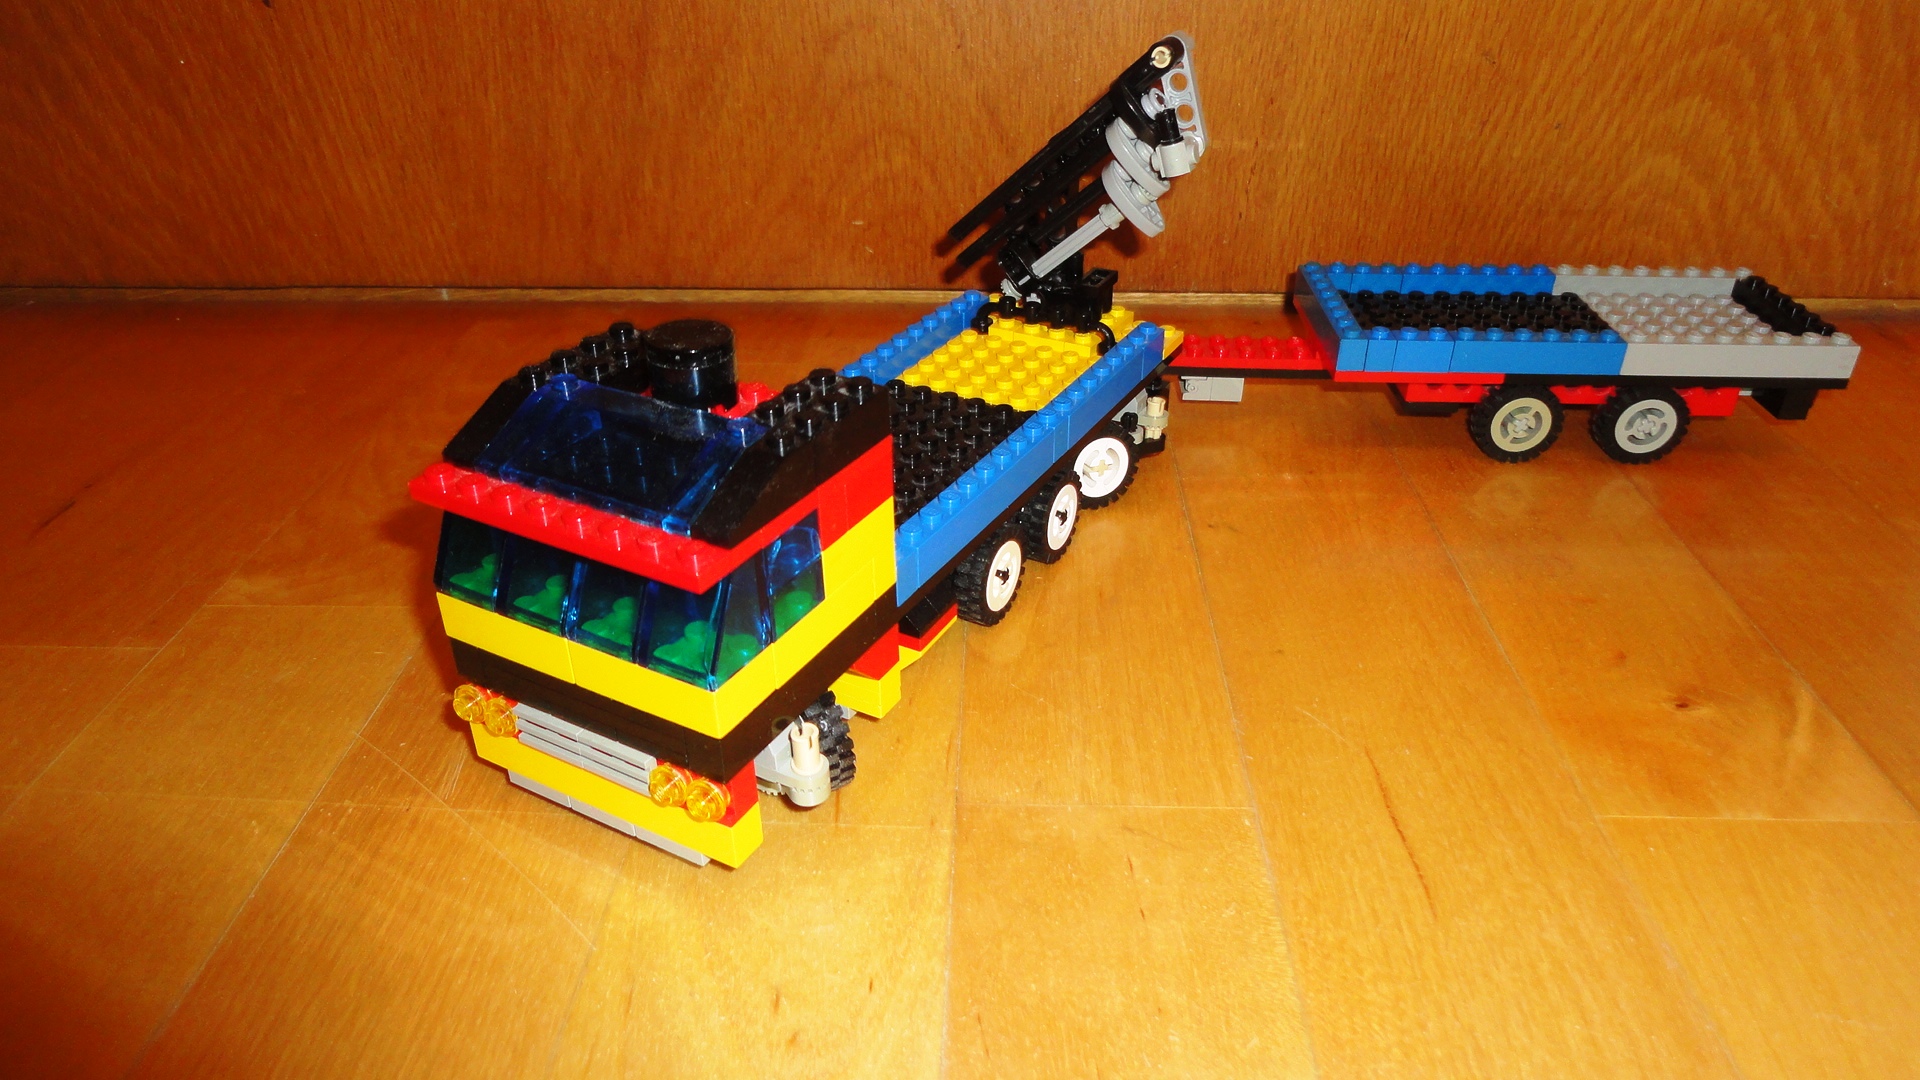
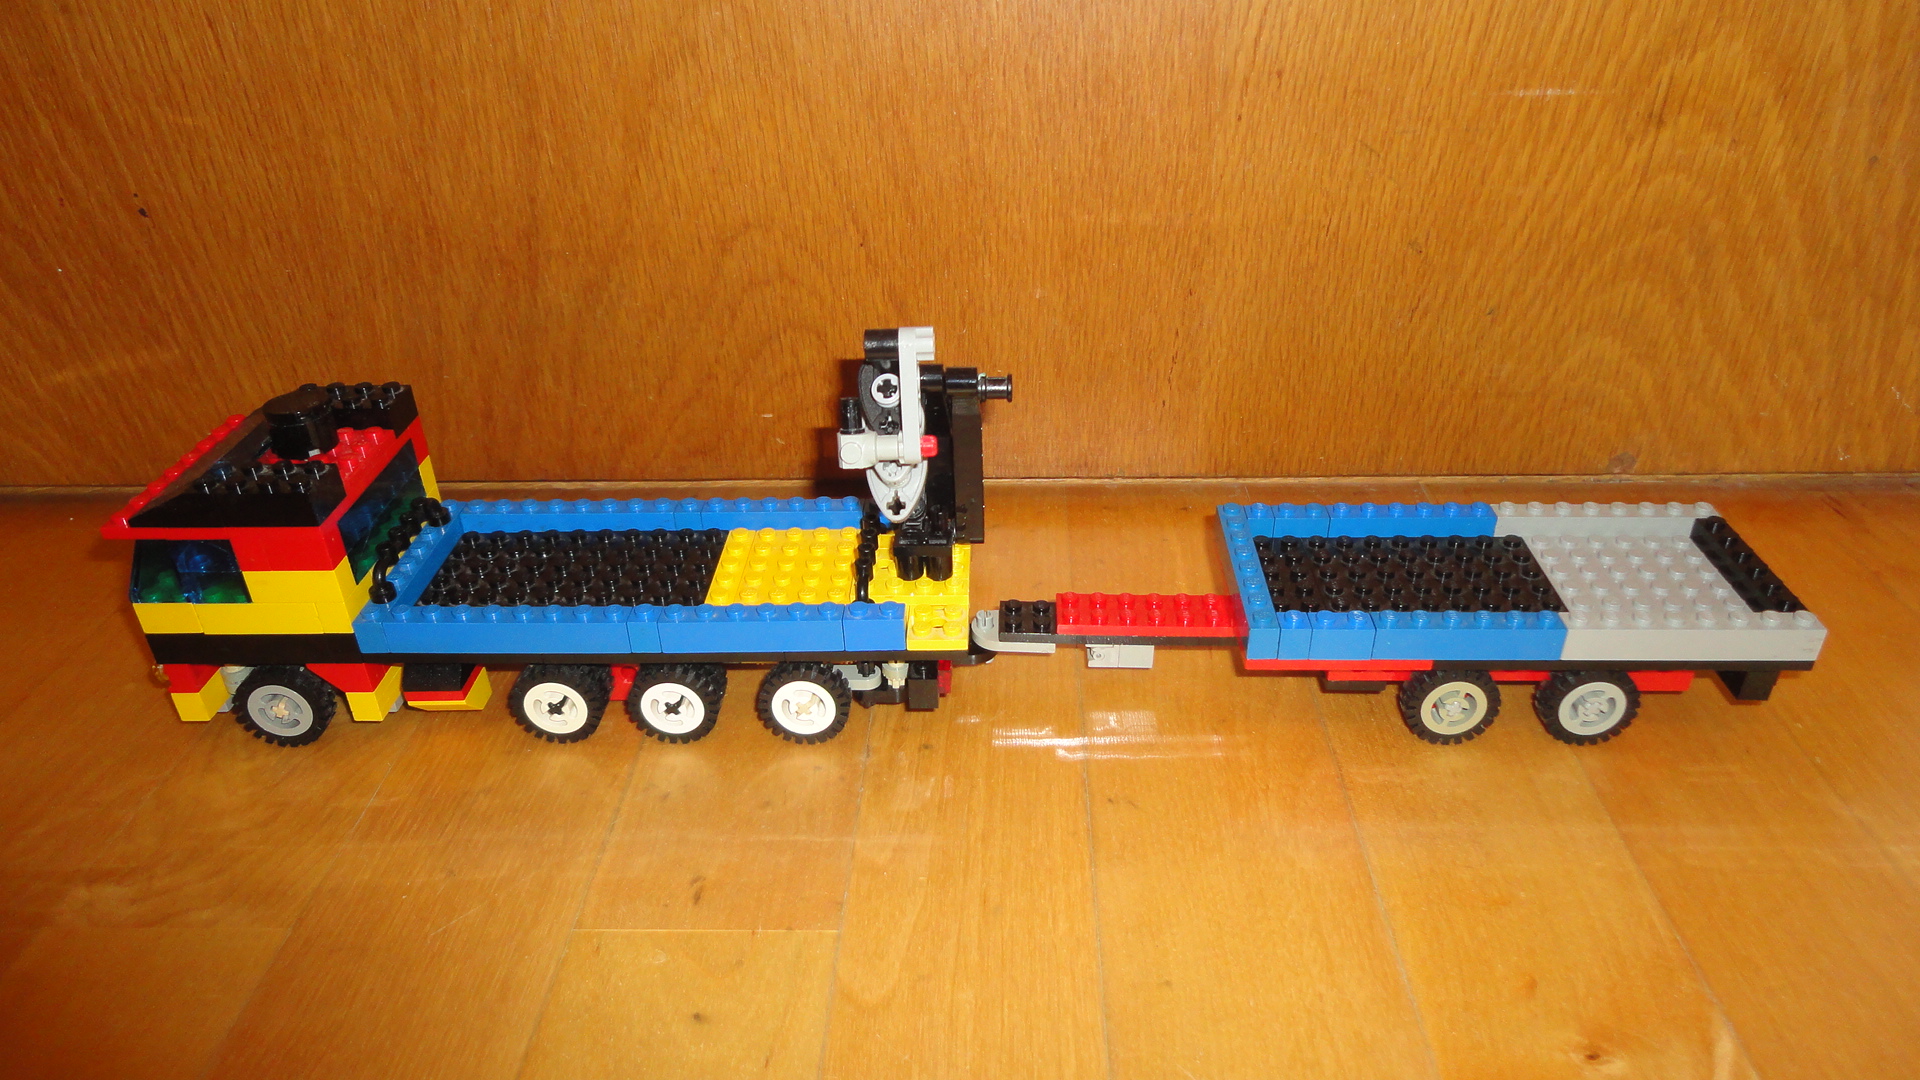
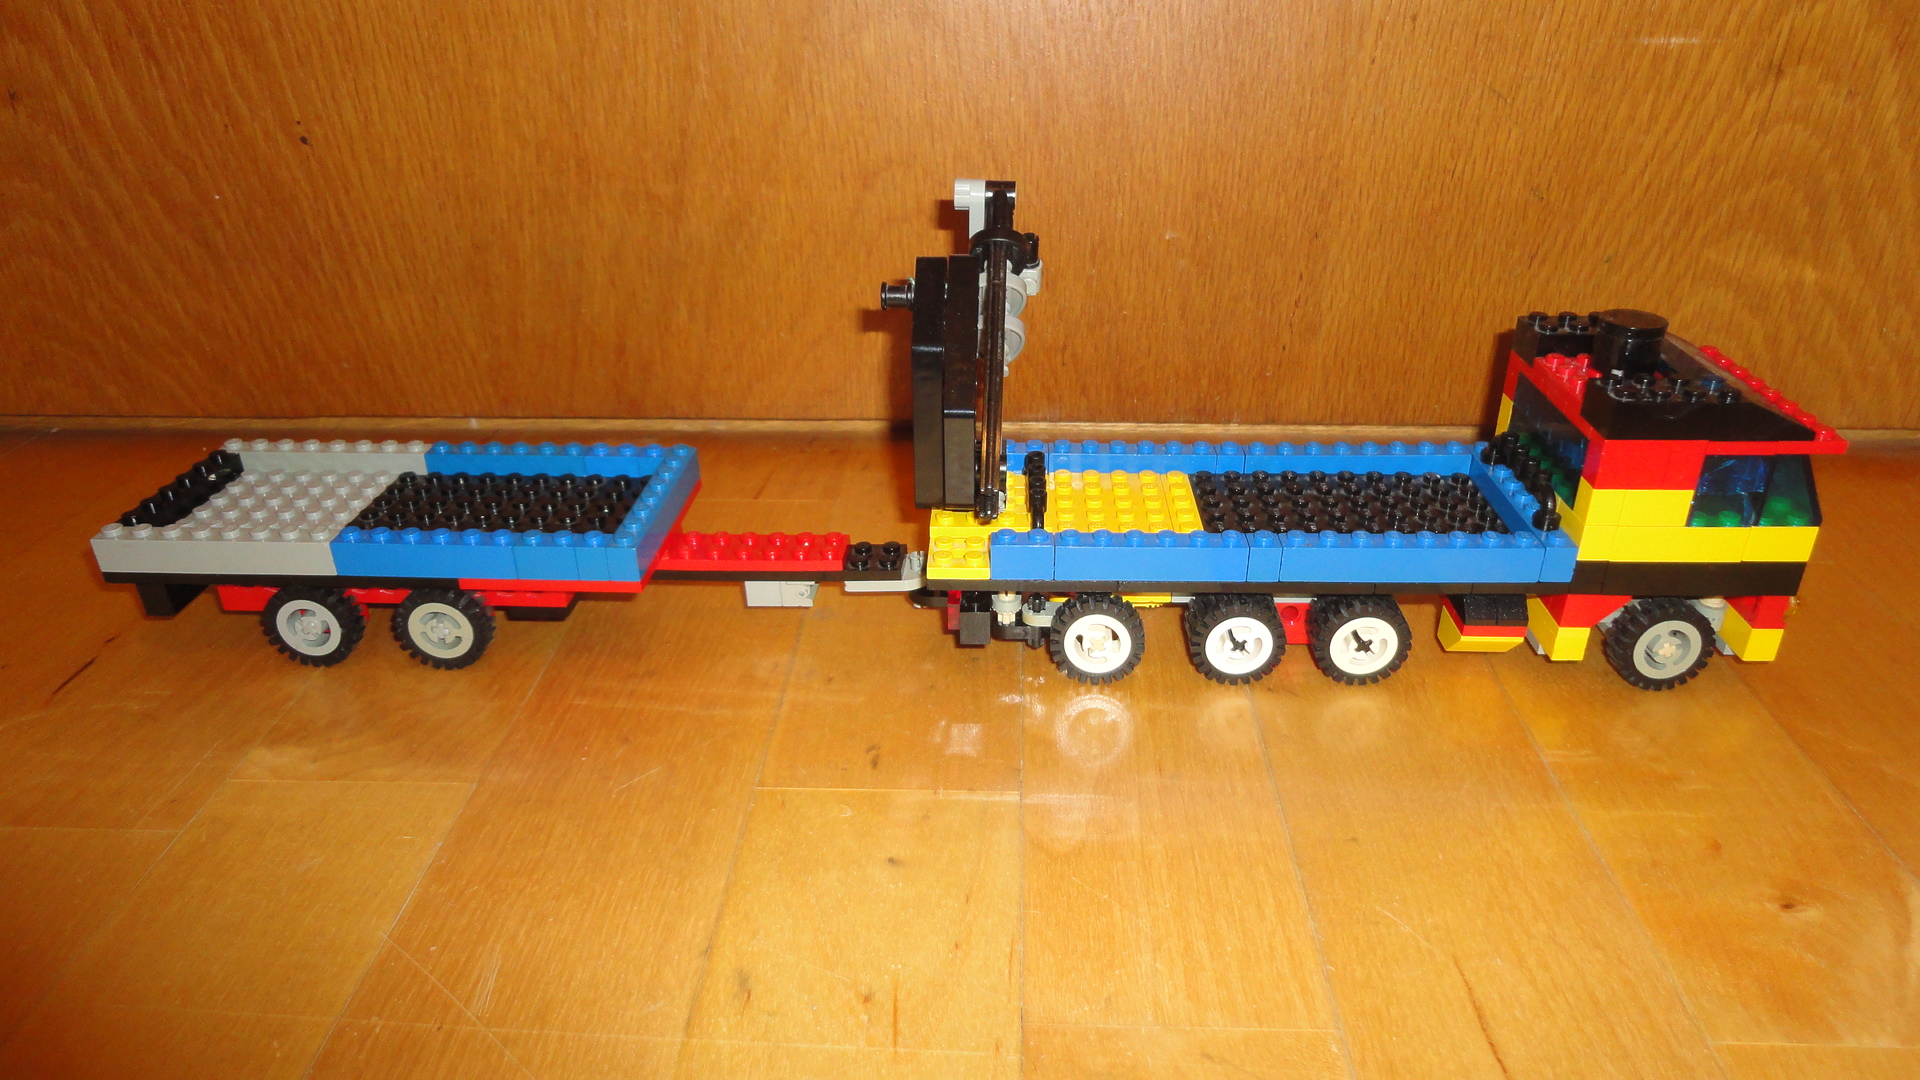
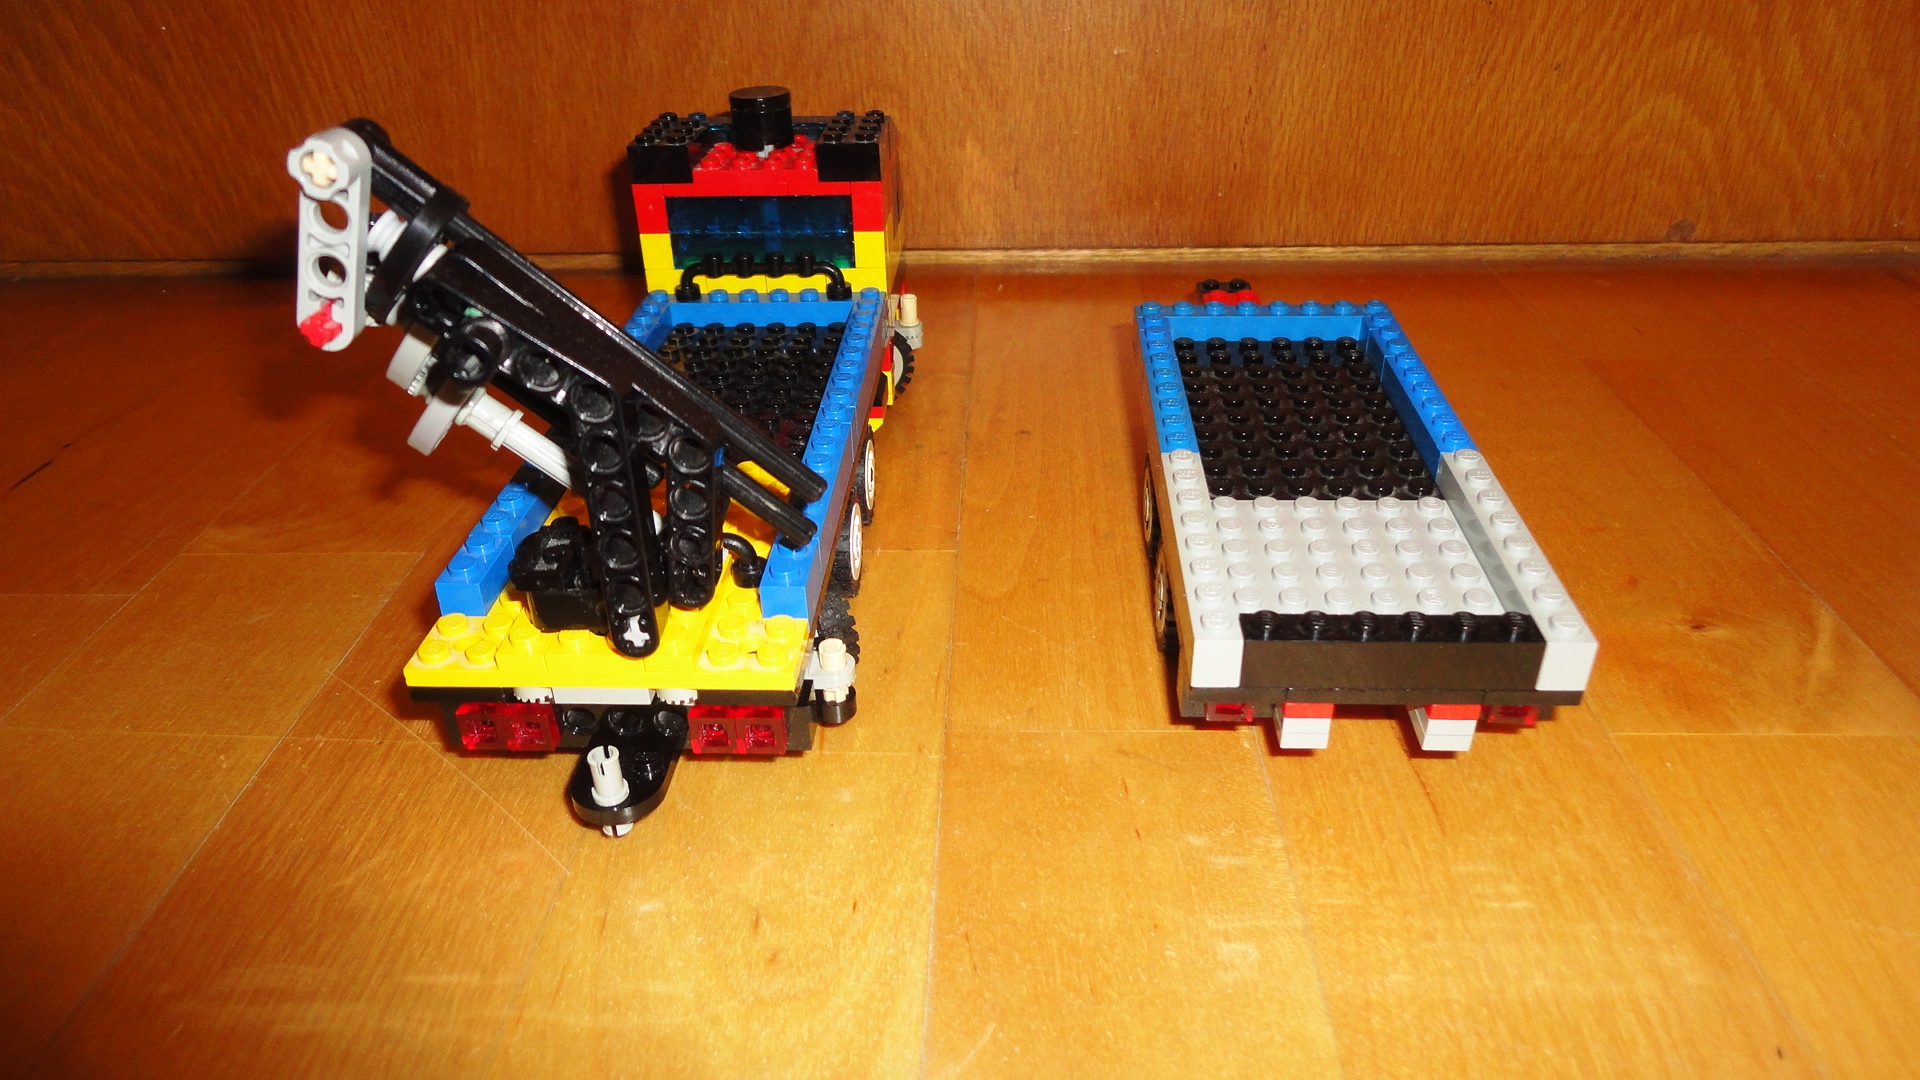
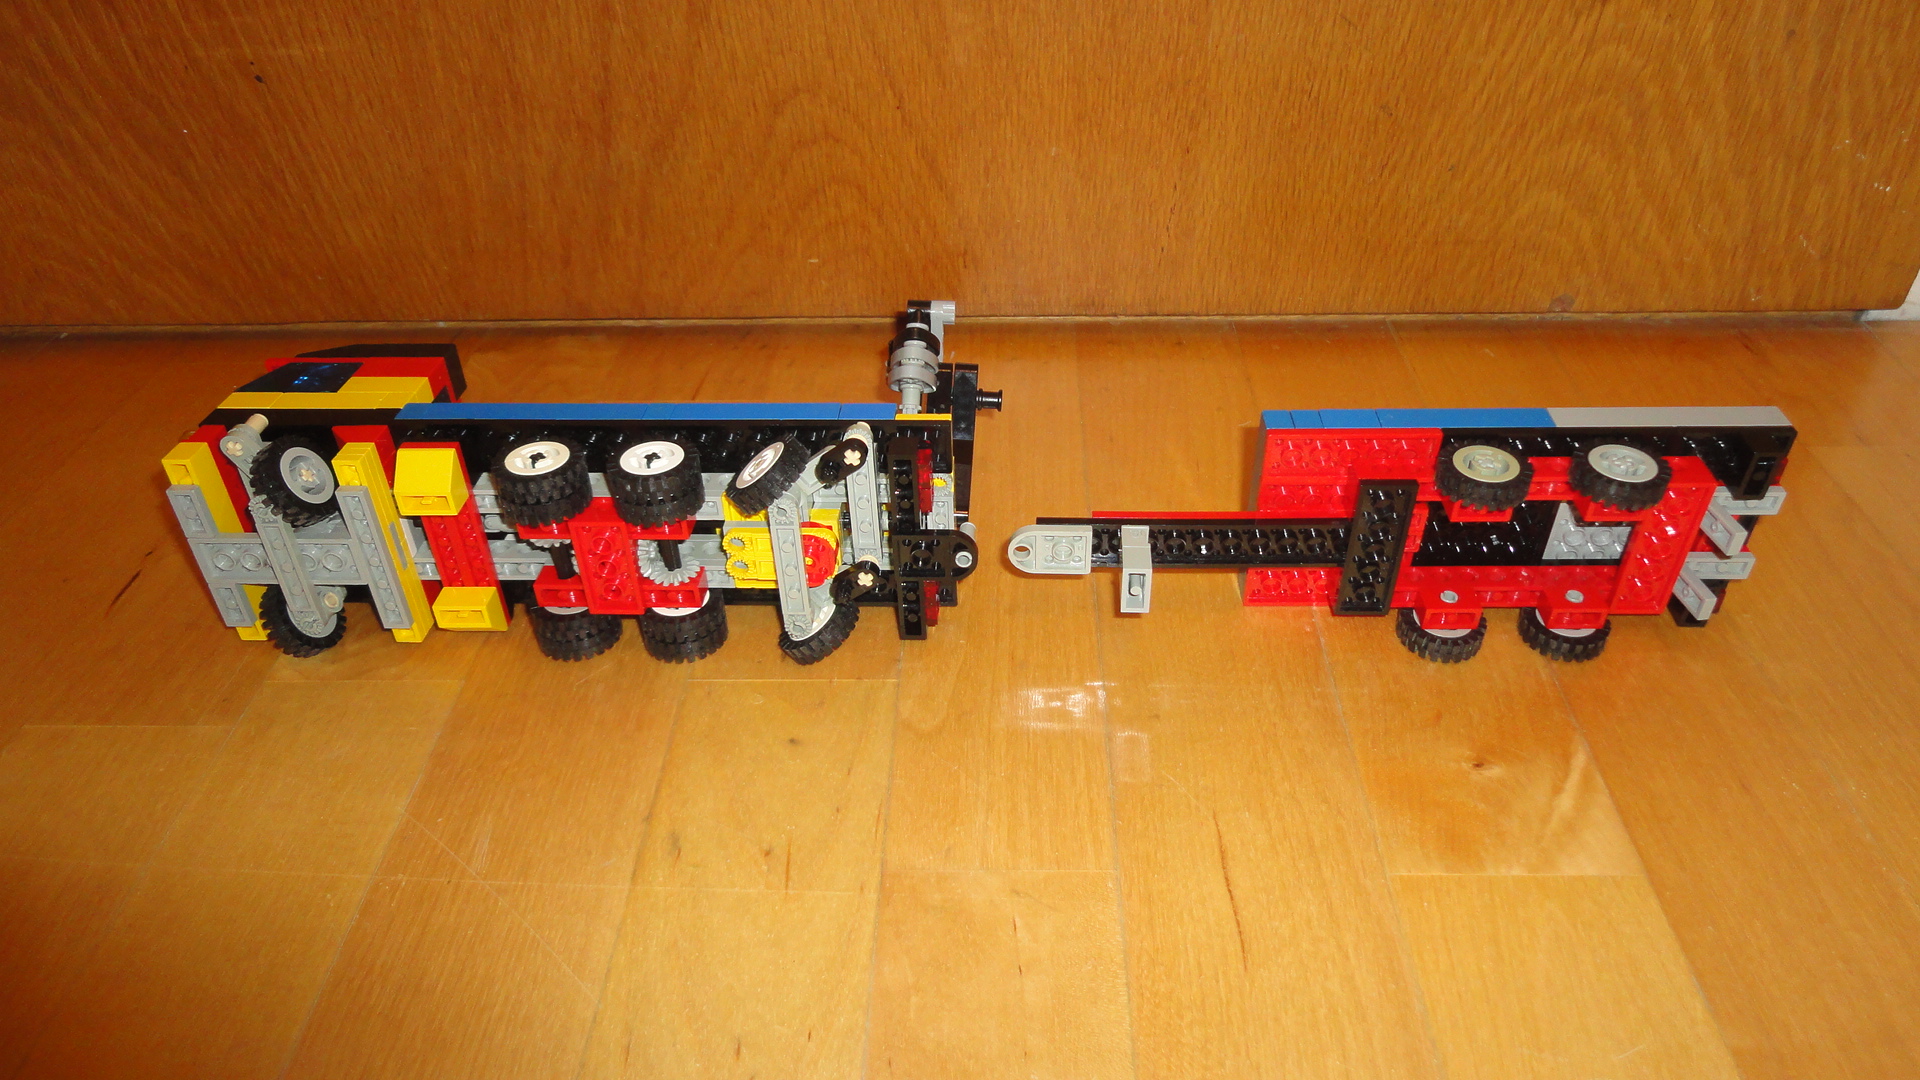
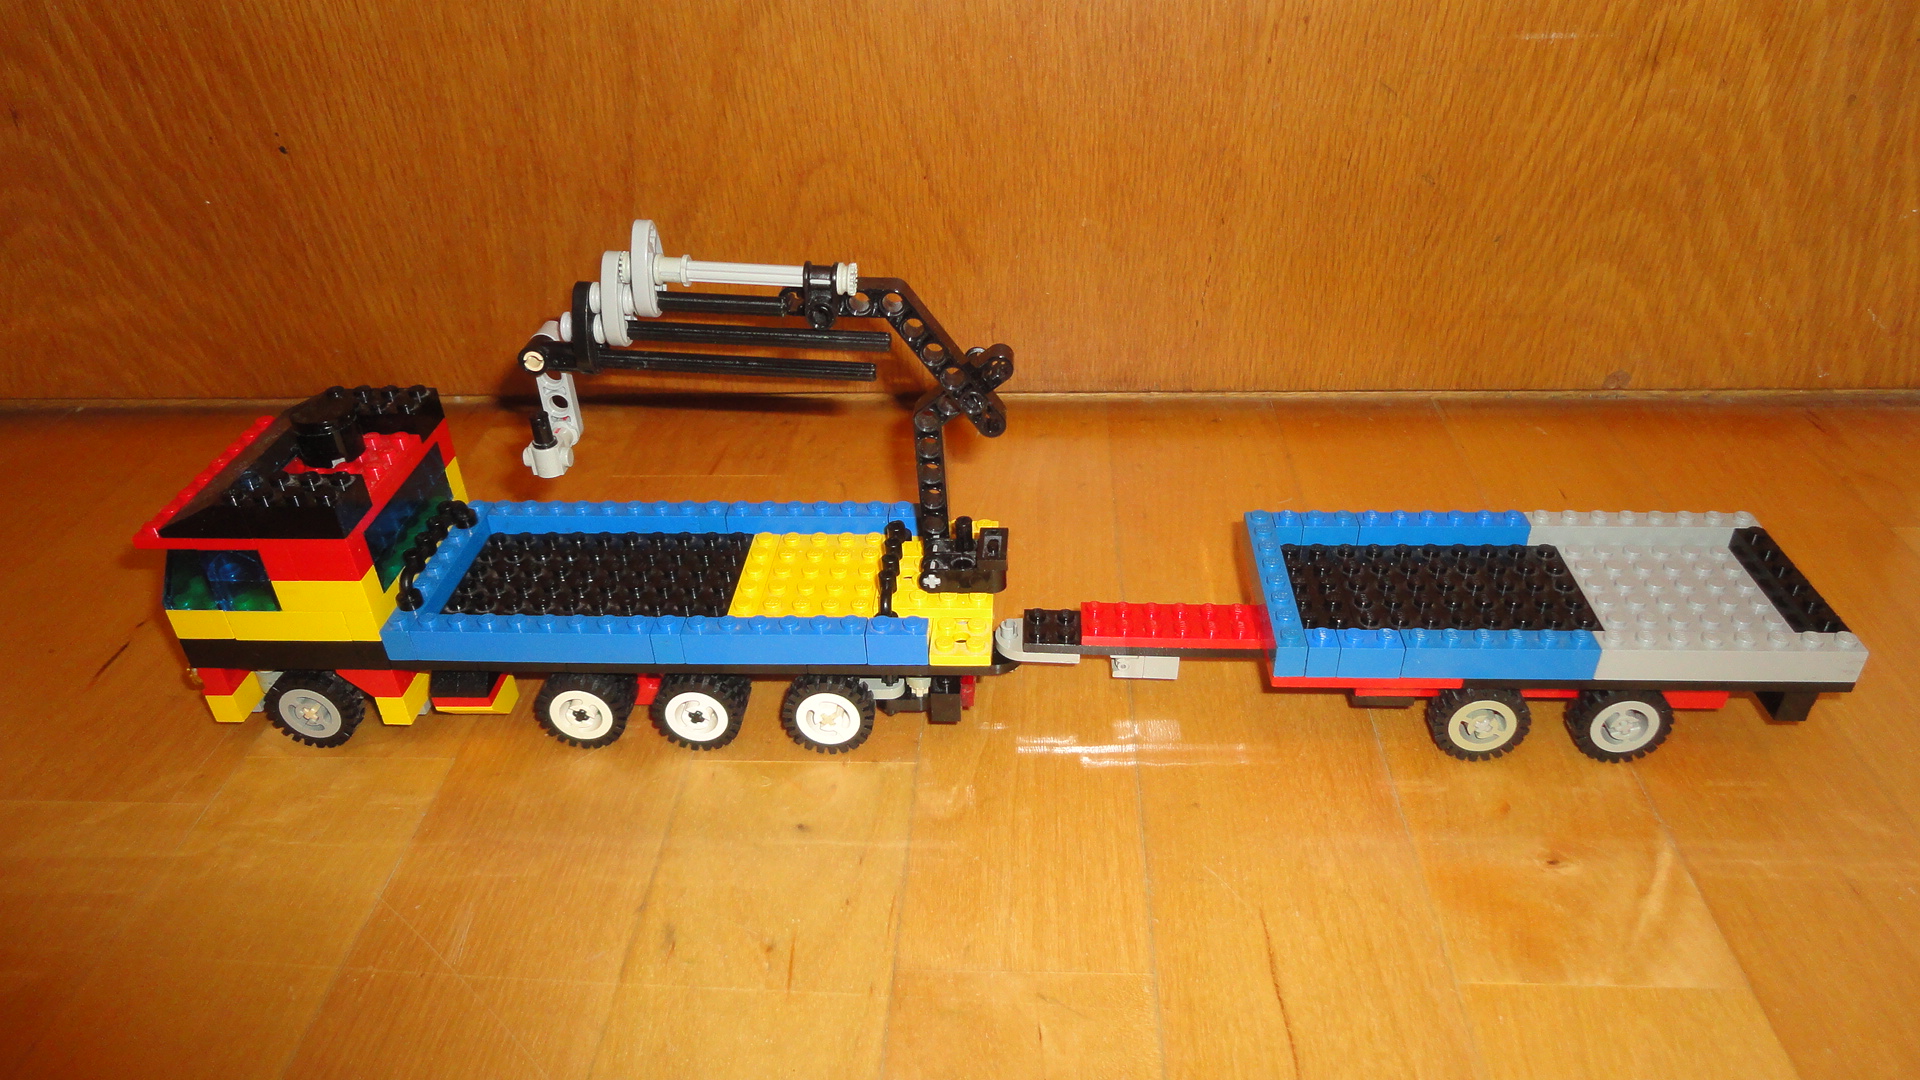
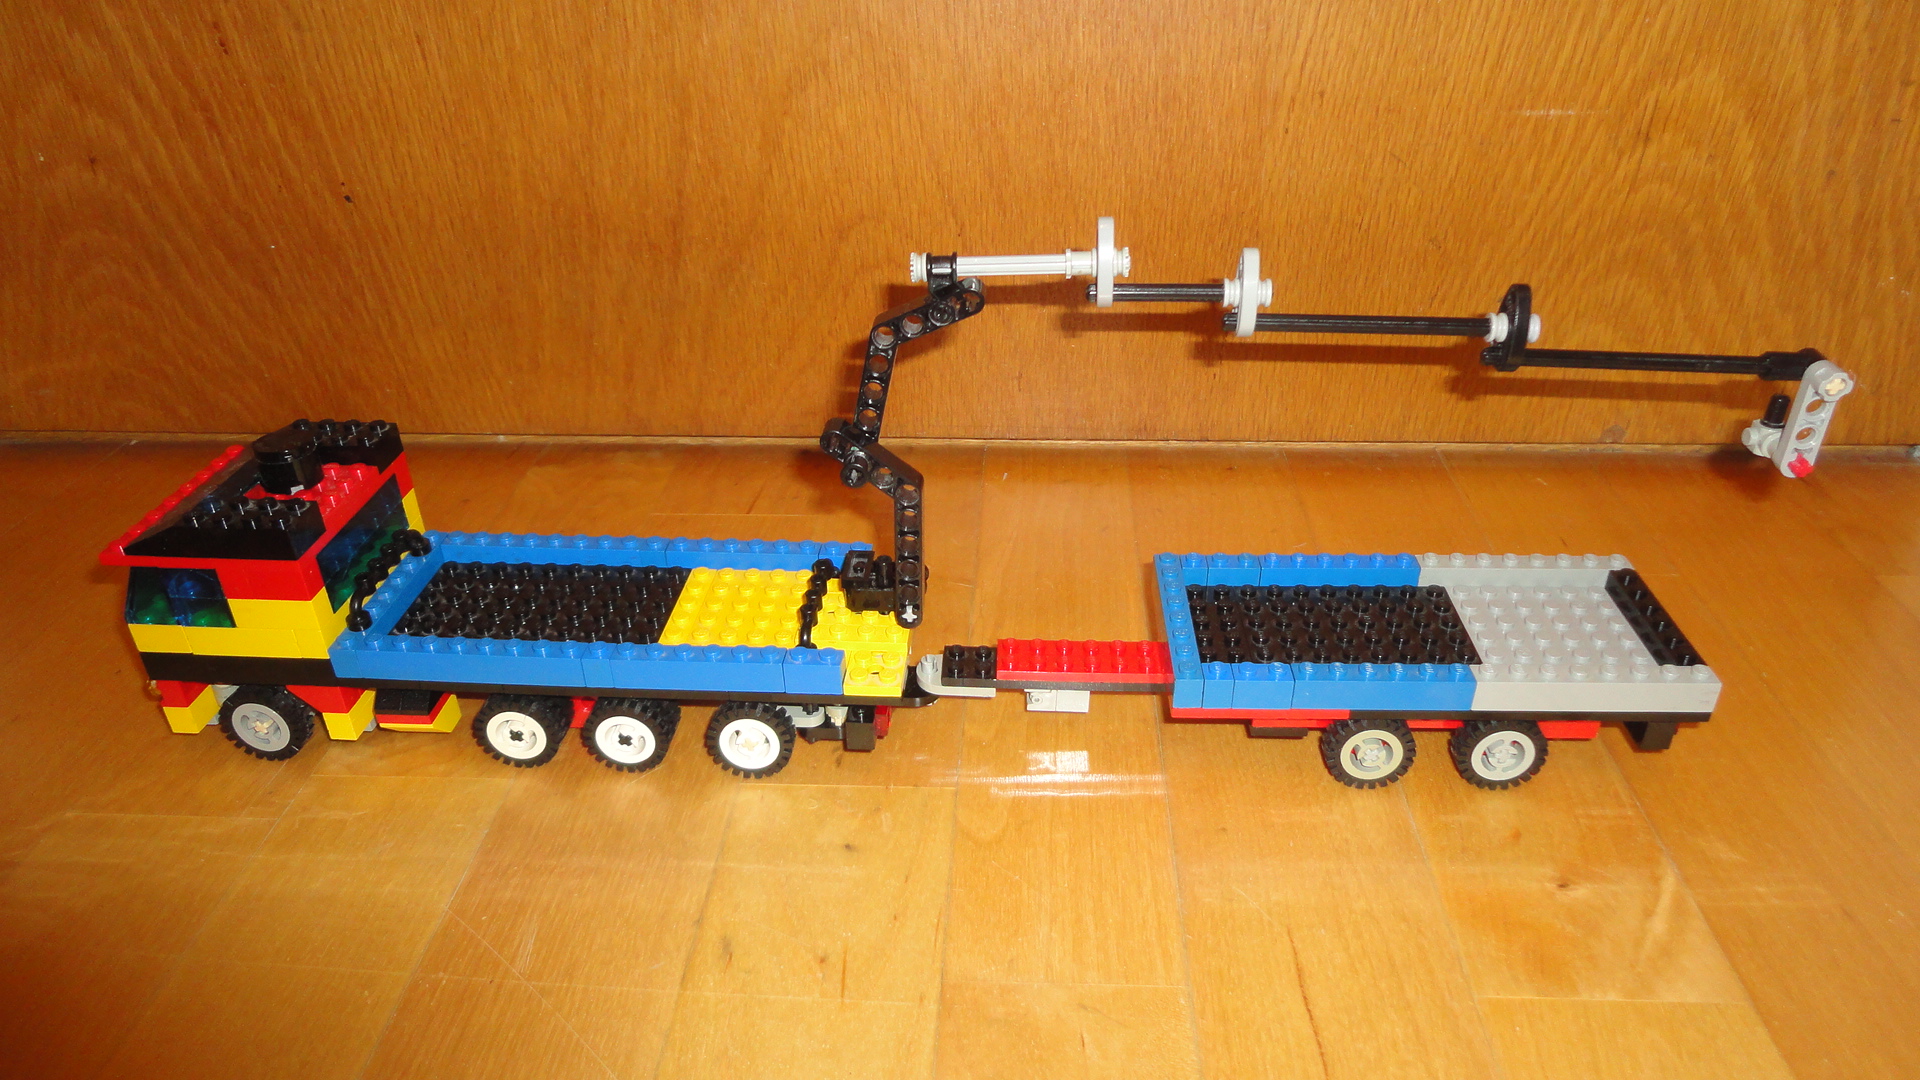
Here is another small scale truck, this time 10x4 with crane. 10 means number of wheels when double wheels are counted as one and 4 means number of driven wheels but truck is not motorized. Usually truck has 2 unsteered axles so then notation is only 10x4 not 10x4/6 where 6 means number of steered wheels.
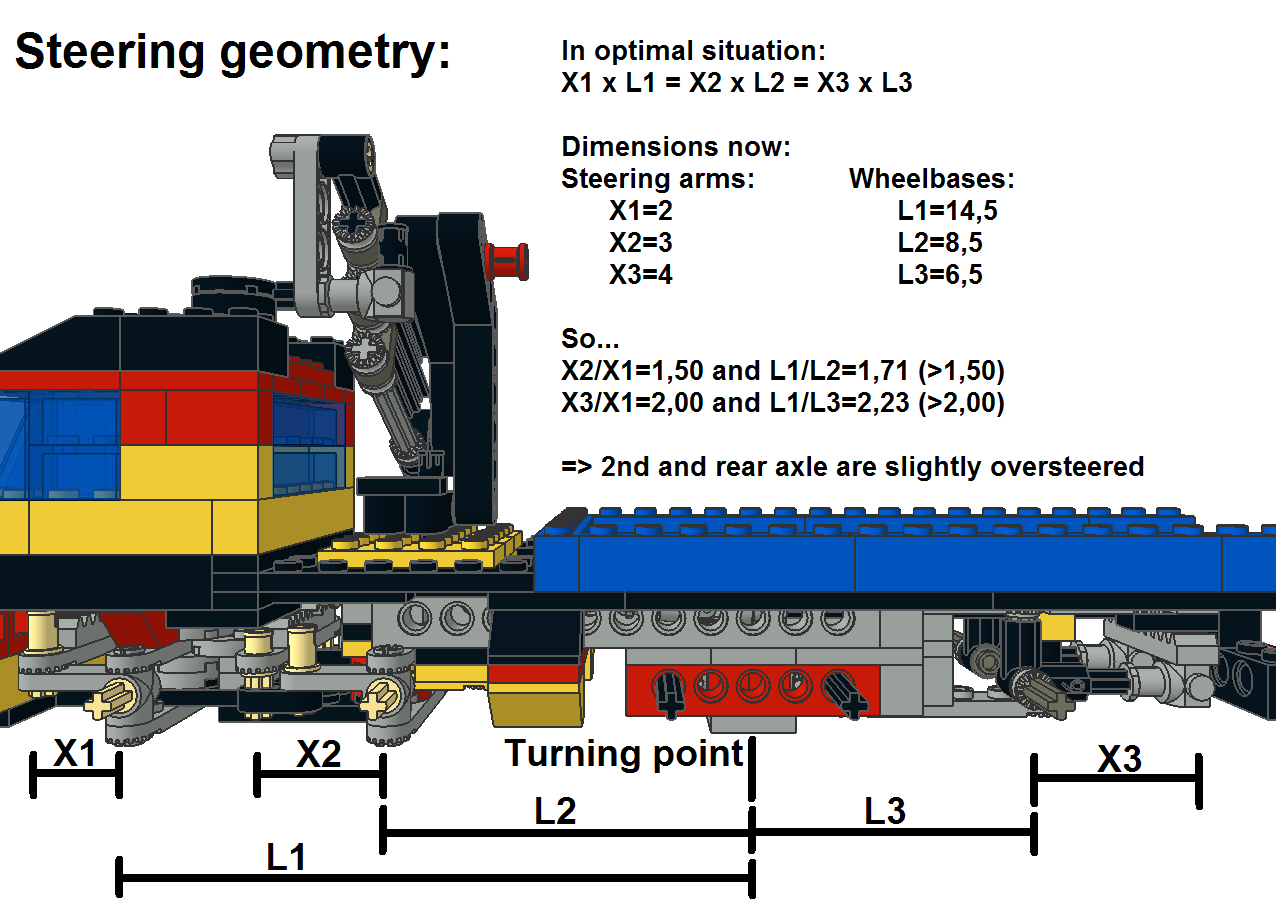
So, this truck has 3 steered axles with 3 different steering angles. Different angles are done by different lengths in steering arms (check picture Steering geometry). Wheelbases are measured from turning point which is centre point of the unsteered axle. When you have 2 unsteered axles like now turning point is in the middle of these unsteered axles. Note that truck doesn’t have Ackermann steering but inner and outer wheels turn to same angle. In front steered axles this error is not significant but rear steered axle is not accurate although steering geometry is otherwise optimized: in tight curve you can see that inner wheel doesn’t turn enough. There is also crane in this truck. Crane’s telescope is quite difficult to use so you won’t play with crane but you can take still pictures in different working situations. When you build this crane try to find pins with maximum friction so you can keep crane up also when telescope is in maximum length. If you don’t get enough friction you can put short piece of thread through beams before adding pin. You can test different thicknesses of thread to see which one doesn’t prevent to put pin into hole but gives enough friction. In my truck crane’s pins had first enough friction but now there is thin insulated wire in first joint, it gives a lot of friction. Pin in second joint has still enough friction to keep crane up. I have made complete model of this truck so there are step by step building instructions and part list available for builders. Check YouTube video or Brickshelf Gallery link BuildIt, or download LDraw file. For builders I recommend to copy upgraded crane from next version 3 8x4 truck. It has longer reach and better usability but it still fits to same space behind cabin. As an option rear steered axle can be equipped with double wheels if you like rougher heavy hauler look. :-) D.3. Version 3, 8x4 truck with crane & 2-axle trailer:
This small scale 8x4 truck with crane & 2-axle trailer is downsized upgrade of previous Small scale 10x4 truck with some improvements. Truck has two steered axles and two driven axles (tandem drive) but truck is not motorized.
So, truck has one axle less which allows shorter but also stronger and simpler frame. While basic wheel base (from front axle to middle point of the driven axles) is shorter rear steered axle can have shorter steering arms than in 10x4 truck. So rear axle of 10x4 truck is removed and replaced with 2nd front axle which has three stud long steering arms. This way rear bumper with lights can be one stud closer to rear axle. With front axle’s basic two stud long steering arms and this rear steered axle design truck’s steering geometry is now quite accurate. Also crane has some improvements. To reach both truck and trailer crane is moved from behind cabin to rear. Now crane can turn around partly outside the frame so it reserves smaller space of cargo body. Crane’s telescope uses now technic cams instead of technic beam 2 x 0,5 liftarms so crane has much smoother operating. Also telescope’s 8 stud axles are replaced with 10 stud axles so crane reaches four studs longer. It’s a little bit complicated to get crane ready for lifting when it’s packed for transportation. Packed crane is some kind of double jack-knifed but it points to right and hook is upside down.. So first you raise middle boom to vertical position via right side. Then you have enough space at down to raise telescope boom to horizontal position to right. Now you can rotate crane, raise or lower booms and use telescope. Actually this unpacking manoeuvre is quite similar in real truck cranes. And packing procedure goes reversed: shorten telescope, turn crane to right, raise middle boom to jack-knife telescope and finally jack-knife middle boom. Truck has also 2-axle trailer which has middle-axle drawbar trailer design. Actually I wanted 3-axle trailer but tandem drive 8x4 truck needs too much wheels. If I make LDraw model of this truck and trailer I’ll design 3-axle trailer. Not only drawbar is equipped with outrigger but there are also two outriggers in the rear. This allows to load/unload trailer without being coupled to truck. You can see outriggers in out position in picture Bottom view. As an universal note about this kind of 8x4 truck with rear steered axle you have to say that design makes basic wheel base short but drawbar coupling is far from turning point. This helps truck’s handling so you can turn around in smaller circle but you also lose some directional stability. Also drawbar coupling’s position helps trailer to turn in smaller space but gives same stability issues. So this kind of truck and trailer belong to cities and construction yards but not for long haul on highways. E. Modified 5590:
E.1. Version 1, 6x2/4 tractor truck:
This truck has 3 modifications compared to original 5590 Model Team truck: it’s longer, front axle has greater steering angle and in the rear 1 driven axle (truck is not motorized) is replaced with steered one. So typical 6x4 American truck has become to European truck. In this version different steering angles are made so that rear steered axle has longer steering arms. A normal 3-axle truck with 1 steered axle and 1 driven axle is marked as 6x2 so 2 steered axles with 1 driven axle must be marked as 6x2/4.
More info about how to get right steering angles when using different lengths in steering arms can be found in picture Steering geometry in earlier C.2. Small scale version 2, 10x4 truck with crane. While rear steered axle is now in front of driven axle wheelbase between front axle and driven axle is much larger than wheelbase of the rear axles. This means that rear steered axle needs very long steering arms which leads to ugly look. Long wheelbase of the front axle gives more driving stability but diameter of turning circle becomes larger. If you swap rear axles their wheelbase doesn’t change but wheelbase of the front axle is much smaller so you can use shorter steering arms in rear steered axle. This configuration will turn around in smaller circle but driving stability won’t be so good. E.2. Version 2, 10x4 dump truck:
Here is a 5-axle dump truck. I don’t know how common they are but you can see this kind of trucks in Finland. This truck has 1 axle in the front and 4 axles in the rear. This time different steering angles are made by different gear wheels: front axle has 14 teeth gear and rear axles have 8 teeth gears. If you use 14 or 16 teeth gears and normal steering arms on front axle steering becomes very fast, so if there is enough space it’s recommended to use XS(8)-M(24) or Su(12)-Mu(20) bevel gear pair for steering wheel axle. This truck didn’t have enough space so I tried to compensate fast steering with large steering wheel (36 teeth gear wheel). 10x4 means that there should be 2 driven axles in this truck (it’s not motorized). In Europe only trailers have usually more than 2 unsteered axles. So in 5-axle truck there is typically 3 steered axles and it is marked only 10x4, not 10x4/6, where the last number means steered wheels.
While truck is empty rear steered axles are lifted up. To get them down you just remove the axle, move 1 plate from under the axle to over it and put the axle back. Steering rack stays in contact to gear wheel so steering angle is not messed up when you remove the axle. Next version in my modified 5590s is motorized 6x4 dump truck and it can be found on page Project 5590. [Back to main page] |
|
Primary content in this document is © Ari Holopainen. All other text, images, or trademarks in this document are the intellectual property of their respective owners. |
| |
©2005 LUGNET. All rights reserved. - hosted by steinbruch.info GbR |


