| |
Hi all,
A couple of weeks ago James contacted me and asked if I’d be interested in
working on a preliminary design of a Hogwarts engine he had made. It was good
timing since I was getting rather bored with no new projects so I started.
Firstly I completed James’ engine design with a few modifications and new
touches. I also added a tender to it and did up some
instructions.
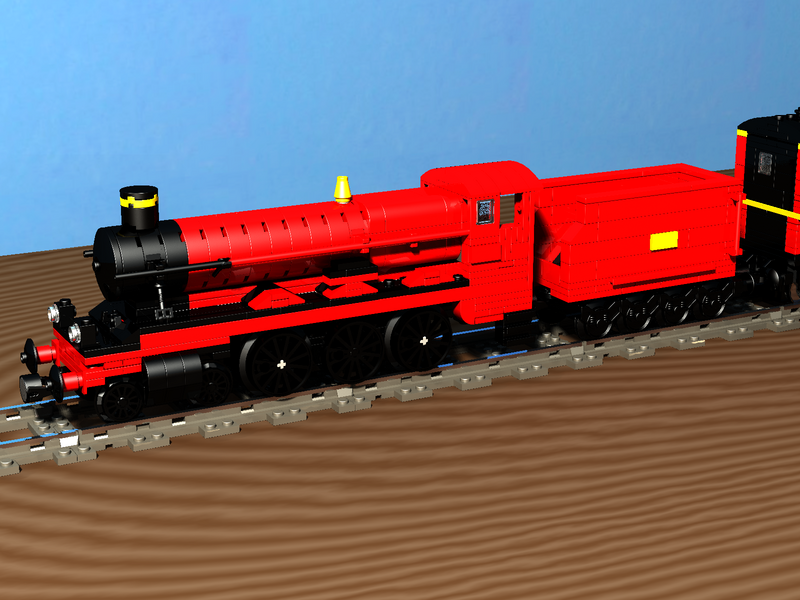
After that James and I passed back and forth some carriage designs which slowly
got more SNOTted as we added new concepts. I was determined to get some
internals in too which made life a little more difficult. Since this is meant to
be a toy train (albeit an expensive one with current BL prices), we wanted to
make it IR compatible which meant making a special carriage based around the
baseplate. Anyway, end result (version 4 for the interested) has
instructions too.

As usual, I did a
wallpaper
render too. The whole gallery is found
here.
It was an extremely satisfying process and I’ve learnt a lot from it. It was
really fun working with someone whose work I admire so much and from whom I have
‘liberated’ so many techniques. I hope you like the end result.
Tim
PS. The wheels in the engine are all Big Ben’s Bricks wheels
|
|
| |
In lugnet.trains, Timothy Gould wrote:
| |
Hi all,
A couple of weeks ago James contacted me and asked if I’d be interested in
working on a preliminary design of a Hogwarts engine he had made. It was good
timing since I was getting rather bored with no new projects so I started.
Firstly I completed James’ engine design with a few modifications and new
touches. I also added a tender to it and did up some
instructions.
After that James and I passed back and forth some carriage designs which
slowly got more SNOTted as we added new concepts. I was determined to get
some internals in too which made life a little more difficult. Since this is
meant to be a toy train (albeit an expensive one with current BL prices), we
wanted to make it IR compatible which meant making a special carriage based
around the baseplate. Anyway, end result (version 4 for the interested) has
instructions too.
As usual, I did a
wallpaper render too. The whole gallery is found
here.
It was an extremely satisfying process and I’ve learnt a lot from it. It was
really fun working with someone whose work I admire so much and from whom I
have ‘liberated’ so many techniques. I hope you like the end result.
Tim
PS. The wheels in the engine are all Big Ben’s Bricks wheels
|
As usual, I knew I’d forget stuff.
PPS. Now cross-posted to .harrypotter and .announce.moc
PPPS. I’d like to thanks James for asking me to work on this
PPPPS. Now Martin Nilsson knows why I was teasing him about macaronis
PPPPPS. And the carriages are seven-wide to those interested
|
|
| |
In lugnet.trains, Timothy Gould wrote:
| |
In lugnet.trains, Timothy Gould wrote:
| |
Hi all,
A couple of weeks ago James contacted me and asked if I’d be interested in
working on a preliminary design of a Hogwarts engine he had made. It was
good timing since I was getting rather bored with no new projects so I
started.
|
|
Heh, why did I have this feeling when I was working on my 4 studs wide macaroni
boiler, that I had to hurry up or else I’d be beaten to it by somebody else? ...
I like the wagons the best, with their curved undersides; that’s what English
wagons look like. The whole thing is actually pretty nice: there’s not much that
could be done to make it look more like the prototype.
The reason that an “actually” crept into the previous sentence is that (and now
some gentle criticisms, or rather suggestions, will follow) it’s hard to rest
one’s eyes on the renders as the luminosity of the red (a warning color, after
all) is far too bright. And maybe the roof of the locomotive cab should be black
after all. Lastly, why haven’t you added a side rod to the big ben wheels of the
locomotive, it ought to work with that design.
Cheers,
Martin
|
|
| |
| |
| |
| |
Hi all,
A couple of weeks ago James contacted me and asked if I’d be interested in
working on a preliminary design of a Hogwarts engine he had made. It was
good timing since I was getting rather bored with no new projects so I
started.
|
|
Heh, why did I have this feeling when I was working on my 4 studs wide
macaroni boiler, that I had to hurry up or else I’d be beaten to it by
somebody else? ...
|
It was funny to see your post as I had James’ boiler design sitting in my inbox
from a couple of weeks ago. It’s also similar to an idea I considered for my
Russian L class steamer but decided against for the reason that it would be too
hard to add greebles (that train had a lot of boiler detailing). However on the
right sort of prototype such as yours or this one it is really effective.
| |
I like the wagons the best, with their curved undersides; that’s what English
wagons look like. The whole thing is actually pretty nice: there’s not much
that could be done to make it look more like the prototype.
|
The curved undersides were the most fun bit. Making them work whilst keeping
internals was a big challenge. The progress of the carriages was quite
interesting as the designs got swapped back and forward between James and
myself. James also has a suggestion of a cheaper alternative which may sacrifice
a bit of accuracy but make it a lot cheaper/easier.
I’ll also use this as an excuse to add something else I forgot. The carriages
are involve half plate height offsets here and there. In fact, the IR carriage
is a half plate height.
| |
The reason that an “actually” crept into the previous sentence is that (and
now some gentle criticisms, or rather suggestions, will follow) it’s hard to
rest one’s eyes on the renders as the luminosity of the red (a warning color,
after all) is far too bright. And maybe the roof of the locomotive cab should
be black after all. Lastly, why haven’t you added a side rod to the big ben
wheels of the locomotive, it ought to work with that design.
|
Oh yes! To be honest I am not too happy with the renders at all. The red is too
bright and the black is too dark (which is why the red is too bright or vice
versa). Unfortunately all my playing with lighting couldn’t improve the picture
and so I decided to ship as is. I may upgrade the pictures if I can work out how
to make them look better. It might be the background playing up with the
foreground so I might have to remove them from my ‘playroom’ and onto a white
floor.
As for the rods... I am usually too scared to build things that I haven’t tested
(or can work out easily) in real life. Since I have no BBB wheels handy I wasn’t
willing to add a side rod that might not work. I forgot earlier but I’ll upload
the MPDs so that if anyone wants to they can try adding some.
Thanks for your comments and criticisms (I like criticism as it helps me
improve),
Tim
|
|
| |
Nice, I have been considering the use of the new 1x3 curved slopes for the
tumblehome of coaches too but as usual I am far too slow! The difference with my
idea was that the whole side would slope in slightly towards the top, how it
would mate with the ends, I’m not sure. I really like your window design, I’m
not so certain the doors look right but I can’t think of a better way. I think I
would have just represented the door windows and handles. Ironically the choice
of loco to do a proper round boiler on actually had a tapered (partially
conical) boiler !
Tim
PS I think you need to study GWR 3500 gallon tenders a bit ;)
|
|
| |
In lugnet.trains, Tim David wrote:
| |
Nice, I have been considering the use of the new 1x3 curved slopes for the
tumblehome of coaches too but as usual I am far too slow!The difference with
my idea was that the whole side would slope in slightly towards the top, how
it would mate with the ends, I’m not sure.
|
The original version James sent me had a full curve sloping in at the bottom and
top. The prototype cars seemed to me to only curve in at the bottom and I wanted
to keep the window design as it was so I just did the bottom half.
| |
I really like your window design,
|
The window design was James’ and was pretty much how the coach started. After
that I worked around getting them to fit (which involved dropping the roof half
a plate).
| |
I’m not so certain the doors look right but I can’t think of a better way. I
think I would have just represented the door windows and handles.
|
That was what I had right up until the very last minute when I changed it to
what you saw. Damn!
| |
Ironically
the choice of loco to do a proper round boiler on actually had a tapered
(partially conical) boiler !
|
Details, details ;)
| |
Tim
PS I think you need to study GWR 3500 gallon tenders a bit ;)
|
Where were you in jlug chat when I needed you. I wanted to know the class number
so I could find more pics. Anyway, this one is a MAGIC tender and thus doesn’t
have to be perfectly prototypical... :P
Tim
|
|
| |
In lugnet.trains, Timothy Gould wrote:
| |
In lugnet.trains, Tim David wrote:
| |
Nice, I have been considering the use of the new 1x3 curved slopes for the
tumblehome of coaches too but as usual I am far too slow!The difference with
my idea was that the whole side would slope in slightly towards the top, how
it would mate with the ends, I’m not sure.
|
The original version James sent me had a full curve sloping in at the bottom
and top. The prototype cars seemed to me to only curve in at the bottom and I
wanted to keep the window design as it was so I just did the bottom half.
|
Sorry, I think you misunderstood what I meant (either that or I am
misunderstanding you) My thinking was that the sides would be much the same as
you have them, but the whole panel would be slightly off the vertical, so the
coach is maybe half a stud wider at the waist than the roofline. The section
above the waist would still be flat, just not vertical.
| |
| |
I really like your window design,
|
The window design was James’ and was pretty much how the coach started. After
that I worked around getting them to fit (which involved dropping the roof
half a plate).
| |
I’m not so certain the doors look right but I can’t think of a better way. I
think I would have just represented the door windows and handles.
|
That was what I had right up until the very last minute when I changed it to
what you saw. Damn!
| |
Ironically
the choice of loco to do a proper round boiler on actually had a tapered
(partially conical) boiler !
|
Details, details ;)
| |
Tim
PS I think you need to study GWR 3500 gallon tenders a bit ;)
|
Where were you in jlug chat when I needed you. I wanted to know the class
number so I could find more pics. Anyway, this one is a MAGIC tender and thus
doesn’t have to be perfectly prototypical... :P
|
Well in the film it a was a GWR Hall class (59xx) The tender would be a six
wheeler and would give opportunity to do some Martin Nilsson 1x1x2/3 slope work
on the sides. Wikipedia is your
friend ;)
Tim
|
|
| |
In lugnet.trains, Tim David wrote:
| |
In lugnet.trains, Timothy Gould wrote:
| |
In lugnet.trains, Tim David wrote:
| |
Nice, I have been considering the use of the new 1x3 curved slopes for the
tumblehome of coaches too but as usual I am far too slow!The difference
with my idea was that the whole side would slope in slightly towards the
top, how it would mate with the ends, I’m not sure.
|
The original version James sent me had a full curve sloping in at the bottom
and top. The prototype cars seemed to me to only curve in at the bottom and
I wanted to keep the window design as it was so I just did the bottom half.
|
Sorry, I think you misunderstood what I meant (either that or I am
misunderstanding you) My thinking was that the sides would be much the same
as you have them, but the whole panel would be slightly off the vertical, so
the coach is maybe half a stud wider at the waist than the roofline. The
section above the waist would still be flat, just not vertical.
|
That sounds really neat. Can’t wait to see it.
| |
| |
Where were you in jlug chat when I needed you. I wanted to know the class
number so I could find more pics. Anyway, this one is a MAGIC tender and
thus doesn’t have to be perfectly prototypical... :P
|
Well in the film it a was a GWR Hall class (59xx) The tender would be a six
wheeler and would give opportunity to do some Martin Nilsson 1x1x2/3 slope
work on the sides. Wikipedia
is your friend ;)
Tim
|
For a mathematician my skill at counting was sorely lacking. There’s always the
next version.
Tim
|
|
| |
In lugnet.trains, Timothy Gould wrote:
| |
| |
| |
| |
Hi all,
A couple of weeks ago James contacted me and asked if I’d be interested in
working on a preliminary design of a Hogwarts engine he had made. It was
good timing since I was getting rather bored with no new projects so I
started.
|
|
Heh, why did I have this feeling when I was working on my 4 studs wide
macaroni boiler, that I had to hurry up or else I’d be beaten to it by
somebody else? ...
|
It was funny to see your post as I had James’ boiler design sitting in my
inbox from a couple of weeks ago. It’s also similar to an idea I considered
for my Russian L class steamer but decided against for the reason that it
would be too hard to add greebles (that train had a lot of boiler detailing).
However on the right sort of prototype such as yours or this one it is really
effective.
|
There is nothing new under the sun.
I just discovered the following, without looking for it. So it seems to be
destiny that I should share it:
Pony-ear-SNOTted macaroni boiler from
1966
That page also shows some micro-scale trains, one in 1-wide scale, which I guess
still today would have to be classed as avant garde...
/Martin
|
|
| |
In lugnet.trains, Timothy Gould wrote:
| |
Hi all,
A couple of weeks ago James contacted me and asked if I’d be interested in
working on a preliminary design of a Hogwarts engine ...
|
Tim and James-
It’s just gorgeous! I want one under my Christmas tree (and on top of our next
SCLTC layout)!
-Ted
SCLTC
|
|
| |
In lugnet.trains, Martin Nilsson wrote:
| |
There is nothing new under the sun.
I just discovered the following, without looking for it. So it seems to be
destiny that I should share it:
Pony-ear-SNOTted macaroni boiler from
1966
That page also shows some micro-scale trains, one in 1-wide scale, which I
guess still today would have to be classed as avant garde...
/Martin
|
Hey look - on that same page is Larry’s
Drop Center Flat Car with Transformer, in the same colors even. Cool!
-Matt :)
|
|
| |
In lugnet.trains, Timothy Gould wrote:
| |
Hi all,
A couple of weeks ago James contacted me and asked if I’d be interested in
working on a preliminary design of a Hogwarts engine he had made. It was good
timing since I was getting rather bored with no new projects so I started.
|
Nice effort, Tim and James. This is especially interesting to me (and Ross)
because we (in the sense that I acquire the needed bricks and he assembles
them;-) have studied the Hogwarts Express at length, from finding pics and
schematics online to freeze-framing our HP DVDs to ascertain info about the
train.
Ross’ first effort I brought to Brickfest PDX but I never really made an
announcement about it because it was such a WIP:
He has since modified it, but we are now working on a total revision of it....
in dark red Hmmm. And that is with coaches. Brick acquisition has been slow,
but results will be forthcoming, so stay tuned:-)
Here are some thoughts about yours based on what I have learned researching
ours:
The roof definitely needs to be black. The coaches’ roofs, however, should be
dark gray. The entire train, of course, should be dark red. Since you have
created this baby virually, why not go all out and create it in dark red? :-d
(it might even help your lighting problems a bit)
As was mentioned elsewhere, the tender should only have 3 axles. We explored
the window treatment idea you have utilized and decided that it looked too bulky
and proportionally didn’t work well. So we decided that that treatment should
be handled with decals.
You have decided to use two yellow stripes to show the pinstriping-- we also
looked at this and decided that the plate is WAY too thick to simulate the
delicate pinstriping of the coaches. At best one could use the hinge brick
striping technique, but it would only be able to be used for the bottom stripe
(which actually is a double stripe), so that’s not a perfect solution, either.
What we have finally decided to do is to use a plate for the bottom striping and
use a dark red decal stripe through the middle of that yellow plate to
simulate the double striping. The top stripe will be a thin yellow decal
stripe. In any event, however, I think that having NO stripes is better than
using 2 yellow plate stripes-- they are too dominate and change the entire color
scheme of the train IMO.
One of these days I will be finishing up my rip-offs of the Hogwarts Express
logo, so perhaps that can be placed where people could use it either virtually
or as a decal. I have no idea how that is done virtually, but I could provide
it in any form necessary for someone who could run with the idea.
JOHN
|
|
| |
In lugnet.trains, John Neal wrote:
| |
In lugnet.trains, Timothy Gould wrote:
| |
Hi all,
A couple of weeks ago James contacted me and asked if I’d be interested in
working on a preliminary design of a Hogwarts engine he had made. It was
good timing since I was getting rather bored with no new projects so I
started.
|
Nice effort, Tim and James. This is especially interesting to me (and Ross)
because we (in the sense that I acquire the needed bricks and he
assembles them;-) have studied the Hogwarts Express at length, from finding
pics and schematics online to freeze-framing our HP DVDs to ascertain info
about the train.
|
I only worked from two pics of the Hornby set and one picture of the real loco
in its standard livery. I’m really, really bad at finding prototype pictures so
your advice is very valuable.
Very nice design. I look forward to seeing it complete.
| |
He has since modified it, but we are now working on a total revision of
it.... in dark red Hmmm. And that is with coaches. Brick acquisition has
been slow, but results will be forthcoming, so stay tuned:-)
|
Better your money than mine ;)
| |
Here are some thoughts about yours based on what I have learned researching
ours:
The roof definitely needs to be black. The coaches’ roofs, however, should
be dark gray. The entire train, of course, should be dark red. Since you
have created this baby virually, why not go all out and create it in dark
red? :-d (it might even help your lighting problems a bit)
|
Thanks for that colour advice. I will leave it in standard red as I like to be
able to afford any designs I make but I will certainly change the roof colours
(and rerender with the correct bleys).
| |
As was mentioned elsewhere, the tender should only have 3 axles. We explored
the window treatment idea you have utilized and decided that it looked too
bulky and proportionally didn’t work well. So we decided that that treatment
should be handled with decals.
|
Accuracy over lego-acy. As you may have noticed I’ve never been a stickler for
scale (at all). I am looking forward to seeing your design. It’s something I
love about Lego that you can ramp up the accuracy as much or as little as you
like. I prefer the slightly toylike look but am very impressed by people who
build really accurate models (except you eight-widers, build smaller :P).
| |
You have decided to use two yellow stripes to show the pinstriping-- we also
looked at this and decided that the plate is WAY too thick to simulate the
delicate pinstriping of the coaches. At best one could use the hinge brick
striping technique, but it would only be able to be used for the bottom
stripe (which actually is a double stripe), so that’s not a perfect solution,
either. What we have finally decided to do is to use a plate for the bottom
striping and use a dark red decal stripe through the middle of that yellow
plate to simulate the double striping. The top stripe will be a thin yellow
decal stripe. In any event, however, I think that having NO stripes is
better than using 2 yellow plate stripes-- they are too dominate and change
the entire color scheme of the train IMO.
|
You had me worried there that I’d gone for the double. You could use a stack of
flags to get the stripes (assuming they come in dark red) as they are half plate
thick. The initial window design James sent me used flags between the lower and
upper half but I replaced it by a tile in order to get internal space.
| |
One of these days I will be finishing up my rip-offs of the Hogwarts Express
logo, so perhaps that can be placed where people could use it either
virtually or as a decal. I have no idea how that is done virtually, but I
could provide it in any form necessary for someone who could run with the
idea.
JOHN
|
If you send my a copy of the decals I can try to run them through my image to
dat converter for virtual use. Hopefully they will be simple enough to work.
Thanks for all your comments and advice.
Tim
|
|
| |
In lugnet.trains, John Neal wrote:
> He has since modified it, but we are now working on a total revision of
> it.... in [dark red] Hmmm. And that is with coaches. Brick acquisition has
> been slow, but results will be forthcoming, so stay tuned:-)
Good luck with that...
http://www.brickshelf.com/cgi-bin/gallery.cgi?i=1083307
http://www.brickshelf.com/cgi-bin/gallery.cgi?i=1173011
Just don't forget there are other colours out there:
http://www.brickish.org/members/files/jrailton%5Croyal_train_001.jpg
;-)
And I love this shot that Huw took:
http://www.brickshelf.com/cgi-bin/gallery.cgi?i=667682
I went for an actual 'Castle' class. That's what 'Hogwart's Castle' is supposed
to be, but they couldn't get a Castle for the film. The Hornby model is
actually a Castle, since they didn't have a Hall class mould. I think I'll have
to re-do mine in dark green.
Personally, I think the BBB wheels below the sole plate make the boiler a little
too high on Tim's engine. If I do rebuild mine, I'll stick with the model-team
sizes, though it means I can't do full linkages.
The curves on the carriages are nicely done, but they do come up quite high and
raise everything higher above the bogeys. They would certainly look better on a
larger scale model, but an excellent job on fitting them in. Why not use BBB
small wheels and design some lower profile bogeys? Then you could insert a
plate or two of red between the tops of the curves and the yellow stripe.
It may not be the neatest method, but here's how I've attached things to a
macoroni boiler:
http://www.brickshelf.com/cgi-bin/gallery.cgi?i=1514337
Jason R
|
|
| |
In lugnet.trains, Jason J. Railton wrote:
| |
In lugnet.trains, John Neal wrote:
| |
He has since modified it, but we are now working on a total revision of
it.... in dark red Hmmm. And that is with coaches. Brick acquisition has
been slow, but results will be forthcoming, so stay tuned:-)
|
Good luck with that...
http://www.brickshelf.com/cgi-bin/gallery.cgi?i=1083307
http://www.brickshelf.com/cgi-bin/gallery.cgi?i=1173011
|
lol Thanks; you know what I’ve been going through;-) But I have to say that,
from the looks of your beaut, it is definitely worth it! Actually, I am in the
middle of recoloring my Milwaukee Road Hiawatha train in dark red, and Ross is
working on the Hogwarts Express.
| |
Just don’t forget there are other colours out there:
http://www.brickish.org/members/files/jrailton%5Croyaltrain001.jpg
;-)
|
Yeah, I remember seeing pics of those coaches, but I can’t tell from this one
about which colours you’re speaking;-) (translation: post more better pics:-)
| |
And I love this shot that Huw took:
http://www.brickshelf.com/cgi-bin/gallery.cgi?i=667682
|
Tasty!
| |
I went for an actual ‘Castle’ class. That’s what ‘Hogwart’s Castle’ is
supposed to be, but they couldn’t get a Castle for the film. The Hornby model
is actually a Castle, since they didn’t have a Hall class mould. I think I’ll
have to re-do mine in dark green.
|
Good luck with that;-) I’ve already had my dark green
odyssey:-)
| |
Personally, I think the BBB wheels below the sole plate make the boiler a
little too high on Tim’s engine. If I do rebuild mine, I’ll stick with the
model-team sizes, though it means I can’t do full linkages.
|
Yup-- shrouding is a huge issue that is essentially unsolvable at smaller
scales...
| |
The curves on the carriages are nicely done, but they do come up quite high
and raise everything higher above the bogeys. They would certainly look
better on a larger scale model, but an excellent job on fitting them in. Why
not use BBB small wheels and design some lower profile bogeys? Then you could
insert a plate or two of red between the tops of the curves and the yellow
stripe.
It may not be the neatest method, but here’s how I’ve attached things to a
macoroni boiler:
http://www.brickshelf.com/cgi-bin/gallery.cgi?i=1514337
|
I never got the impression of such a curving profile of the coaches. I’ll have
to go back and look at my reference material.
JOHN
|
|
| |
In lugnet.trains, John Neal wrote:
| |
I never got the impression of such a curving profile of the coaches. I’ll
have to go back and look at my reference material.
JOHN
|
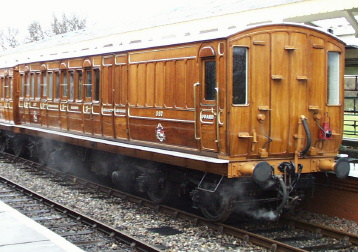
The profile of the coaches used in the film (BR Mk1) is actually pretty much a
constant large radius curve down the whole side. Newer designs of British
coaches have a different profile with a far sharper curve at the bottom.
This example shows the
difference,the nearest coach is a Mk1 while the rest are Mk2s.
Tim
|
|
| |
In lugnet.trains, John Neal wrote:
| |
You have decided to use two yellow stripes to show the pinstriping-- we also
looked at this and decided that the plate is WAY too thick to simulate the
delicate pinstriping of the coaches. At best one could use the hinge brick
striping technique, but it would only be able to be used for the bottom
stripe (which actually is a double stripe), so that’s not a perfect solution,
either. What we have finally decided to do is to use a plate for the bottom
striping and use a dark red decal stripe through the middle of that yellow
plate to simulate the double striping. The top stripe will be a thin yellow
decal stripe.
|
Pedant On As far as I can tell from looking at pics of the web of the Hogwarts
Express the coaches are painted in the standard BR maroon livery of the ‘60s. In
which case the twin yellow pinstripes actually have a black line between them,
rather than a maroon one./Pedant On
;-)
Tim
|
|
| |
In lugnet.trains, Tim David wrote:
| |
In lugnet.trains, John Neal wrote:
| |
You have decided to use two yellow stripes to show the pinstriping-- we also
looked at this and decided that the plate is WAY too thick to simulate the
delicate pinstriping of the coaches. At best one could use the hinge brick
striping technique, but it would only be able to be used for the bottom
stripe (which actually is a double stripe), so that’s not a perfect
solution, either. What we have finally decided to do is to use a plate for
the bottom striping and use a dark red decal stripe through the middle of
that yellow plate to simulate the double striping. The top stripe will be a
thin yellow decal stripe.
|
Pedant On As far as I can tell from looking at pics of the web of the
Hogwarts Express the coaches are painted in the standard BR maroon livery of
the ‘60s. In which case the twin yellow pinstripes actually have a black line
between them, rather than a maroon one./Pedant On
|
I really do love Pedant Alerts! :-) This is news to me, and greatly
appreciated! I find that trying to nail down fine details like this is a
serendipitous process at best! When building, I may choose to omit certain
details for any number of reasons, but I always want to have most if not all of
the facts available to me before I begin.
JOHN
|
|
| |
In lugnet.trains, Tim David wrote:
| |
In lugnet.trains, John Neal wrote:
| |
I never got the impression of such a curving profile of the coaches. I’ll
have to go back and look at my reference material.
JOHN
|
The profile of the coaches used in the film (BR Mk1) is actually pretty much
a constant large radius curve down the whole side. Newer designs of British
coaches have a different profile with a far sharper curve at the bottom.
This example shows the
difference,the nearest coach is a Mk1 while the rest are Mk2s.
|
Wow. Now that is what I call “sub-til”;-) I must confess that I don’t see much
difference, and gauging from the curvature of the Mk1 I would have to say that
it is nominal at best and trying to account for it at such a small scale is
futile. But that’s just me:-)
Now I realize that my material has been based heavily on the Hornby models. I
guess I’d better search for generic BR Mk1 pics instead!
JOHN
|
|
| |
In lugnet.trains, John Neal wrote:
| |
In lugnet.trains, Tim David wrote:
| |
In lugnet.trains, John Neal wrote:
| |
I never got the impression of such a curving profile of the coaches. I’ll
have to go back and look at my reference material.
JOHN
|
The profile of the coaches used in the film (BR Mk1) is actually pretty much
a constant large radius curve down the whole side. Newer designs of British
coaches have a different profile with a far sharper curve at the bottom.
This example shows the
difference,the nearest coach is a Mk1 while the rest are Mk2s.
|
Wow. Now that is what I call “sub-til”;-) I must confess that I don’t see
much difference, and gauging from the curvature of the Mk1 I would have to
say that it is nominal at best and trying to account for it at such a small
scale is futile. But that’s just me:-)
Now I realize that my material has been based heavily on the Hornby models.
I guess I’d better search for generic BR Mk1 pics instead!
JOHN
|
I have to say I don’t think I would bother with it on a Mk1, possibly on a Mk2
built 8 wide..
Tim
|
|
| |
--SNIP--
| |
Wow. Now that is what I call “sub-til”;-) I must confess that I don’t see
much difference, and gauging from the curvature of the Mk1 I would have to
say that it is nominal at best and trying to account for it at such a small
scale is futile. But that’s just me:-)
|
--SNIP--
Now I see what’s wrong with you eight-widers. You try to make things look
accurate instead of doing things that are fun. :P
Of course a square carriage would have been fine and looked just as accurate if
not more so but adding that curve was too much of a challenge to pass up.
Tim
|
|
| |
In lugnet.trains, Timothy Gould wrote:
| |
--SNIP--
| |
Wow. Now that is what I call “sub-til”;-) I must confess that I don’t see
much difference, and gauging from the curvature of the Mk1 I would have to
say that it is nominal at best and trying to account for it at such a small
scale is futile. But that’s just me:-)
|
--SNIP--
Now I see what’s wrong with you eight-widers. You try to make things look
accurate instead of doing things that are fun. :P
Of course a square carriage would have been fine and looked just as accurate
if not more so but adding that curve was too much of a challenge to pass up.
Tim
|
Is that just super-affluence of red curved slopes or was the carriage affected
by a passing dementor? :-)
Anyway, to compare notes, here’s a link to my 8mm scale Hogwarts Express, a
scale model of the Hall class engine (5972 Olton Hall) used in the films (Oh for
some larger BBB blind drivers!). I believe the coaches were also red rather
than dark red in the films, so I haven’t waited to accumulate lots of dark red
pieces! Isn’t this just as much fun in a larger scale?
http://www.brickshelf.com/cgi-bin/gallery.cgi?f=90774
I have Harry and friends in the windows and lights in the firebox! I took
pictures of real coaches at preserved railways in order to get the proportions
right, including the positions of the battery boxes and vacuum brake cylinder
underneath :-)
I intend to build more coaches soon, with the brake coach having a different
layout. I might stick with 3 coaches rather than 4 though, as the length of
platforms on the layout becomes a limiting factor!
Mark
|
|
| |
Hi Mark,
| |
| |
Now I see what’s wrong with you eight-widers. You try to make things look
accurate instead of doing things that are fun. :P
Of course a square carriage would have been fine and looked just as accurate
if not more so but adding that curve was too much of a challenge to pass up.
Tim
|
Is that just super-affluence of red curved slopes or was the carriage
affected by a passing dementor? :-)
|
I don’t but CAD does. I figure those parts are appearing everywhere now so it’s
only a matter of time before Brickilink reflects their true value.
| |
Anyway, to compare notes, here’s a link to my 8mm scale Hogwarts Express, a
scale model of the Hall class engine (5972 Olton Hall) used in the films (Oh
for some larger BBB blind drivers!). I believe the coaches were also red
rather than dark red in the films, so I haven’t waited to accumulate lots of
dark red pieces! Isn’t this just as much fun in a larger scale?
http://www.brickshelf.com/cgi-bin/gallery.cgi?f=90774
|
Carriages look good although I don’t like the gears too much. Have you thought
about using part 2903 with a 32065 across it to fit the drive rods?
| |
I have Harry and friends in the windows and lights in the firebox! I took
pictures of real coaches at preserved railways in order to get the
proportions right, including the positions of the battery boxes and vacuum
brake cylinder underneath :-)
|
Far too much work for me ;)
| |
I intend to build more coaches soon, with the brake coach having a different
layout. I might stick with 3 coaches rather than 4 though, as the length of
platforms on the layout becomes a limiting factor!
Mark
|
I made the IR coach into a sort of brake coach/baggage coach. Just made up the
internals as films are rarely consistent anyway.
Tim
|
|
| |
In lugnet.trains, Timothy Gould wrote:
| |
--SNIP--
| |
Wow. Now that is what I call “sub-til”;-) I must confess that I don’t see
much difference, and gauging from the curvature of the Mk1 I would have to
say that it is nominal at best and trying to account for it at such a small
scale is futile. But that’s just me:-)
|
--SNIP--
Now I see what’s wrong with you eight-widers. You try to make things look
accurate instead of doing things that are fun. :P
|
Guilty as charged. Except that you’ve failed to account for the fun involved in
rivet counting:-)
| |
Of course a square carriage would have been fine and looked just as accurate
if not more so but adding that curve was too much of a challenge to pass up.
|
It was a fun and unique design exploration, and appreciated!
JOHN
|
|
| |
In lugnet.trains, Timothy Gould wrote:
| |
Carriages look good although I don’t like the gears too much. Have you
thought about using part 2903 with a 32065 across it to fit the drive rods?
|
Sadly those wheels are too big, being 8ft diameter to scale. I did consider the
wheels from the bar code truck (part 6595), though I have them only in white and
light bley so far. I’ve also experimented with model team wheels with tyres.
The cogs are 42mm diameter, 5’3” to scale, where the engine needs 6ft wheels
(48mm), so they’re the closest I’ll get. I probably have historical reasons
too, as I initially used 8-tooth cogs between them on a previous engine, which
is now retired, to guarantee reliable alignment of the wheels. As I improved
reliability of rods, I dispensed with the small cogs.
I wondered about modding some bar code truck-sized wheels by cutting them across
at their thinnest point to make a 1L-wide wheel with the 6 holes for crank pins
- perhaps if I had bought a few technic cranes cheap and had more wheels than I
would ever use for Technic models...
| |
I made the IR coach into a sort of brake coach/baggage coach. Just made up
the internals as films are rarely consistent anyway.
Tim
|
For this first coach I used the 6x4 and 4x4 smooth centred brown plates from the
Sopwith Camel to do wood-panelled compartments, though there’s little point as I
made the roof permanent and the vertically-mounted plates only detach after a
few months of going to shows and shifting boxes around.
John mentions rivet-counting. Well I did put the ventilators on top of the
carriage :-) Sometimes at shows I’ll say to a pedant “count the rivets on
that!”, but only if they’re being unreasonable about the limitations of LEGO
scale modelling.
I also used the macaroni boiler technique on my Thomas and Stepney models:
http://www.brickshelf.com/cgi-bin/gallery.cgi?i=742630
http://www.brickshelf.com/cgi-bin/gallery.cgi?i=742629
Notice the 1x2 hinges incorporated to hold the chimney and dome. I think this
technique would be nowhere without the 4x4 round brick for strength! I wished
there were a plate to go with it - so much so that I even drew a sketch of one:
http://www.brickshelf.com/gallery/mbellis/New-Parts/Designed-Only/Plates/4x4_round_plate.bmp
Mark
|
|
| |
--SNIP--
| |
Sadly those wheels are too big, being 8ft diameter to scale. I did consider
the wheels from the bar code truck (part 6595), though I have them only in
white and light bley so far. I’ve also experimented with model team wheels
with tyres. The cogs are 42mm diameter, 5’3” to scale, where the engine needs
6ft wheels (48mm), so they’re the closest I’ll get. I probably have
historical reasons too, as I initially used 8-tooth cogs between them on a
previous engine, which is now retired, to guarantee reliable alignment of the
wheels. As I improved reliability of rods, I dispensed with the small cogs.
|
Whoops! For some reason I thought those gears were eight wide.
Tim
|
|
| |
In lugnet.trains, Mark Bellis wrote:
| |
For this first coach I used the 6x4 and 4x4 smooth centred brown plates from
the Sopwith Camel to do wood-panelled compartments, though there’s little
point as I made the roof permanent and the vertically-mounted plates only
detach after a few months of going to shows and shifting boxes around.
John mentions rivet-counting. Well I did put the ventilators on top of the
carriage :-) Sometimes at shows I’ll say to a pedant “count the rivets on
that!”, but only if they’re being unreasonable about the limitations of LEGO
scale modelling.
I also used the macaroni boiler technique on my Thomas and Stepney models:
http://www.brickshelf.com/cgi-bin/gallery.cgi?i=742630
http://www.brickshelf.com/cgi-bin/gallery.cgi?i=742629
Notice the 1x2 hinges incorporated to hold the chimney and dome. I think
this technique would be nowhere without the 4x4 round brick for strength! I
wished there were a plate to go with it - so much so that I even drew a
sketch of one:
http://www.brickshelf.com/gallery/mbellis/New-Parts/Designed-Only/Plates/4x4_round_plate.bmp
Mark
|
Mark,
I’m in the US, but I’m modeling some Thomas and Friends engins and cars. Perhaps
you can explain a bit regarding GB train operation, past and present.
I notice a white lantern, sometimes 2, placed on the front foot plate on many
engines. But other times it’s missing in photos. What is it, and what are the
details of it’s use. Is there a similar light at the back of a engine or train?
US cars have air automatic brakes. Do GB cars? The US also eliminatd the use of
caboose, and now uses a FRED, are brake vans still used. I’ve heard mention of
combination passenger/brake cars (Clarable), could you give a bit more detail?
Mat
|
|
| |
In lugnet.trains, Mathew Clayson wrote:
| |
In lugnet.trains, Mark Bellis wrote:
| |
For this first coach I used the 6x4 and 4x4 smooth centred brown plates from
the Sopwith Camel to do wood-panelled compartments, though there’s little
point as I made the roof permanent and the vertically-mounted plates only
detach after a few months of going to shows and shifting boxes around.
John mentions rivet-counting. Well I did put the ventilators on top of the
carriage :-) Sometimes at shows I’ll say to a pedant “count the rivets on
that!”, but only if they’re being unreasonable about the limitations of LEGO
scale modelling.
I also used the macaroni boiler technique on my Thomas and Stepney models:
http://www.brickshelf.com/cgi-bin/gallery.cgi?i=742630
http://www.brickshelf.com/cgi-bin/gallery.cgi?i=742629
Notice the 1x2 hinges incorporated to hold the chimney and dome. I think
this technique would be nowhere without the 4x4 round brick for strength! I
wished there were a plate to go with it - so much so that I even drew a
sketch of one:
http://www.brickshelf.com/gallery/mbellis/New-Parts/Designed-Only/Plates/4x4_round_plate.bmp
Mark
|
Mark,
I’m in the US, but I’m modeling some Thomas and Friends engines and cars.
Perhaps you can explain a bit regarding GB train operation, past and present.
I notice a white lantern, sometimes 2, placed on the front foot plate on many
engines. But other times it’s missing in photos. What is it, and what are the
details of its use. Is there a similar light at the back of a engine or
train?
|
Until the mid-to-late 50s the headlamps formed a code to denote the type of
train. There were four positions, centre, left and right along the footplate and
top of the smokebox door. See this site
for more info (scroll down a bit for the codes. The different railway companies
had their own variations on the codes. Many of the first generation of diesel
locos had discs on the fronts, replicating the headlamp positions. These discs
folded in half, covering their lamp and their white face. See
here for some examples
After this time there was a move to 4
digit headcodes to display the service code of the train, in the mid Seventies
these went out of use. From the mid Eighties there has been a gradual retrofit
of high intensity headlights, all stock now carries these, previously the lights
in the front were more like marker lights than of any use to the driver.
Every train has to carry a red tail light. On unit trains and locomotives this
is built in, on freight and hauled passenger stock it is a separate lamp fitted
onto a lamp iron (a bracket) From the mid Nineties these have changed to
flashing units, presumably the advent of LEDs has allowed this to provide
greater battery life (not called FREDs here AFAIK).
| |
US cars have air automatic brakes. Do GB cars?
|
All passenger stock has had continuous brakes for at least 100 years (IIRC).
However this was mainly vacuum rather than air brakes, The last thirty years has
seen a move over to air and now all stock is air braked (I think) Until the
Sixties almost all freight stock was unfitted (i.e. handbrakes only), the
exceptions were those used in passenger and express freight trains (fish trains
being an example) Those vehicles which had continuous brakes were vacuum braked.
Again from the Seventies there was a move to get rid of unfitted trains (they
had lower speed limits and required the use of a brake van (similar idea to a
caboose) Most of the unfitted vehicles have now been scrapped due to changes in
traffic patterns, some were vacuum or air braked. Again AFAIK all freight stock
is now air braked.
| |
The US also eliminated the use
of caboose, and now uses a FRED, are brake vans still used.
|
The removal of unfitted or partially fitted trains (trains with a section of
continuously braked vehicles next to the loco) has meant that the brake van has
become obsolete, they are now rare and only used for nuclear flask trains and by
the Permanent Ways (MOW in the US) department. The guard now travels in the rear
cab of the locomotive.
| |
I’ve heard
mention of combination passenger/brake cars (Clarabelle), could you give a
bit more detail?
|
All trains used to have to carry a guard (conductor in the US?) (there are now
quite a few One-Man-Operation services on commuter lines). The guard travelled
in the guards compartment, sometimes this was in a
dedicated vehicle on services
that required a lot of luggage space (mainly express trains), or in a
vehicle with
passenger and luggage space. These were far more common than full brakes (the
dedicated vehicles) as every train has to have one. These vehicles aren’t called
combines in the UK, rather ‘brake first’, ‘brake second’ or ‘brake composite’
(first and second class) (also, further in the past ‘brake third’)
Again things have changed in the last twenty years as almost all passenger
trains are now units, but any loco-hauled services still have to contain a
vehicle with a guard’s compartment. Within the luggage space the guard had a
small office, in the past this would often have had
side lookouts called duckets.
Hope that help
Tim
|
|
| |
In lugnet.trains, Tim David wrote:
| |
Until the mid-to-late 50s the headlamps formed a code to denote the type of
train. There were four positions, centre, left and right along the footplate
and top of the smokebox door. See this site for more info (scroll down a bit for the codes. The different
railway companies had their own variations on the codes. Many of the first
generation of diesel locos had discs on the fronts, replicating the headlamp
positions. These discs folded in half, covering their lamp and their white
face. See here for some
examples
|
| |
Every train has to carry a red tail light. On unit trains and locomotives
this is built in, on freight and hauled passenger stock it is a separate lamp
fitted onto a lamp iron (a bracket) From the mid Nineties these have changed
to flashing units, presumably the advent of LEDs has allowed this to provide
greater battery life (not called FREDs here AFAIK).
| |
US cars have air automatic brakes. Do GB cars?
|
All passenger stock has had continuous brakes for at least 100 years (IIRC).
However this was mainly vacuum rather than air brakes, The last thirty years
has seen a move over to air and now all stock is air braked (I think) Until
the Sixties almost all freight stock was unfitted (i.e. handbrakes only), the
exceptions were those used in passenger and express freight trains (fish
trains being an example) Those vehicles which had continuous brakes were
vacuum braked. Again from the Seventies there was a move to get rid of
unfitted trains (they had lower speed limits and required the use of a brake
van (similar idea to a caboose) Most of the unfitted vehicles have now been
scrapped due to changes in traffic patterns, some were vacuum or air braked.
Again AFAIK all freight stock is now air braked.
|
snipped
Tim,
that was extremely useful, thank you. I’m assuming that Thomas with two coaches
would be a B class, same for Toby with his coach and baggag car. Is the red end
of train light mounted high or low?
Mat
|
|
| |
In lugnet.trains, Mathew Clayson wrote:
| |
In lugnet.trains, Tim David wrote:
| |
Until the mid-to-late 50s the headlamps formed a code to denote the type of
train. There were four positions, centre, left and right along the footplate
and top of the smokebox door. See this site for more info (scroll down a bit for the codes. The different
railway companies had their own variations on the codes. Many of the first
generation of diesel locos had discs on the fronts, replicating the headlamp
positions. These discs folded in half, covering their lamp and their white
face. See here for some
examples
|
| |
Every train has to carry a red tail light. On unit trains and locomotives
this is built in, on freight and hauled passenger stock it is a separate
lamp fitted onto a lamp iron (a bracket) From the mid Nineties these have
changed to flashing units, presumably the advent of LEDs has allowed this to
provide greater battery life (not called FREDs here AFAIK).
| |
US cars have air automatic brakes. Do GB cars?
|
All passenger stock has had continuous brakes for at least 100 years (IIRC).
However this was mainly vacuum rather than air brakes, The last thirty years
has seen a move over to air and now all stock is air braked (I think) Until
the Sixties almost all freight stock was unfitted (i.e. handbrakes only),
the exceptions were those used in passenger and express freight trains (fish
trains being an example) Those vehicles which had continuous brakes were
vacuum braked. Again from the Seventies there was a move to get rid of
unfitted trains (they had lower speed limits and required the use of a brake
van (similar idea to a caboose) Most of the unfitted vehicles have now been
scrapped due to changes in traffic patterns, some were vacuum or air braked.
Again AFAIK all freight stock is now air braked.
|
snipped
Tim,
that was extremely useful, thank you. I’m assuming that Thomas with two
coaches would be a B class, same for Toby with his coach and baggag car. Is
the red end of train light mounted high or low?
|
I would have thought so, although as I said it varied slightly from railway to
railway so I wouldn’t worry about it too much. The red light on the end is
normally mounted just above one of the buffers, i.e. low down to one side.
Tim
PS I was very wordy in my last post and still missed out the whole point of the
guard! The guards van contains a control point for the train brakes, the same
for a brake van in a fitted freight train, in an unfitted freight train the
brake van provided additional (hand) braking power to the loco.
Tim
|
|
| |
In lugnet.trains, Tim David wrote:
| |
In lugnet.trains, Mathew Clayson wrote:
| |
In lugnet.trains, Tim David wrote:
| |
Until the mid-to-late 50s the headlamps formed a code to denote the type of
train. There were four positions, centre, left and right along the
footplate and top of the smokebox door. See
this site for more info (scroll
down a bit for the codes. The different railway companies had their own
variations on the codes. Many of the first generation of diesel locos had
discs on the fronts, replicating the headlamp positions. These discs folded
in half, covering their lamp and their white face. See
here for some examples
|
| |
Every train has to carry a red tail light. On unit trains and locomotives
this is built in, on freight and hauled passenger stock it is a separate
lamp fitted onto a lamp iron (a bracket) From the mid Nineties these have
changed to flashing units, presumably the advent of LEDs has allowed this
to provide greater battery life (not called FREDs here AFAIK).
| |
US cars have air automatic brakes. Do GB cars?
|
All passenger stock has had continuous brakes for at least 100 years
(IIRC). However this was mainly vacuum rather than air brakes, The last
thirty years has seen a move over to air and now all stock is air braked (I
think) Until the Sixties almost all freight stock was unfitted (i.e.
handbrakes only), the exceptions were those used in passenger and express
freight trains (fish trains being an example) Those vehicles which had
continuous brakes were vacuum braked. Again from the Seventies there was a
move to get rid of unfitted trains (they had lower speed limits and
required the use of a brake van (similar idea to a caboose) Most of the
unfitted vehicles have now been scrapped due to changes in traffic
patterns, some were vacuum or air braked. Again AFAIK all freight stock is
now air braked.
|
snipped
Tim,
that was extremely useful, thank you. I’m assuming that Thomas with two
coaches would be a B class, same for Toby with his coach and baggag car. Is
the red end of train light mounted high or low?
|
I would have thought so, although as I said it varied slightly from railway
to railway so I wouldn’t worry about it too much. The red light on the end is
normally mounted just above one of the buffers, i.e. low down to one side.
Tim
PS I was very wordy in my last post and still missed out the whole point of
the guard! The guards van contains a control point for the train brakes, the
same for a brake van in a fitted freight train, in an unfitted freight train
the brake van provided additional (hand) braking power to the loco.
Tim
|
In the illustrations from the original Awdry books, Thomas has his front lamp on
top of the smokebox when pulling a passenger train such as Annie and Clarabel.
This indicates a stopping passenger train, class 2.
Gordon, on the other hand, has two lamps low down, one over each buffer, when he
pulls the express, class 1.
When Thomas pulls a goods train, the lamp positions vary according to the rules.
In the first Awdry books most of his goods trains are unfitted, but that’s not
surprising for the late 1940s. James’ accident, when the trucks pushed him down
the hill, was caused by the failure to stop at the top to pin down the brakes,
as well as wooden brake blocks catching fire.
It’s worth sticking to the prevailing rules for the era (or decade) you’re
modelling, especially as preserved railways seek to present old engines in
correct livery for their original operation. This is one reason why many
British model railways are set in the 60s, since that provides for the widest
range of rolling stock, from steam to early diesels.
Toby’s coach Henrietta would be offended to be called a Baggage Car :-) Toby
usually has the single lamp high up for a stopping passenger train.
The guard has a handbrake plus the ability to break the vacuum in a
vacuum-braked train.
Also, many wagons had through brake pipes even if they were not fitted with
vacuum or air brakes, so that if the train had sufficient brake force overall,
it could have continuous brakes with these wagons in the train and hence go
faster by being of a different class.
Mark
|
|
|